SOAP API
API method with e-mail authorization :
b2c_issuer_agreement_order
Welcome to Maventa integration guide!
This guide will tell you how to connect your financial system to Maventa e-invoicing and document exchange service. See how to move from testing to production, what API methods to use for different functionality, as well as get useful tips and information about how the integration works.
Let’s go!
The integration process includes setting up the integration, testing it and finally moving to production.
Before entering the production environment all integrators are required to fill in and sign Maventa Integration Agreement that outlines important arrangements such as billing and support. The agreement is given to you by your integration contact point.
To get the necessary API keys to testing and production follow the steps described below.
If you haven’t quite yet decided what type of integration to make, see our Overview section. In there you can find guidance how to define the integration scope and level based on the needed functionality and automation.
To start using Maventa APIs, open a test account for your company from here.
When you have registered the company account in testing, contact Integration Care (integrations@maventa.com) or your integration contact point to convert your account into a partner account. At the same time they will create a vendor_api_key for you. This key is linked to your partner account will be used to identify your software interaction with the API.
After having the necessary API keys you can start building the integration. Follow feature specific guides for detailed instructions on sending, receiving, account & settings configuration and service activation.
Make sure you also understand how the testing environment works.
When integration is created and tested in the testing environment, next step is to move to production. To get the necessary keys follow the same process as in testing.
First create a regular account for your company in production from here. After that contact Integration Care (integrations@maventa.com) or your integration contact point to change the account to partner and create the vendor_api_key.
When can the integration be taken to production
Before moving to production, it is good to check that the basic operations around the integration are working. If possible, Maventa likes to organise a short test/demo session with the integrators to go over together
Company and service activation
Sending an invoice or a batch of invoices, to specific external recipients
Receiving
Extra
To use the API you need three different API keys, which are used in almost every request towards Maventa API:
user_api_key (identifies a single user, required in all interaction with API)company_uuid (identifies a single company, required in all interaction with API)vendor_api_key (identifies a partner, required in all partner interaction with API)User_api_key and the company_uuid are returned when you create new users and companies. The vendor_api_key is given to you by your integration contact point from Maventa.
In SOAP API, authentication is performed by providing all keys on each request.
In REST API, authentication is performed by using oauth2 standard tokens. See more at REST API Authentication.
When using the API keys, make sure they are written as is and ensure there are no extra blanks before or after the key to avoid errors.
The purpose of the vendor_api_key is to identify the partner the customer and their transactions “belong” into. This is necessary for correct billing, reporting and support handling. It is very important that Partner and ERP integrations always use their own vendor_api_key in all API calls. Actions performed without supplying vendor_api_key will not be related to any vendor / partner. All actions submitted without specifying vendor_api_key will be billed directly to related customer, based on general price list.
Usually, if a partner is developing multiple different ERP systems and wants to get their customer transactions sorted by ERP, a partner wants to have a different vendor_api_key for each ERP. In general, this key is then ”hard-coded” into the software or at least hidden so that a user cannot change it.
Note also that the testing and production endpoints of the API use different API keys. API keys from testing will work on production and vice versa. Errors like USER NOT FOUND mean that the user_api_key is wrong for that environment. Please, make sure you are using the correct API endpoint for your API key.
In Addition to the above mentioned 3 API keys, 2 extra keys are also supported. These keys allow ERPs to pass license information along through our system, onto billing systems. These keys are supported in all our API versions and are optional:
license_key (License key of software making the call (255 characters max) From systems integrated to VLS this is the activation key)license_meta (License metadata in JSON string format. license_meta parameter will be stored in a TEXT database field (65535 characters); if the JSON string exceeds that size, it will be cut and inconsistent data will be stored){
"licensing":"Some License",
"erp_name":"My ERP",
"erp_version":"1.0",
"erp_user":"Some User"
}In the testing server, electronic, email and print sends outside Maventa are only simulated, but internal sends work as in the production environment. Also all the notification emails related to account management and error handling are sent out to the real recipients (e.g. do not use something like test@test.com since that domain really exists meaning that the e-mail address might also exist). Note! If there is a need to test the invoice sending via email route for a real recipient please contact us or support@maventa.com and we can enable it for a specific account.
It is also good to note, that the testing environment is also used for internal testing, which means that it can differ from the production environment from time to time. The database of the testing server might be unavailable at times, and the server may be emptied without notice. Also for data privacy do not use real/production data in the testing environment.
APIs to use: SOAP API or REST API
Invoices are sent by providing an XML file and specifying other necessary data as parameters on the API call. After the send you will get an ID that can be used to monitor invoice delivery.
You can use the same functionality to send invoices based on your preference either using SOAP or REST API.
To send an invoice make sure you have:
See more information by opening the guides for
How invoice gets delivered, how to give the delivery address and look up invoice recipients
How to send an invoice. What are the possible invoice statuses, how to use webhooks, resend and handle errors
Invoice image and attachment handling
Customers can use Maventa to receive invoices through various networks. Scanning service can be activated for PDF invoices.
Everything is delivered easily through one API. Invoices are received first to the customer’s Maventa account from where they are downloaded to the receiving financial system.
Use webhooks to build seamless receiving flow and integrate automated Detect service checks to add security and automation in the invoice processing. Fraud reporting functionality lets customers report suspicious senders and contribute to preventing invoice fraud.
How to build your invoice receiving flow, good to know about invoice networks in different countries and recommended routines for fetching the invoices.
Integrate Detect as part of the invoice receiving flow and support invoice processing automation with smart invoice and supplier checks.
Add the fraud reporting functionality into your system. And let users, with a few clicks, do reports of suspicious invoice senders.
What are the supported document XML formats
How validation is handled
Finvoice format specific handling
Announcements about past and future changes
API to use: SOAP API or REST API
All companies using Maventa have an own account that is registered with unique business ID and company details. After registration company settings can be configured, including activation of different services and networks. Before account is ready to be used fully, it needs to be in verified state to ensure customer authentication process has been completed.
Company accounts will always be linked to at least one user. Users are created based on an email address. The user can be a real user or a technical/API user only. This gives possibility to create the user set up in a very flexible way, taking into account the integration needs.
In company and user management note that:
company_uuiduser_api_keyOpen and verify company accounts, configure settings, different account types
Create users, manage user settings and roles
Take into use different services and networks enabled by Maventa. Select the services that you want to include in your integration and check here the service specific guides for implementation instructions.
Send invoices to consumers either into their net bank and/or mobile application. Use email or printing service as a fallback options for sending.
Invoices to consumers can be sent through Maventa via email, print or then as an e-invoices or direct payments to the consumer’s netbank. As an additional electronic route we also support sending to digital mail service Kivra and through our print service route, there is a possibility to forwards invoices and letters to consumer’s digital mail box, OmaPosti. Below is the list of all the options that are available for sending invoices to consumers:
e-invoices to netbank
Direct debit
Kivra digital mail service
Email
Print
OmaPosti
For sending invoices to consumers via the email or print route you can force the sending using invoice sending method from either our SOAP or REST APIs.
Consumer e-invoicing (B2C) in Finland enables suppliers to send e-invoices to consumers’ personal netbanks and direct payments to consumers who do not use an online banking service. This service is only available for Finnish companies registered to Maventa. If you need to send invoices from Finnish company to consumers outside Finland only option is to send them via email or by print.
The consumer invoice channel supports sending an invoice image and attachments along with the invoice. In consumer banking, depending on the bank, there may be a link to an invoice display service where the consumer can download the original invoice image and any attached files.
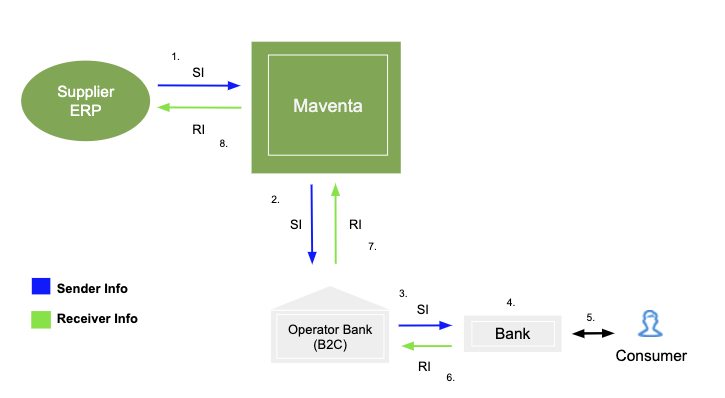
In Finland B2C e-invoicing to netbank requires activation through bank messaging. Suppliers activate the consumer e-invoicing via Sender info SI-message and by that notify the consumers of the option to receive e-invoices from that supplier. Consumers inform that they want to receive e-invoices from the supplier with Receiver info RI-message. The ReceiverProposal message RP-message is used when the supplier asks for the consumer’s e-invoice address.
B2C e-laskutuksen avaus
Ensin yritykselle tulee luoda ja aktivoida Maventa -tili. Aktivointipyynnön yhdeydessä lähtee myös pankkiverkon avauspyyntö pankille käsittelyyn. Pankkiverkon avauksessa kestää muutamia päiviä Danske Bankin kiire tilanteesta riippuen. Vasta kun pankkiverkko on auki, voi aloittaa kuluttajalaskutus sanomien lähettämisen. Alla on listattu molempien rajapintojen metodit tilin luontiin, aktivointiin, pankkiverkon avaukseen ja asetusten määrittelyyn:
REST rajapinta
Käyttäjän luonti: POST /v1/users
Tilin luonti: POST /v1/companies
Tilin aktivointi käyttöön sekä pankkiverkon avauspyynnön lähetys: POST /v1/companies/authorizations
Tilin aktivoinnin tilan kysely: GET /v1/companies/{id}/status
Pankkiverkon tilan kysely (status for the “BANK” network): GET /v1/company/profiles
Tilin asetusten määrittely: PATCH /v1/company/settings
Tilin asetusten tarkastelu: GET /v1/company/settings
SOAP rajapinta
Tilin luonti: register_with_password
Tilin aktivointi käyttöön sekä pankkiverkon avauspyynnön lähetys: authorize_companies
Tilin aktivoinnin tilan kysely: company_auth_status
Tilin asetusten määrittely configure_company
Tilin asetusten tarkastelu (bank_send kertoo pankkiverkon tilan) show_company_configuration
Uuden käyttäjän lisääminen tilille user_create_e
Uusi kuluttajaverkkolaskuja lähettävä asiakas
Luodaan ADD (uusi laskuttajailmoitus) tyyppinen SI-sanoma, joka lähetetään APIn yli joko käyttäen SOAP tai REST rajapintaa (metodit lähetykseen lueteltuna alempana). Täältä löytyy sivu, jolla voi muodostaa laskuttajailmoituksen eri sanomia. Tässä linkki ilmoittamispalvelun soveltamisohjeeseen, josta löytyy sanomien tarkemmat kuvaukset.
Myös RP-sanomat voit lähettää samalla metodilla.
SI-sanoman tilan pollaus voidaan käyttää metodia. Huom! SI-sanoman liikkumiseen operaattorin ja pankin välillä saattaa kestää useampi pvä, jopa 5 päivää. Sanomat ovat tilassa “ok” heti lähetyksen jälkeen ja jos tila ei muutu viiden päivän sisään virheeseen (ERROR) voi sanomien olettaa olevan ok. Myös se että RI sanomia tulee tilille, kertoo siitä että SI sanomat ovat ok.
Kun kuluttaja on valinnut yrityksen laskuttajakseen, palautuu RI-sanoma. Saapuneet RI-sanomat ensin listataan, jonka jälkeen sanomat voi ladata yksitellen listauksessa palautuneiden id tietojen perusteella.
REST rajapinta
Sanomien lähetys (SI, RP): POST /v1/fi_bank_messages
SI ja RP sanomien tilan pollaus: GET /v1/fi_bank_messages/{id}
Saapuneiden RI sanomien id listaus: GET /v1/fi_bank_messages/ri_messages
Yksittäisen RI sanoman lataus id:n perusteella: GET /v1/fi_bank_messages/ri_messages/{id}
SOAP rajapinta
Sanomien lähetys (SI, RP): message_send
SI ja RP sanomien tilan pollaus: message_status
Saapuneiden RI sanomien listaus: ri_message_list
Yksittäisen RI sanoman lataus id:n perusteella: ri_message_show
Asiakas jolla on kuluttajalaskutus käytössä jo toisen operaattorin kautta
Tehdään CHANGE-sanoma, jolla sopimus siirretään vanhalta operaattorilta Maventalle. CHANGE-sanoman saa tehtyä näppärästi olemassa olevan ADD-sanoman pohjalta. CHANGE-Sanoma lähetetään vanhaa yhteyttä pitkin eli vanhan operaattorin kautta pankeille.
Jos myös ERP järjestelmä vaihtuu, kannattaa myös huolehtia siitä, että asiakas saa jotenkin siirrettyä RI-sanomat (tai ainakin niiden tiedot) vanhasta järjestelmästään uuteen järjestelmään. Kun sopimus siirtyy vanhalta operaattorilta Maventa:lle CHANGE -sanomalla, siirtyvät RI-sanomien sopimukset uudelle operaattorille, mutta itse tiedostot eivät. Uudelta operaattorilta näkee siis vain ne uudet RI-sanoma tiedostot, jotka kuluttajat tekevät sen jälkeen kun sopimus on siirretty.
Voitte halutessanne lähettää täysin saman CHANGE sanoman myös Maventa tililtä kaikille pankeille, jotta tiedostot jäävät Maventa -tilille talteen mahdollisia tulevaisuuden muutostarpeita varten.
Uudet RI-sanomat saapuvat jatkossa asiakkaan Maventa tilille, ja näiden lataus onnistuu APIn yli samoilla metodeilla kuin edellisessä tapauksessa (kts. kohta 3.)
There are currently two types of messages supported by Maventa and needed for opening the service and to setting up the consumer e-invoicing, SI-messages and RI-messages. Prerequirement for using the consumer e-invoicing is to have the bank connection activated for the supplier.
In briefly:
SI-message (Sender info) is a notification to the banking system whereby the supplier notifies banks and informs consumers of its readiness to send consumer e-invoices and direct payments. It could be considered as a consumer e-invoicing agreement between the supplier and the bank.
To make a new agreement SI-message with MessageActionCode ADD is sent through Maventa API to each bank the supplier wants to use for consumer e-invoicing. After sending you can poll the status of the sent messages. For SI messages our system shows OK immediately when the message has been sent OK to the operator bank. Between the banks B2C messages can travel with delay up to 1-4 banking days so keep in mind that possible error messages can arrive even after a week. When all is ok new RI-messages will start to flow in.
If the message fails on the bank side you will get an error. In case SI-message is in error state, you can get the errors by first listing error ids and then viewing the error message.
If there is a need to change or add some information for the agreement it can be done by sending a SI-message with the type CHANGE. With the CHANGE message, you can modify almost everything except the billing subject code (PaymentInstructionIdentifier). For bank account information, e-invoice address, and intermediary, both old and new elements are used, but other details are simply updated in the CHANGE message, and the bank replaces the old information with the new one.
If a change is needed for the billing subject code, the old SI-message must be terminated (DELETE message), and a completely new one (ADD) must be sent.
Supplier agreement can be deleted by sending SI-message with the type DELETE. This will also delete all the consumer agreements (RI-messages) linked to this supplier agreement.
Implementation guidelines for creating the SI-messages and a tool for creating messages can be found from Finance Finland’s webpage
Note! Since our B2CFI traffic goes through our intermediator bank, Danske Bank, SI-message must have DABAFIHH defined as a sender operator code!
SI-messages (and RP-messages) can also be sent through our user interface (B2C messages -> Sent messages). The messages can be sent separately as one message per file or then all messages in one file. The latter option is something that you will get when creating the messages using FKL’s tool that can be found from the link above.
REST
To send messages (SI, RP): POST /v1/fi_bank_messages
To poll the status of sent message: GET /v1/fi_bank_messages/{id}
To list error message ids: GET /v1/fi_bank_messages/error_messages
To download a specific error message: GET /v1/fi_bank_messages/error_messages/{id}
SOAP
To send messages (SI and RP): message_send
To poll the status of sent message use: message_status
To list error message ids: error_message_list
To download a specific error message: error_message_show
Billing Subject
Consumer billing includes mandatory billing subject code (PaymentInstructionIdentifier) which is an identifier specified by the sender in the SI-message. Billing subject code is used to identify the reason for payment. Same supplier can have multiple SI-messages with different billing subject. When sending consumer e-invoices this same billing subject code needs to be given in the invoice XML. In Finvoice the billing subject is given in the optional EpiPaymentInstructionID field and in TEAPPSXML description, the corresponding element is HEADER / PAYMENT_INSTRUCTION_IDENTIFIER.
To get this reason for payment to be visualised for the consumers in their netbank or web payment services you will need to specify it in SellerInvoiceTypeText element and with all language code (FI, SE, EN).
<SellerInvoiceDetails>
   <PaymentInstructionIdentifier>Vuokra</PaymentInstructionIdentifier>
   <SellerInstructionFreeText LanguageCode="FI">Anna viimeisimmän laskun viitenumero </SellerInstructionFreeText>
   <SellerInstructionFreeText LanguageCode="SV">Ge den senaste fakturans referensnummer </SellerInstructionFreeText>
   <SellerInstructionFreeText LanguageCode="EN">Enter the reference number </SellerInstructionFreeText>
   <SellerInvoiceTypeDetails>
     <SellerInvoiceTypeText LanguageCode="FI">Vuokra lasku</SellerInvoiceTypeText>
     <SellerInvoiceIdentifierText LanguageCode="FI" SellerInvoiceIdentifierType="01">Viitenumero</SellerInvoiceIdentifierText>
   </SellerInvoiceTypeDetails>
   <SellerServiceCode>01</SellerServiceCode>
</SellerInvoiceDetails>
Bank account information
Supplier’s bank account information is given in the SellerAccountDetails element in SI-message. Bank account numbers must be in IBAN format and supplier needs to define all the account numbers to be used in the consumer e-invoicing. When sending consumer e-invoices the IBAN given in the invoice must match to at least one IBAN given in the SI-message.
List of Finnish banks supporting consumer e-invoicing. We recommend to send SI-message to each of these banks:
| Bank Identifier Code | Bank name |
|---|---|
| AABAFI22 | Ålandsbanken |
| DABAFIHH | Danske Bank |
| HELSFIHH | Aktia |
| ITELFIHH | Säästöpankit, Oma Säästöpankki |
| NDEAFIHH | Nordea Pankki |
| OKOYFIHH | OP-Pohjola-ryhmä |
| POPFFI22 | POP Pankit |
| SBANFIHH | S-Pankki |
RI-messages (Receiver info) can be considered as consumer e-invoicing agreements between the consumer and the supplier and they are always linked to the existing SI-message. There will be as many RI-messages as there are consumers using that particular bank and would like to have the e-invoicing with the supplier in question.
RI-messages with MessageActionCode ADD will be sent to the supplier when a new consumer chooses the supplier as their e-invoicer from their netbank. If a consumer’s information is changed, RI-message with the type CHANGE will be sent to the supplier and if a consumer wants to end the consumer agreement with the supplier RI-message with the type DELETE will be sent. It’s recommended to keep your own consumer register on the ERP side that has the updated status for each RI-messages. We recommend to list and download all the new RI-messages daily and then update your consumer register accordingly. If you send an e-invoice and get a sending error that the consumer agreement is not active, poll for the RI messages, there should be the type delete message for that consumer.
REST
To list received RI-messages: GET /v1/fi_bank_messages/ri_messages
To download RI-message: GET /v1/fi_bank_messages/ri_messages/{id}
To delete RI-message (file) from Maventa account (note! Use this only after you have downloaded the messages to your ERP, deletion cannot be undone): DELETE /v1/fi_bank_messages/ri_messages/{id}
SOAP
To list received RI-messages: ri_message_list
To download RI-message: ri_message_show
To delete RI-message from Maventa account (note! Use this only after you have downloaded the messages to your ERP): ri_message_delete
Handy tip for testing: You can also send RI-messages to your own test account using the same method for sending SI-messages. You can both send and download RI-messages yourself to verify that the integration is working before going to production.
<SOAP-ENV:Envelope xmlns:SOAP-ENV="http://schemas.xmlsoap.org/soap/envelope/" xmlns:eb="http://www.oasis-open.org/committees/ebxml-msg/schema/msg-header-2_0.xsd" xmlns:xlink="http://www.w3.org/1999/xlink">
<SOAP-ENV:Header>
<eb:MessageHeader SOAP-ENV:mustUnderstand="1" eb:id="20200731110324320000" xmlns:eb="http://www.oasis-open.org/committees/ebxml-msg/schema/msg-header-2_0.xsd">
<eb:From>
<eb:PartyId>FI4941452835555555</eb:PartyId>
<eb:Role>Sender</eb:Role>
</eb:From>
<eb:From>
<eb:PartyId>SBANFIHH</eb:PartyId>
<eb:Role>Intermediator</eb:Role>
</eb:From>
<eb:To>
<eb:PartyId>003712345678</eb:PartyId>
<eb:Role>Receiver</eb:Role>
</eb:To>
<eb:To>
<eb:PartyId>DABAFIHH</eb:PartyId>
<eb:Role>Intermediator</eb:Role>
</eb:To>
<eb:CPAId>yoursandmycpa</eb:CPAId>
<eb:ConversationId>nnnn</eb:ConversationId>
<eb:Service>Routing</eb:Service>
<eb:Action>ProcessReceiver</eb:Action>
<eb:MessageData>
<eb:MessageId>2020083111032432000022</eb:MessageId>
<eb:Timestamp>2023-09-31T11:03:24+03</eb:Timestamp>
<eb:RefToMessageId>20150609223129270000</eb:RefToMessageId>
</eb:MessageData>
</eb:MessageHeader>
</SOAP-ENV:Header>
<SOAP-ENV:Body>
<eb:Manifest eb:id="Manifest" eb:version="2.0">
<eb:Reference eb:id="Finvoice" xlink:href="20200731110324320000">
<eb:schema eb:location="http://www.pankkiyhdistys.fi/verkkolasku/finvoice/finvo" eb:version="2.0"/>
</eb:Reference>
</eb:Manifest>
</SOAP-ENV:Body>
</SOAP-ENV:Envelope>
<?xml version="1.0" encoding="ISO-8859-15"?>
<?xml-stylesheet type="text/xsl" href="FinvoiceReceiverInfo.xsl"?>
<FinvoiceReceiverInfo Version="2.0" xmlns:xsi="http://www.w3.org/2001/XMLSchema-instance" xsi:noNamespaceSchemaLocation="FinvoiceReceiverInfo.xsd">
<MessageDetails>
<MessageTypeCode>RECEIVERINFO</MessageTypeCode>
<MessageTypeText>VASTAANOTTAJAN ILMOITUS</MessageTypeText>
<MessageActionCode>ADD</MessageActionCode>
<MessageActionCodeIdentifier>00</MessageActionCodeIdentifier>
<MessageDate Format="CCYYMMDD">20200831</MessageDate>
<SenderInfoIdentifier>testi</SenderInfoIdentifier>
</MessageDetails>
<SellerPartyDetails>
<SellerPartyIdentifier>1234567-8</SellerPartyIdentifier>
<SellerOrganisationNames LanguageCode="FI">
<SellerOrganisationName>Your Software Oy</SellerOrganisationName>
</SellerOrganisationNames>
<SellerOrganisationNames LanguageCode="SV">
<SellerOrganisationName>Your Software Oy</SellerOrganisationName>
</SellerOrganisationNames>
<SellerOrganisationNames LanguageCode="EN">
<SellerOrganisationName>Your Software Oy</SellerOrganisationName>
</SellerOrganisationNames>
<SellerOrganisationBankName>Your Software Oy</SellerOrganisationBankName>
<SellerPostalAddressDetails>
<SellerStreetName>Tie 6</SellerStreetName>
<SellerTownName>Helsinki</SellerTownName>
<SellerPostCodeIdentifier>00200</SellerPostCodeIdentifier>
<CountryCode>FI</CountryCode>
<CountryName>SUOMI</CountryName>
</SellerPostalAddressDetails>
</SellerPartyDetails>
<InvoiceSenderInformationDetails>
<SellerWebaddressText>www.yritys.fi</SellerWebaddressText>
<InvoiceSenderAddress>00372345678</InvoiceSenderAddress>
<InvoiceSenderIntermediatorAddress>DABAFIHH</InvoiceSenderIntermediatorAddress>
</InvoiceSenderInformationDetails>
<SellerAccountDetails>
<SellerAccountID IdentificationSchemeName="IBAN">FI4941452835555555</SellerAccountID>
<SellerBic IdentificationSchemeName="BIC">NDEAFIHH</SellerBic>
</SellerAccountDetails>
<SellerInvoiceDetails>
<PaymentInstructionIdentifier>Lasku</PaymentInstructionIdentifier>
<SellerInstructionFreeText LanguageCode="FI">Syötä yritykseltä saamasi rekisteröintitunnus.</SellerInstructionFreeText>
<SellerInstructionFreeText LanguageCode="SV">Ange registrerings-ID du fått från företaget.</SellerInstructionFreeText>
<SellerInstructionFreeText LanguageCode="EN">Enter the registration ID you received from the company.</SellerInstructionFreeText>
<SellerInvoiceTypeDetails>
<SellerInvoiceTypeText LanguageCode="FI">Liikuntamaksu</SellerInvoiceTypeText>
<SellerInvoiceIdentifierText LanguageCode="FI" SellerInvoiceIdentifierType="99">Rekisteröintitunnus</SellerInvoiceIdentifierText>
</SellerInvoiceTypeDetails>
<SellerInvoiceTypeDetails>
<SellerInvoiceTypeText LanguageCode="SV">Motionsavgift</SellerInvoiceTypeText>
<SellerInvoiceIdentifierText LanguageCode="SV" SellerInvoiceIdentifierType="99">Registeringsnummer</SellerInvoiceIdentifierText>
</SellerInvoiceTypeDetails>
<SellerInvoiceTypeDetails>
<SellerInvoiceTypeText LanguageCode="EN">Exercise fee</SellerInvoiceTypeText>
<SellerInvoiceIdentifierText LanguageCode="EN" SellerInvoiceIdentifierType="99">Registration ID</SellerInvoiceIdentifierText>
</SellerInvoiceTypeDetails>
</SellerInvoiceDetails>
<ReceiverInfoTimeStamp>2023-09-19T11:03:24+03</ReceiverInfoTimeStamp>
<BuyerPartyDetails>
<BuyerOrganisationName>Matti Mallikas</BuyerOrganisationName>
<BuyerPostalAddressDetails>
<BuyerStreetName>katu 1</BuyerStreetName>
<BuyerTownName>PORVOO</BuyerTownName>
<BuyerPostCodeIdentifier>06100</BuyerPostCodeIdentifier>
<CountryCode>FI</CountryCode>
<CountryName>SUOMI</CountryName>
</BuyerPostalAddressDetails>
</BuyerPartyDetails>
<InvoiceRecipientDetails>
<InvoiceRecipientAddress>FI4941452835555555</InvoiceRecipientAddress>
<InvoiceRecipientIntermediatorAddress>SBANFIHH</InvoiceRecipientIntermediatorAddress>
<SellerInvoiceIdentifier>123456</SellerInvoiceIdentifier>
<InvoiceRecipientLanguageCode>FI</InvoiceRecipientLanguageCode>
</InvoiceRecipientDetails>
<BuyerServiceCode>00</BuyerServiceCode>
<ConversionDetails/>
</FinvoiceReceiverInfo>
RP-message (Receiver Proposal message) is used when the supplier asks for the consumer’s e-invoice address before e-invoices can be sent. When a consumer accepts the proposal, a RI-message is sent to the supplier. RP-message is a way to get more consumers to take the e-invoicing into use.
• The supplier and the consumer in question have agreed that the supplier requests the e-invoicing address with an RP message
• Supplier has consumer e-invoicing agreement with the banks (SI-messages are sent and ok)
• The PaymentInstructionIdentifier field has the same data content in the RP as it does in the SI-message
NOTE! If the Customer has not reacted within 30 calendar days, the Bank deletes the RP-message from the consumer’s netbank. The deletion is not in any way notified with an ack message.
Implementation guidelines for creating the RP-messages and more information for the process can be found from Finance Finland’s webpage
Consumer e-invoicing can be deactivated by sending SI-messages with the type DELETE. This will delete the supplier agreements with the banks and remove the supplier from the list of companies providing consumer e-invoicing from the netbanks. Deactivation and deleting of SI-messages will also delete all the consumer agreements (RI-messages) linked to the supplier agreement in question. In case there is only a need to change the service provider or other information on the SI-messages there is no need to delete the existing agreements but instead the information can be changed easily by sending SI-messages with the type CHANGE.
In case the service provider will be changed you will need to send SI-messages with the type CHANGE from the old service provider and with those SI-messages inform which will be the new service provider. In this way all the existing consumer agreements (RI-messages) will follow along to the new service provider and there is no changes needed to be done by the consumers. Note! It might take few banking days for the SI messages to travel to each bank and to get validated so you should be prepared for the possible errors to arrive few days after the sending of the messages. This means that you should not close down the old connection immidiately but instead you should wait for couple of days (5 days should be enough). Only after those few days if no errors arrive you can close the old connection. Note! RI-message files from the old service provider are not moved to the new service provider in any automated way. You will need to make sure you have downloaded the files or saved the information to your end.
InvoiceSenderAddress and InvoiceSenderIntermediatorAddress should have the current sender information and with NewInvoiceSenderAddress and NewInvoiceSenderIntermediatorAddress you can inform the new sender information:
<InvoiceSenderInformationDetails>
<InvoiceSenderAddress>003712345678</InvoiceSenderAddress>
<InvoiceSenderIntermediatorAddress>DABAFIHH</InvoiceSenderIntermediatorAddress>
<NewInvoiceSenderAddress>003787654321</NewInvoiceSenderAddress>
<NewInvoiceSenderIntermediatorAddress>NDEAFIHH</NewInvoiceSenderIntermediatorAddress>
</InvoiceSenderInformationDetails>
Kivra is a digital mail service that allows consumers to receive invoices, letters, and various documents in an electronic format. To learn more about Kivra, visit their website at https://kivra.fi/.
Companies can utilize Kivra through Maventa to send invoices to consumers. Also, consumers have the option to make payments for the invoices through the service.
Kivra functions as one of the electronic routes (relay) in our automated routing, positioned after e-invoice and before email routes. If an invoice is sent without the consumer’s full e-invoice address (IBAN and bank operator), lookup towards Kivra’s consumer registry is performed based on the data on the invoice. If a consumer has a Kivra account, and hasn’t blocked invoices from the sender in question (based on the sender’s bid), invoice is delivered to their Kivra account. In case the Kivra route fails, the invoice is routed via the next available route, such as email or print.
Kivra delivery can now also be attempted as part of the print delivery route. In the POST /v1/invoices, you can include a new optional parameter under print_settings: allow_kivra_fi
When this parameter is set, the system will attempt to deliver the invoice via Kivra before defaulting to print — even if print is the only explicitly allowed route. This allows for Kivra delivery attempts without requiring e-invoice route activation.
The consumer match against Kivra’s registry is performed using one of the following sets of data from the invoice XML:
OmaPosti is an application that allows consumers to receive their letters electronically instead of in a paper form. In case a consumer invoice is going to print, our print service provider will do a look up towards the OmaPosti consumer registry. When a consumer has an active OmaPosti account and has not opted out of receiving digital letters from a sender in question (based on the Maventa account’s OVT code), the invoice will be redirected to the consumer’s OmaPosti account instead of being delivered as a paper document. However, if the consumer does not have an OmaPosti account, the invoice will be printed and sent as a paper letter to the consumer.
To determine if a consumer has an OmaPosti account, a combination of their name and postal address or social security number is used for identification. It is good to keep in mind that while a social security number (ssn) can be used as an identifier, it is highly recommended not to include such sensitive information on invoices.
It is also possible for the sender to exclude an invoice from being sent through the OmaPosti route by setting a parameter print_settings[prevent_digital_post] to “true” while using POST /v1/invoices to send or setting the parameter prevent_digital_post to “true” while using the invoice_put_invoice_with_metadata method for sending.
In summary, OmaPosti provides a digital alternative for receiving letters and in Maventa OmaPosti works only through the print route. Specific criteria mentioned above are used to determine whether an invoice should be sent electronically or as a physical document.
Invoices can be sent through Maventa to consumers via direct debit (AvtaleGiro), netbank and Vipps (eFaktura), Digital postkasse innbygger (DPI, only for municipalities), e-mail and print. The invoice can be forced to go to a specific route like eFaktura or it can be specified to try all routes in a predefined order to reach the consumer with the help of our routing logic. Activation comes at no cost, and there are no extra monthly or yearly charges associated with using the service. Your only expense will be for the transactions you make.
Updates regarding the consumer invoicing in Norway:
There are two vendor agreements that needs to be signed in order to use both the direct debit and eFaktura (netbank and Vipps) routes.
Before the company can send consumer invoices through Maventa, or enable any of the extra features like the direct debit solution, the main vendor agreement must be activated. The main vendor agreement enables the sending of eFaktura (netbank and Vipps) and using the fallback routes e-mail and print. To enter into an agreement with Visma is enough to reach all the banks and the company does not need a separate agreement with their own bank to enable the consumer invoicing.
Only a norwegian company account in Maventa can activate the agreement and send invoices to Norwegian consumers.
When activation is initiated either through the API or UI, Maventa does a query to MPS (Mastercard payment services) to check if the given organisation number already has an existing agreement through another service provider. If another agreement exists, the person with signatory rights for the company needs to sign an agreement through Visma Sign’s electronic signing service to give consent for Visma to move the old agreement to Visma. Note! It is the company’s responsibility to make sure that the old agreement is closed, so that they do not come into a conflict with this agreement.
If the company does not have existing consumer agreement, the service is activated immidiately without the need to sign a separate agreement through Visma Sign as the company has already approved the Visma TOS.
Activation timeline: MPS creates the agreement immediately but it usually takes about an hour for the information to get updated on Maventa as we fetch new agreements every 30 minutes. For the agreement to get activated within all the banks, it can take up to 24 hours since each bank fetches agreements from MPS under different timelines. Usually it only takes a couple of hours.
API methods for activating the main vendor agreement:
API Method without e-mail authorization:
Using the AX REST api https://ax-stage.maventa.com/swagger/#!/company/postV1CompanyProfiles method. This method will return error unless the vendor_api key is included in a list of allowed signers. Example:
{ “profiles”:[“INVOICE”], “network”:”BANK”, “network_settings”: {
“name”:”Signer name”,
“email”:”Signer email”,
“agreement_signed”:”true”} }
GET /v1/services/b2cno https://swagger.maventa.com/?urls.primaryName=STAGE%20-%20AutoXChange%20API#/services/getV1ServicesB2cno to get status of the B2CNO/main agreement?
“Yes to All” registry or “Ja takk til alle” registry (JTTA) is a way for consumers to accept e-invoice from all the suppliers. When doing this the consumer gets added into a MPS registry and gets assigned an eFaktura identifier which is then the same identifier used by all the supplier when sending e-invoices to that particular consumers in their netbank. With the old, already deprecated eFaktura references (CVR) there was a direct connection between the specific supplier and the consumer, but an eFaktura identifier is more general that all suppliers can use. By activating the “Yes to All” from their netbank, consumer accepts e-invoices from all suppliers that are able to send e-invoice. When “Yes to All” is activated there is no need for the supplier to send out any consumer requests and the first invoice can be sent directly to the consumer’s netbank.
Maventa does not fetch and store the eFaktura Identifiers, but instead uses the Yes to All registry for lookup to get the consumer’s eFaktura identifier based on the data given on the invoice including email, phone, address, name and SSN. Order and combination of the data used:
Some ERPs have their own direct API connection to MPS to do the JTTA lookup to get the eFaktura identifier and then use that when sending invoices to Maventa.
AvtaleGiro is a direct debit payment method used throughout the Norway.
Direct debit solution through Maventa means that when the direct debit invoice is sent, the deduction file is created automatically by MPS based on the data from the invoice. By using Maventa solution the supplier does not need to create the deduction file themselves and then sent it through another channel as the direct debit has worked before. Addition to the automatic creation of the deduction file, our solution also handles the invoice notification.
NOTE! This is not to be confused with a current combo solution thorough Maventa where the invoice notification is sent by Maventa but the deduction file must be created elsewhere and sent to MPS either through direct integration from the ERP to MPS or through AutoPay.
To get started the with the AvtaleGiro the supplier needs a direct debit agreement with their bank. This is a manual process today and it is handled outside of Visma. In the agreement with the bank the supplier must specify customer ID as 229221. This is to identify the direct debit solution with Visma and to give consent for Maventa to have an authority to send deduction files on the behalf of the supplier, and to fetch their mandates.
If the supplier already has an active AvtaleGiro agreement with another service provider, they need to authorize the take-over process using Visma sign. During activation the supplier is required to enter an e-mail address to a person within the company that has signatory rights. Once the agreement is signed the activation itself starts and we send the necessary data to MPS.
If another agreement exists, the person with signatory rights for the company needs to sign an agreement through Visma Sign’s electronic signing service to give consent for Visma to move the old agreement to Visma. Company is responsible for making sure the old agreement is closed. Note! If the supplier already has an active agreement and are already sending deduction files through another service provider, activation in Maventa does not stop the old route like it does for eFaktura to netbank. Meaning they can send invoice combo through us and deduction file through old channel and it will not be stopped at MPS. However, the mandates can only be fetched from MPS by Visma.
If the supplier already have an active agreement with their bank they can activate direct debit through Maventa and we configure the agreement with MPS.
Maventa needs the following information from the company:
Agreement can be activated through the API or UI.
Mandates will be collected and stored in Maventa.
Once the general AvtaleGiro agreement is in place, a payer can create one or more payment mandates, each of which is an agreement between the payer and the payer’s bank to automatically pay recurring bills to a specific payee on the due date. Mandates can only be registered in connection with payees that offer AvtaleGiro. Mandates include the following information:
KID – identifies the payer/payee relationship
Payer’s account number
Payee’s account number
Amount limit – the maximum amount per month which will be automatically paid to the specific payee connected to the mandate. This limit is set by the payer and is considered private information; it is not shared with the payee
Notification setting – The payer specifies if they would like to be notified each time a new payment is scheduled
Payment mandates can be initiated in several ways:
The payer can register a mandate in their online bank using suggestions from the bank which are based on historic payments
The payer can use Mastercard Payment Services’ suggestions at https://pvu.nets.no/pvu-suggestions/avtalegiro. Suggestions are based on historic payments and are not available for all banks
If the payee offers Mastercard Payment Services' E-Agreement service, the payee can send the payer to Mastercard Payment Services’ web-based onboarding solution. This solution requires the payer to authenticate using BankID, and is generally linked from the “my account” area of the payee’s website
A paper or PDF coupon which is provided by the payee can be filled out by the payer and returned. The payee will then forward the slip to Mastercard Payment Services for processing, either by regular post or electronically via SFTP. Paper/PDF coupons have the following requirements:
KID
Payee name
Payee account number
Payer account number
Amount limit
Notification preference (yes/no)
Must be in portrait layout with all information on one page
Mandates are created by the consumer either through the suppliers webpage, or supplier sends out papers to be filled in, or the consumer can create it in their nettbank after they payed the first invoice.
Note! As long as the consumer has an active mandate and e-invoice agreement, the invoice will always be the notification.
Mandates are shown in EUI and can be fetched through the API.
We fetch the mandates when avtalegiro is actived and then we updated mandates 4 times a day (poll for new ones, updated ones)
kid string account_number string notification boolean 1 - consumer wants to be notified of avtalegiro sends, 0 - consumer does not want notification status integer 1 - active, 0 - inactive updated_timestamp string
When a consumer creates a direct debit mandate in their bank, they choose if they want to get a notification on a coming direct debit action. They choose if that is enabled or disabled, not how to be notified. We do not support bank notification. We support eFaktura as first choice, then e-mail and print. eFaktura as notification we also need to find them in Y2A (later slides). eFaktura as notification is not possible to pay in bank, unless manually changing it.
POST /v1/services/atg https://swagger.maventa.com/?urls.primaryName=STAGE%20-%20AutoXChange%20API#/services/postV1ServicesAtg To create a new ATG agreement GET /v1/services/atg https://swagger.maventa.com/?urls.primaryName=STAGE%20-%20AutoXChange%20API#/services/getV1ServicesAtg PATCH /v1/services/atg/{account_number} https://swagger.maventa.com/?urls.primaryName=STAGE%20-%20AutoXChange%20API#/services/patchV1ServicesAtgAccountNumber to update existing ATG agreement GET /v1/services/atg/{account_number} https://swagger.maventa.com/?urls.primaryName=STAGE%20-%20AutoXChange%20API#/services/getV1ServicesAtgAccountNumber to fetch ATG agreement
GET /v1/services/atg/mandates https://swagger.maventa.com/?urls.primaryName=STAGE%20-%20AutoXChange%20API#/services/getV1ServicesAtgMandates to fetch mandates
When sending consumers invoices it is mandatory to specify the recipient_type as “consumer” on the sending API metadata. Recipient_type identifies that the invoice is going to the B2C route. If “consumer” is not specified, the invoice will go to the B2B route.
It is also recommended that integrators use the route_order when sending consumer invoices. Route_order specifies the available routes the supplier wants to use and the priority of those routes. If the route_order is empty or it is left out completely the invoice will go to the predefined default route order.
Default route order is the following:
| Route | route_order value | Note |
| Direct debit (AvtaleGiro) | netbank | Direct debit route is part of the default route order only if the direct debit is active on the supplier’s account |
| eFaktura to netbank | netbank | eFaktura and VIPPS |
| if email address is given on the invoice data or in sending API metadata | ||
| Print service does not need to be enabled separately on the supplier’s account, printing will work anyway |
Example of sending a consumer invoice to a defined route order:
{
{ "version":"1.1", "recipient_type": "consumer", "routing": { "route_order":["netbank", "email", "print"] } }
}
When sending B2C invoices, the print service doesn’t need to be enabled in the supplier’s Maventa account. The print route is automatically enabled if it’s specified in the route order or if the default route order settings are used. The printed invoice will always use the sender’s invoice image, if provided, regardless of the print settings.
In certain situations, companies may have a specific need to have the route order set per supplier account not per invoice. In such cases, Maventa can assist in making this change. Please reach out to the Maventa support for further information and guidance on how to proceed with this request.
Attachments are supported through Visma Document Hotel. Limitations are the same as for print. Maventa send a link to Visma Document Hotel where we show only PDFs. If the invoice contains other attachment formats like .png we do not pass these on to consumer.
When the main vendor agreement and direct debit agreement are both active, direct debit invoices can be sent.
Instead supplier creating the deduction file and sending it to MPS themselves, the supplier can send the invoice via Maventa and the deduction file is created automatically based on that data on the invoice. The notification (eFaktura, e-mail or print) is also handled and sent out by Maventa. Meaning the supplier does not have to relate to two different channels.
Prerequisites for the supplier:
Prerequisites for the consumer:
The direct debit route is the first option in our default route order if the supplier has the direct debit activated.
Prerequisites towards the direct debit invoice:
If above mentioned prerequisites are not met or MPS returns an error that the mandate is not active, invoice will go to the next possible route (eFaktura, or email/print).
Consumers have the option to receive notifications about upcoming direct debits when they enter into a direct debit agreement with their supplier. The notification will primarily be sent as an eFaktura if the consumer has activated eFaktura through JTTA. If eFaktura is not activated, the notification can be sent via email or in print. If the consumer does not want to receive notifications, Maventa will only send the invoice as a direct debit without notification.
It is also possible for the supplier to disable notifications if they choose to do so.
Notification via eFaktura
If the consumer has eFaktura activated through JTTA notification will always be sent to netbank. It will be shown as an invoice with a direct debit and will not be possible for the consumer to pay.
Notification via email
If the consumer wants to be notified, and does not have eFaktura active, then the notification will be sent as email as long as there is an address available. The text in the e-mail specifies that this is a direct debit agreement to eliminate the risk of it getting paid twice.
Notification via print
If the consumer wants to be notified, and does not have eFaktura or e-mail address given, then the notification will be sent to print. Maventa will add a cover sheet to the invoice where it specifies that this is a direct debit and should not be paid.
When the main vendor agreement is active the first invoice can be sent. In order to send an invoice as eFaktura the receiver must be registered in in the “Yes to all” registry with MPS (JTTA).
validation on eFaktura:
Due date validation. Has to be minimum three days before due date.
Payable amount must be postive amount.
Bank account is validated 11 digits and MOD 11.
KID validation 2-25 digits MOD 10 check.
API methods:
eFaktura means both sending to Netbank and Vipps as long as the consumer is part of the “Yes to all” registry (JTTA) and has not disabled receiving in their Vipps application. What is sent to netbank is also shown in the Vipps application. Invoice is visible, and it can be paid in both netbank or Vipps, but cannot be paid twice. It is not possible anymore to only receive in Vipps.
Requirements on consumer to receive an invoice in Vipps:
However the following scenarios need to be taken into account:
Status:
When sending an invoice to Vipps the invoice is then validated and been sent to the consumers application and is visible under the payment section in the application. This is done in about 15 minutes. Status with Vipps is then pending and status with Maventa is sent. Sent status is the final status of this invoice. There it will stay until 14 days after due date then it is removed from the application.
Explanations of the states in Vipps: https://github.com/vippsas/vipps-invoice-api/blob/master/vipps-invoice-api.md#detailed-information-about-invoice-states-and-transitions
Note: ERPs that use invoice_create method can not send invoices to VIPPS because the phone number could not be saved to Database
Maventa can route an invoice to the Digital Postkasse Innbygger (DPI), which is used only by municipalities (Visma Enterprise). When sending to DPI the payload must contain a social security number (personnummer) in a .aix file. The SSN will be used to check the consumer against the Kontakt og Reservasjonsregistret (KRR). In KRR the consumer has chosen if they want to receive invoices or not to their DPI account, and if that account is in either eBoks och DigiPost.
In order to send to DPI or send with SSN contact Maventa support.
Invoices to consumers can be sent through Maventa as e-invoices to the consumer’s netbank, Kivra or via email and print. Distribution to consumer’s netbank and Kivra is handled by our partner, InConx AB (former Compello), who acts as the Certified Technical Distributor (CTD), and fallback routes, email and print by Maventa.
In Sweden also companies can receives invoices through this channel as a company can have an SSN (social security number) as their organization number.
To activate the B2C it is is a simple process - all you need is an account number where payments will be received. The required consumer invoicing agreements are created automatically during activation, so your company will be assigned an FUI (Faktura Utställar Identitet) and an Agreement ID (Avtals-ID or Avtalsbankgironummer) without any additional steps.
If you already have an FUI and Agreement ID, you can provide them during activation, but it’s not mandatory.
FUI (Faktura Utställar Identitet) is a unique to each sender and it is formed by the following information:
Example of an FUI: 005560169095.00002222222.FSPA.SE
For one FUI the sender can have 99 account numbers
To obtain an FUI from your own bank, the process must be handled manually by visiting the bank in person. When setting up the agreement, it’s important that the bank specifies InConx AB as the CTD (Certifierad Teknisk Distributör). InConx AB is a certified technical distributor of e-invoices to banks, partnering with BGC, Nordea, and Swedbank to ensure a secure and high-quality service. This certification is renewed annually. After the agreement is finalized, the sender will receive an FUI (Faktura Utställar Identitet) and an Agreement ID (Avtals-ID or Avtalsbankgironummer).
Following information is needed to activate the service through Maventa. Activation can be done either through our UI or via the API:
Mandatory:
Optional:
In addition to the account details (and optionally the FUI and Agreement ID), Maventa will also forward the company’s name and business ID (BID) to our B2C partner. Note! The sender’s account name in Maventa must exactly match the name registered with Bolagsverket, as this will be verified during the activation process.
Once the information is submitted, InConx AB will initiate the activation of the FUI and establish the necessary connections with Bankgirocentralen (BGC), Nordea, and Swedbank, enabling the sender to deliver e-invoices directly to consumers’ online banks. These connections also allow access to all other banks through the central systems. A connection to Kivra is also created at this stage and becomes active once the bank connections are established. This activation process typically takes about one week.
When activation is complete, the sender can start sending invoices to consumers via banks and Kivra. At the same time, an onboarding page is created, allowing consumers to register themselves as recipients in their online banks.
If the sender already has an active FUI and consumer invoicing setup with another service provider but wishes to transition to Maventa, it is possible to transfer the FUI and all related FMIs. This transfer requires manual handling, so please contact our support team for assistance.
Activation timeline:
There need to be a connection created towards BGC, Nordea and Swedbank and we must receive the status back from all three banks and Kivra before the B2C service is active. This can take up to a week.
Note! In case the sender is also a customer of InExchange, prevent routing all sent invoices through InExchange setting needs to be turned on in order for our B2C solution to work. If the setting is not turned on all sent invoice will be forced through InExchange connection without even trying our B2C route. When the setting is on, Maventa will hande internal traffic, sending to Peppol, email and print routes addition to the B2C and also handles the billing of these actions
API methods
POST /v1/services/b2cse/agreement - Create B2CSE network registration request
GET /v1/services/b2cse/agreement - Get status of B2CSE network reqistration request
Once the B2C service is active, the sender will appear as a B2C invoicer in consumers’ online banks, allowing consumers to set up a consumer invoicing agreement with them. To do this, the consumer is guided to an onboarding page within their netbank, where they must complete a standardized form. This page is branded with the Visma logo by default. If customization is needed, please contact our support team.
After the consumer submits the agreement, a unique identifier called FMI (Faktura Mottagar Identitet) is created and stored by InConx AB. This FMI is essential for delivering e-invoices to the consumer’s bank. The consumer’s social security number (SSN), included on the invoice, is used to match and retrieve the FMI. At this time, Maventa does not support sending consumer e-invoices without an active FMI.
FMI is a unique ID to identify the consumer. It is stored in InConx AB side, and there is currently no lookup capabilities towards the consumer registry.
FMI is specified as following:
Examples from different banks:
Note! Receiving invoices on behalf of someone else is not supported in our B2C solution currently.
When B2C SE is activated, a connection to Kivra is automatically established. If no FMI (Faktura Mottagar Identitet) is found for the consumer based on the SSN provided on the invoice, the invoice will be routed to Kivra — provided the consumer has Kivra capabilities. No prior agreement between the sender and the consumer is required for Kivra delivery. A lookup is performed against Kivra’s consumer registry using the SSN from the invoice. If the consumer has an active Kivra account, the invoice is delivered there. If the Kivra route fails, the invoice is sent via the next available fallback channel, such as email or print.
Note! Currently it is not possible to only activate the Kivra without the bank capabilities. If there is a growing need for this, we can re-evaluate the solution.
Before sending invoices through our B2C solutions make sure the service is in active state and that the prevent routing all through InExchange setting is on (read more from activation).
Invoice Requirements for B2C Delivery
The SSN should be provided in the endpoint ID field in one of the following formats: YYYYMMDDnnnn or YYMMDDnnnn
<cac:AccountingCustomerParty>
    <cac:Party>
      <cbc:EndpointID schemeID="0007">201012081234</cbc:EndpointID>
      <cac:PartyIdentification>
        <cbc:ID schemeID="0007">201012081234</cbc:ID>
      </cac:PartyIdentification>
When an invoice is sent from the ERP to Maventa, it follows this routing logic:
Internal Routing Check
The value in the endpoint ID (or customer’s business ID) field is checked against our internal system. If a match is found, the invoice is sent directly to the receiver within our internal network.
Peppol Routing Check
The value in the endpoint ID (or customer’s business ID) field is cross-referenced with the Peppol registry. If the receiver is listed in Peppol, the invoice is routed through Peppol.
Inexchange / Swedish operator network Routing Check
The value in the endpoint ID (or customer’s business ID) field is checked against the Inexchange address book and NEA registry. If the receiver is found, invoice is sent through that operator route.
EINVOICE_BANK_B2C_SECO - invoice send to consumer’s Netbank
EINVOICE_B2C_SECO_KIVRA - invoice send to consumer’s Kivra account
Send and receive electronic invoices and other trading documents in an international Peppol network.
Peppol eases the trade between suppliers and buyers by providing a standardised way for exchanging trading documents electronically within countries and cross-border. Sending and receiving between recipients takes place over Peppol Access Points that connect the buyers and suppliers to the network.
Maventa is one of the cerfified Peppol Access Points. This means that when you are integrated to Maventa you can easily provide connection to Peppol to your customers.
0192. For Norwegian company whose organisation number would be 123456789 Peppol address would be 0192:123456789APIs to use REST API - Invoices and other documents SOAP API - Enable/disable, invoices only
Note, that if the company is already registered to receive invoices or other document types through another Access Point than Maventa this registration needs to be removed by the old Access Point before Maventa can do the registration.
To create registration to Peppol
REST API Call POST /v1/company/profiles
INVOICE_AND_CREDIT_NOTEPEPPOL{
"profiles": [
"INVOICE_AND_CREDIT_NOTE"
],
"network": "PEPPOL"
}SOAP API Call enable_operator with enabled=true
INVOICE_AND_CREDIT_NOTEMaventa creates the registration with the following identifiers (schemes)
0192)0216)0007)0184)0106 or 9944 - depending which is used to register company account to Maventa)9930)0208)9931)If you want to register a participant outside of these countries or with a different identifier please contact Maventa.
REST API
REST API
To follow up when the registration has been succesfully completed you can register a webhook. Use the event type NETWORKS to get notification of all changes in the registration statuses.
To remove registration from Peppol network
REST API
SOAP API
enabled=falseINVOICE_AND_CREDIT_NOTEUse print service to print the invoice and deliver it by post to recipients who cannot receive electronic invoices. Define the settings based on your customer needs.
Print can be used as the option to deliver the invoice if the invoice is not possible to send as an e-invoice or email invoice.
The requirements to send the invoice by print are that:
See the used price list for print related transaction costs.
To be able to use the print as a delivery option for the invoices, the printing service needs to be activated separately for a company account. Activation can be done through the API or UI.
To activate the print service use API method PATCH /v1/company/setting. Under send_invoice_print block set the parameter enabled to true.
To disable the printing service set the enabled parameter to false.
To check if the printing is active (or disabled) use use GET /v1/company/settings. Under send_invoice_print block the parameter enabled tells if the service is active (true) or not active/disabled (false).
To activate the print service call API method configure_company and set parameter print_and_send_request to 1.
To disable the printing service set the print_and_send_request to 0.
To check if the printing service is active use Show_company_configuration method and parameter print_and_send_enabled (true / false)
Invoices sent via print service will by default use Maventa generated invoice image template. This template is optimized for effective handling and it fits perfectly to the envelope used by the printing service provider. Customers can customize the template by adding their company logo to the invoice template (via UI or API).
Examples of Maventa templates here.
There is also an option to use the customer’s own invoice image for all the prints or per invoice (via UI or API). A cover sheet with address details will be added by Maventa to all printed invoices with the customer’s own image enabled and the cover sheet is debited as an extra page. The reason for the cover sheet is to make sure that the address details fits to the envelope.
Prints are always double-sided if there is more than one page.
To add a logo for an invoice image template created by Maventa use PATCH /v1/company/setting and parameter logos . Note! Most image formats are supported but not PDF. JPEG or PNG is preferred. PNG with transparency is not supported.
To remove the uploaded logo use the same above mentioned method method but
To use your own image with all prints, use PATCH /v1/company/setting. Under send_invoice_print block set the parameter use_own_pdf to true. To stop using your own image, set the use_own_pdf parameter to false.
In case you want to enable/disable the use of own image per invoice, it can be done when using POST /v1/invoices for sending. There is a parameter called print_own_image inside the print_settings that can be used to enable (true) or disable (false) the use of own image. Using this parameter will override the defined company based print settings.
To add a logo for an invoice image template created by Maventa use update_logo API method
To remove the uploaded logo use remove_logo method
To use your own image with prints, use configure_company method and set parameter print_and_send_own_pdf to true.
Note that when using your own template you should be careful and take technical restrictions in consideration.
All files must be of PDF format (or have the same content requirements) for it to be printed correctly. That means that the file cannot contain dynamic components and that all fonts, images and others are included in the file (ie the files should be 100% “self-contained”). All new customers must test their PDF files (all variants of fonts, images, etc.) to verify that the PDFs can be handled. If the PDF contains graphics, such as logos, charts, and other images, they must be of good quality.
See below for country-specific configuration options and requirements:
If you use your own invoice image make sure to familiarize youself with the PDF layout rules by Posti.
Addition to Posti as the mail distributor, there is also Jakeluyhtiö Suomi Oy (JYS) which have few additions to the Posti rules. Difference is the tracking barcodes they print on the invoice image, see the JYS rules merged with the Posti ones.
There is also an option to exclude the cover sheet from the prints. In that case the sender is not only responsible for making sure their invoice image meets the layout rules but also to make sure to follow the position requirements for the receiver’s address details so that those fit perfectly to the envelopes used in Finland. Contact support to confirm your layout and to enable this setting.
There is a possibility for customers to choose if they want all their invoice images to be printed with colors or with black & white (via API or UI). The default setting is black & white. If the color printing is enabled, it will be billed based on the number of pages in a printed invoice, not based on the number of pages actually having colors.
Addition to company based setting there is also a possibility to choose the color option for a specific invoice in the sending API
To enable the color printing for all invoices sent from a company account use PATCH /v1/company/setting method. Under send_invoice_print block set the parameter color_scheme to COLORED. To use only black & white set the parameter color_schemeto BLACK_AND_WHITE.
To choose the color printing in sending use POST /v1/invoices method and set print_settings[color] to “true”.
To enable the color printing for all invoices sent from a company account use configure_company method and set print_and_send_color parameter to true.
Invoices that are sent to Maventa before 24:00 will get printed, processed and enveloped during that night and handed over to the mail distributor next morning. Production does not take place during the weekends and holidays.
Mail distributors will deliver invoices to the receivers according to the chosen letter class.
There are two letter class options available for Finnish companies to choose from when sending domestic letter, economy and priority. Priority is the default one. Letter class can be changed via API or UI. For foreign letters, only priority class is used.
To change the letter class use PATCH /v1/company/setting method. Under send_invoice_print block set the parameter letter_class to PRIORITY or ECONOMY
To choose the letter class in sending use POST /v1/invoices method and set print_settings[letter_class] to “economy” or “priority”.
You can change the letter class using configure_company method and print_and_send_letter_class (1 = Priority, 0 = Economy) parameter.
The Finnish printing service uses two different envelope sizes. A smaller C5 envelope is used when there are up to 9 sheets in the invoice printed. When invoice has more than 9 sheets a bigger, more expensive, C4 size envelope is used. There are different billing actions for these two cases. As all the printed invoices are double-sided there needs to be more than 18 pages on an invoice for it to be more than 9 sheets, and to use the C4 envelope. Note! If sender’s own invoice image is used, cover sheet added by us is calculated as one page.
Separate PDF attachments are printed with following rules:
Note! There is an extra charge per page printed.
By default the printing of attachments is disabled for Finnish companies. This settings can be changed via API or UI.
If you wish to enable the printing of attachments you can do it by calling PATCH /v1/company/setting method. Under send_invoice_print block set the parameter attachment_print to true. And to disable it again, set the parameter attachment_print to false
If you wish to disable it you can do it by calling configure_company method and setting the parameter print_attachments to false (true = enabled, false = disabled)
When this setting is turned on every invoice that is printed using our PDF-tempate is automatically accompanied with instruction page which explains how your customer can receive invoices electronically instead of paper. Instruction page is free of charge for you.
To use the automatic e-instruction page call PATCH /v1/company/setting method. Under send_invoice_print block set the parameter marketing_page to “true”
To use the automatic e-instructions page call configure_company method with parameter marketing_on_invoice = true
OmaPosti is an application that allows consumers to receive their letters electronically instead of in a paper form. In case a consumer invoice is going to print, our print service provider will do a look up towards the OmaPosti consumer registry. When a consumer has an active OmaPosti account and has not opted out of receiving digital letters from a sender in question (based on the Maventa account’s OVT code), the invoice will be redirected to the consumer’s OmaPosti account instead of being delivered as a paper document. However, if the consumer does not have an OmaPosti account, the invoice will be printed and sent as a paper letter to the consumer. To determine if a consumer has an OmaPosti account, a combination of their name and postal address or social security number is used for identification. It is good to keep in mind that while a social security number (ssn) can be used as an identifier, it is highly recommended not to include such sensitive information on invoices.
It is also possible for the sender to exclude an invoice from being sent through the OmaPosti route:
To prevent using OmaPosti route for an invoice use POST /v1/invoices method and set print_settings[prevent_digital_post] to “true”.
To prevent using OmaPosti route for an invoice use invoice_put_invoice_with_metadata method and set parameter prevent_digital_post to “true”.
In summary, OmaPosti provides a digital alternative for receiving letters, but the specific criteria mentioned above are used to determine whether an invoice should be sent electronically or as a physical document.
When customer’s own invoice image is used, a cover sheet with receiver’s address details is added by Maventa to all printed invoices and it is debited as an extra page. The reason for the cover sheet is to make sure that the address details fits to the envelope. If you use your own PDF-template familiarize yourself with the PDF layout rules provided by the printing service provider.
All invoices are printed as black & white.
Invoices that are sent to Maventa before 24:00 will get printed, processed and enveloped during that night and handed over to the mail distributor next morning. Production does not take place during the weekends and holidays. Mail distributors will deliver invoices to the receivers using Priority letter class.
Separate PDF attachments are printed with following rules:
Note! There is an extra charge per page printed.
By default the printing of attachments is enabled for Norwegian companies. This settings can be changed via API or UI.
The Return Post Automation feature, available in Norway, helps handle undeliverable printed invoices such as those sent to outdated or incorrect addresses, by redirecting them to a designated return address instead of sending them back to the original sender. This return address is automatically used as the sender address on the letters and added by Maventa. At the return address, the sender’s information is extracted, the physical letter is securely shredded, and the delivery failure is reported back to Maventa. The related invoice is then marked with a delivery error.
This provides the sender with a clear overview of failed letters, making it easier to update customer information and resend the invoice if necessary.
This feature comes with a small fee.
If you wish to disable the printing of attachments you can do it by calling PATCH /v1/company/setting method. Under send_invoice_print block set the parameter attachment_print to false. And to enable it again, set the parameter attachment_print to true
If you wish to disable it you can do it by calling configure_company method and setting the parameter print_attachments to false (true = enabled, false = disabled).
When customer’s own invoice image is used, a cover sheet with receiver’s address details is added by Maventa to all printed invoices and it is debited as an extra page. The reason for the cover sheet is to make sure that the address details fits to the envelope. See the PDF layout rules provided by the printing service provider.
The Swedish printing service uses two different envelope sizes. A smaller C5 envelope is used when there are up to 6 sheets in the invoice printed. When invoice has more than 6 sheets a bigger, more expensive, C4 size envelope is used. There are different billing actions for these two cases. As all the printed invoices are double-sided there needs to be more than 12 pages on an invoice for it to be more than 6 sheets, and to use the C4 envelope. Note! If sender’s own invoice image is used, cover sheet is calculated as one page.
There is a possibility for customers to choose if they want all their invoice images to be printed with colors or with black & white (via API or UI). The default setting is black & white. If the color printing is enabled, it will be billed based on the number of pages in a printed invoice, not based on the number of pages actually having colors.
Addition to company based setting there is also a possibility to choose the color option for a specific invoice in the sending API.
To enable the color printing for all the invoice sent from the company account use PATCH /v1/company/setting method. Under send_invoice_print block set the parameter color_scheme to COLORED. To use only black & white set the parameter color_schemeto BLACK_AND_WHITE.
To choose the color printing in sending use POST /v1/invoices method and set print_settings[color] to “true”.
To enable the color printing use configure_company method and set print_and_send_color parameter to true.
Separate PDF attachments are printed with following rules:
If attachments exceed these limits, all the attachments are dropped and the sender will be notified via email. Invoice image is still printed.
Note! There is an extra charge per page printed.
By default the printing of attachments is enabled for Swedish companies. This settings can be changed via API or UI.
If you wish to disable the printing of attachments you can do it by calling PATCH /v1/company/setting method. Under send_invoice_print block set the parameter attachment_print to false. And to enable it again, set the parameter attachment_print to true
If you wish to disable the printing of attachments you can do it by calling configure_company method and setting the parameter print_attachments to false (true = enabled, false = disabled).
Invoices that are sent to AutoInvoice before 24:00 on workdays will get printed, enveloped and handed over to the mail distributor the next day. Production does not take place during the weekends and holidays. Mail distributors will deliver invoices to the receivers according to the chosen letter class. There are two letter class options available for Swedish companies, economy (B-post) and priority (A-post). Priority is the default value. (via UI or API). See the delivery schedule
To change the letter class use PATCH /v1/company/setting method. Under send_invoice_print block set the parameter letter_class to PRIORITY or ECONOMY
To choose the letter class in sending use POST /v1/invoices method and set print_settings[letter_class] to “economy” or “priority”.
You can change the letter class using configure_company method and print_and_send_letter_class (1 = Priority, 0 = Economy) parameter.
When customer’s own invoice image is used, a cover sheet with receiver’s address details is added by Maventa to all printed invoices and it is debited as an extra page. The reason for the cover sheet is to make sure that the address details fits to the envelope. If you use your own PDF-template familiarize yourself with the PDF layout rules provided by the printing service provider.
All invoices are printed as black & white.
Separate attachments are not printed only the invoice image is. To get the attachments printed they must be merged with invoice image before being sent to Maventa.
By default customer own invoice image is used for prints and a coversheet (with address information) will get added with no extra cost. If there is no image given Maventa will generate one accroding to general templates.
Separate PDF attachments are printed with following rules:
Note! There is an extra charge per page printed.
By default the printing of attachments is enabled for Dutch companies. This settings can be changed via API or UI.
If you wish to disable the printing of attachments you can do it by calling PATCH /v1/company/setting method. Under send_invoice_print block set the parameter attachment_print to false. And to enable it again, set the parameter attachment_print to true
If you wish to disable it you can do it by calling configure_company method and setting the parameter print_attachments to false (true = enabled, false = disabled)
Invoices that are sent to AutoInvoice before 24:00 on workdays will get printed, enveloped and handed over to the mail distributor on the same day. Production does not take place during the weekends and holidays. Mail distributors will deliver invoices to the receivers according to the priority letter class schedule.
By default everything is printed with colors. Changing color printing setting does not have any effect on Dutch companies.
To close the print service, call configure_company method with parameter print_and_send_request = 0.
To reopen the service, just follow the steps in chapter Opening service. The print service is enabled immediately after activation, without approval needed.
Print service activation, closing and configuring the settings can all be done over the Maventa UI. The print service settings can be found under Invoice sending settings.
Use Maventa Direct Print API to send EPL and PDF files as letters through print service. The service is currently available in Finland only.
Maventa Mass printing service (also known as Payslip) is a service that enables sending of PDF files as letters through the printing service in Finland. Service was initially build to send payslip material, but it can be used for sending any kind of letters, as long as the printing service rules are followed.
Payslip can be used either through the UI from address https://payslip.maventa.com (testing https://payslip-stage.maventa.com) or via HTTP API.
You need a separate user account for the Mass printing API in order to use it. You can open the account with an API call to https://payslip.maventa.com/register using existing vendor_api_key and company_uuid for Maventa.
| Key | Example | Description |
| sw_api_key | d33e92be-a46b-4963-8ada-25452712e0a6 | Existing software API key from Maventa |
| company_uuid | 99445728-5fd3-428a-96e1-ca0cab692276 | Existing company uuid from Maventa |
| company_name | Test Company Oy | Name of the company |
| user_email | test@yritys.fi | User email address that will be used as user name, needs to be unique! |
| user_pw | secret1234 | Password for the user |
| test_mode | 1 | 1 opens the account in test mode which means that material is not really send out. Note! Contact support to disable the test mode. 0 opens the account in production mode |
| disable_notify_on_complete | 1 | 0 (default) user will get an email notification when material is printed successfully. |
The response code will always be a HTTP 200 and the response body is one of the following:
| Value | Description |
| “OK” | Successful registration, letters can be send and login works |
| “ERROR: COMPANY UUID ALREADY REGISTERED” | Registration failed, company exists already in Payslip service |
| “ERROR: USER EMAIL ALREADY REGISTERED” | Registration failed, user email exists already in Payslip service |
| “ERROR: ONLY FINNISH COMPANIES ALLOWED” | Only Finnish companies allowed to register |
| “ERROR: USER EMAIL INVALID” | Invalid email address |
| “ERROR: INVALID VENDOR KEY” | Invalid software API key |
| “ERROR: INVALID COMPANY UUID” | Invalid company uuid |
| “ERROR: INVALID VALUES” | Company_name, user_email or user_pw empty |
| “ERROR: REGISTRATION FAILED” | Most likely company name already exists in Payslip service. |
To send a letter to Mass printing service call the API endpoint payslip.maventa.com/input_public.
You need to give authentication using HTTP headers. You can give either:
USERNAME and USERPW with which you registered your Mass printing API accountCOMPANY-UUID and USER-API-KEY of your Maventa account| Key | Example | Description |
| version | MyOwnERP | Name of the software (and its version) making the sending. Makes problem solving easier |
| filename | letters_2019_12.zip | Name of the ZIP package, should be unique |
| file | RVBMMTExMzQ0O | The actual ZIP file attached using multipart/form-data |
| zipHash | 69a56b2b66d548d7b51f6dcc9003e90bafce2162 | SHA1 hash of ZIP content, will get check in server to make sure package came through as whole |
| hash | 856697ad0cae67ec48f7627be4cef74feaa2f36b | SHA1 hash of PDF content, will get saved to server for duplicate prevention. Same hash key cannot be used for sending again |
| document_type | PDFXML | PDFXML |
| letter_class | economy | Economy or priority (default value). Letter class to use for sending |
| sw_api_key | 5992955a-3b66-4439-94d1-a854a764da49 | Existing software API key from Maventa. Value given in sending call will override the one set for the Payslip company account in registration |
| license_key | 1234-5678-MKSK-1234 | License key of software making the call (255 chars max) |
| license_meta | License key for MyOwnERP | Additional information about the licensing system |
| color_print | true | Color printinting true Black&White false (default value) |
| duplex | true | Duplex printing for both sides of the letter. Default is false |
| prevent_digital_post | true | Prevent sending to OmaPosti. Default is false |
Note: File upload must be done using the multipart/form-data content type. Do not send the file as a Base64-encoded string in a query parameter. If your integration currently does this, we recommend updating it to use multipart upload.
The response code will be a HTTP 200 and the response body is one of the following or “401 Unauthorized” if authentication fails:
| Value | Description |
| “OK: sent_filename.zip” | Successful sending |
| “ERROR: HASH VALUE DOES NOT MATCH” | Parameter zipHash does not match to the SHA1hash |
| “ERROR: ERROR: DUPLICATE FILE” | Found file with parameter hash |
| “ERROR: FILE TOO LARGE” | API allows max 10Mt files |
| “ERROR: DOCUMENT TYPE UNSUPPORTED” | document_type is something else than PDFXML |
| “ERROR: FILE IS NOT ZIP” | Parameter filename needs to be .zip |
| “ERROR: ZIP FILE CONTAINS UNSUPPORTED FILES” | Only .pdf files are allowed |
| “ERROR: ZIP FILE CORRUPTED” | Unzipping failed |
| “ERROR: NO LETTERS FOUND” | No letter were found. No .pdf files found inside the zip file |
| “ERROR: SINGLE XML REFERENCES MULTIPLE PDFS” | Single iPost-XML can only have reference to one PDF (XML to PDF 1-1 ratio) |
| “ERROR: sent_filename.zip” | Unexpected error, sending failed. Contact our support for more information |
| “ERROR: LETTER OPTION MISMATCH” | All IPost-XMLs in a ZIP file must have the same printing options (letter class, colour..) for billing purposes |
Finnish printing service uses two different envelope sizes. Smaller C5 envelope is used when there are up to 9 sheets in the printed document. When document has more than 9 sheets a bigger, more expensive, C4 size envelope is used. There are different billing actions for these two cases. In case documents are printed as duplex (double-sided) there needs to be more than 18 pages on an document for it to be more than 9 sheets and to end up in the C4 envelope.
All files must be of PDF format (or have the same content requirements) for it to be printed correctly. That means that the file cannot contain dynamic components and that all fonts, images and others are included in the file (ie the files should be 100% “self-contained”). All new customers must test their PDF files (all variants of fonts, images, etc.) to verify that the PDFs can be handled. If the PDF contains graphics, such as logos, charts, and other images, they must be of good quality.
<?xml version="1.0" encoding="ISO-8859-1"?>
<lb:LetterBundle schemaVersion="v0x4" senderFileId="FileD1" xmlns:lb="urn:itella-letterbundle-v0x4" xmlns:xsi="http://www.w3.org/2001/XMLSchema-instance" xsi:schemaLocation="urn:itella-letterbundle-v0x4 LetterBundle_V0x4.xsd">
  <lb:Bundle senderBundleId="">
    <lb:BundleCommon creationDate="2020-06-24T13:17:00.0Z" isTest="false">
      <lb:Sender companyName="Your company Oy" contact="" contactPerson="Support" email="support@support.com" phoneNumber="010-5058474" ovtID="003712345678">
        <lb:SenderAddress>
          <lb:Eu1 name="Your company Oy" address="PL 000" postalCode="00101" city="Helsinki" countryCode="FI"/>
        </lb:SenderAddress>
      </lb:Sender>
      <lb:StdBundleProcessing customerId="" departmentClassification="false" electronicArchiving="T" envelope="S" fileFormat="0" isDuplex="true" letterClass="2" paper="0" password="" serviceFunction="0"/>
      <lb:ExternalFile fileName="sent_filename.pdf" format="PDF" senderFileId="wm_0c5c09e0-03d3-4340-bb6b-0c3c14be7f42">
        <lb:CheckSum type="MD5" value="nnnnnnnnnnnnn"/>
      </lb:ExternalFile>
    </lb:BundleCommon>
    <lb:Letter senderLetterId="LetterID1">
      <lb:LetterMeta>
        <lb:Location pages="1" startPage="1"/>
        <lb:Recipient>
          <lb:Address>
            <lb:Eu1 address="Kotikatu 1" city="Helsinki" countryCode="FI" name="Asiakas Anssi" postalCode="01001"/>
          </lb:Address>
        </lb:Recipient>
      </lb:LetterMeta>
    </lb:Letter>
  </lb:Bundle>
</lb:LetterBundle>
Latest instructions for the letter layout. Addition to Posti as the mail distributor, there is also Jakeluyhtiö Suomi Oy (JYS) which have few additions to the Posti rules. Difference is the tracking barcodes they print on the invoice image, see the JYS rules merged with the Posti ones.
Receiver information should be marked as clearly as possible to make sure machine readability.
To check the status of the sent package, use https://payslip.maventa.com/file_status. API call contains HTTP-header where user name and password are given with USERNAME and USERPW parameters. In addition a GET for giving the sent file name with filename parameter.
You need to give authentication using HTTP headers. You can give either:
USERNAME and USERPW with which you registered your Mass printing API accountCOMPANY-UUID and USER-API-KEY of your Maventa account| Key | Example | Description |
| filename | sent_filename.zip | Name of your ZIP package |
| Value | Description |
| “DONE” | Package is processed and sent successfully |
| “PENDING” | Package is still in sending process |
| “ERROR” | Sending of the package has failed (in these cases our support will get notified and they will contact the sender with more detailed reason for error) |
| “ERROR: No file found” | No file found with the given filename |
Once the file is successfully sent and we have gotten the final confirmation back from the print service provider, the file is completely remove from Maventa. We recommend storing the files on the ERP side for at least a few months after the sending in case there are some support cases related to the sent letters.
PDF material that has been sent to Maventa before 24:00 will get printed during the same night and sent to post office next morning. Post will deliver material to the receivers according to the chosen letter class.
OmaPosti is an application that allows customers to receive their letters electronically instead of in paper form. When a receiver has an active OmaPosti account and has not opted out of receiving digital letters from a specific sender (based on the sender’s ovtID given in the IPOSTXML), the invoice will be redirected to the receiver’s OmaPosti account instead of being delivered as a paper document. However, if the receiver does not have an OmaPosti account, the invoice will be printed and sent as a paper letter to the recipient. To determine if a receiver has an OmaPosti account, a combination of their name and postal address is used for identification.
It is also possible for the sender to exclude the letter from being sent through the OmaPosti route by setting the prevent_digital_post parameter to true in the sending API call.
Please note that in order for the OmaPosti route to function correctly, the necessary information must be specified in the IPOSTXML document. This includes the sender’s OVT code (ovtID) and the receiver’s name and address information.
If you wish to close the service please contact Maventa support.
Activate Maventa Receivables Management Service to accelerate cash flow and free resources from manual work. The service handles reminders, payment monitoring, payment allocation, and debt collection after the invoice has been sent. Note! Only available for Finnish companies.
The Receivables Management service handles payment monitoring, payment allocation, sending of reminders, and debt collection on behalf of the company. Company only needs to create and send the invoice as normally (including the error handling) and the service does the rest. The service is provided by Visma Amili (former Visma Financial Solutions Oy) through Maventa and it is included in the Maventa service with no additional costs for using it. Only costs there might be are related to the debt collection process in later phases and if assignments are cancelled. Service contract and price list.
New things in planning
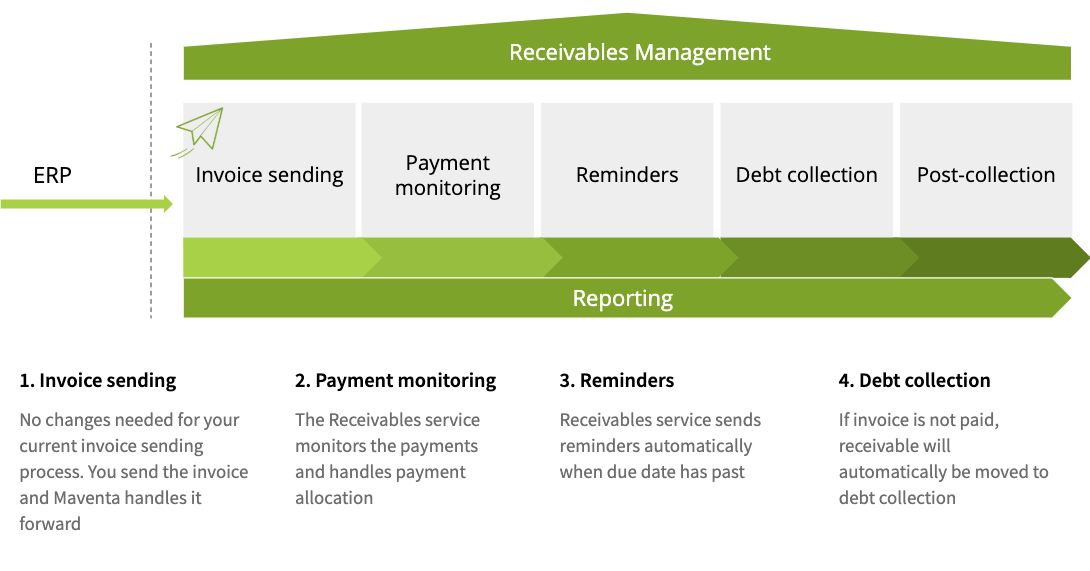
Full receiver’s address information is given
If there is something missing from the receiver’s address details your invoice will end up in the error state with the following error message SEND ERROR (REASON: RECEIVABLES-SERVICE: Postal code for CITY_NAME xxxxxx not found (code #5)).
Invoice will not be sent out to the receiver. You will need to create a new invoice with the corrected address details and send it again.
Due date is not in the past and there is at least 3 days until the due date
If due that has passed or it is within 3 days your invoice will end up in the error state with following error message SEND ERROR (REASON: RECEIVABLES-SERVICE: The due date for the invoice is within three (3) days or has already passed (code #13))
Invoice will not be sent out to the receiver. You will need to create a new invoice with a proper due date and send it again.
Sum of lines must equal the total sum of the invoice
Duplicate invoice numbers are not allowed in most cases
Ensure that each invoice number is unique, avoiding any reuse. However, there are few exceptions to this rule:
See the detailed chart for duplicate expections
In case the invoice number needs to be unique, you will receive the following error message and sending will fail completely (SEND ERROR (REASON: RECEIVABLES-SERVICE: An assignment for this invoice number xxxx already exists and is still open. If you want to open a new assignment for this invoice number, you must first cancel the existing one (code #6 e5006e70-dfab-49da-90fd-2e47d2eb8ea6)).
You will need to create a new invoice with a unique invoice number and send it again. It is highly recommended to prevent the use of the same invoice number already when a user tries to create an invoice in the ERP. This to avoid unnecessary error handling.
Note! If the invoice ends up in any of the above mentioned errors prefixed with SEND ERROR (REASON: RECEIVABLES-SERVICE.., the invoice IS NOT SENT to the receivables service which means that it won’t be sent to the receiver either. Sender needs to make the needed corrections for the invoice content and resend the invoice.
Below is explained how to handle the error cases when the invoice IS ALREADY SENT through the receivables service when the invoice ends up in the error state:
Invoice is sent through the receivables service just before it is sent forward from the Maventa to the receiving operator or access point. In case the receiving operator returns an error (which can happen even a week after the sent) sender needs to handle the failure somehow. Sender is responsible for getting the invoice delivered to the receiver:
In case the invoice ends up in the error state because of the wrong e-invoice address (for example the receiver doesn’t anymore receive invoices to the e-invoice address that the sender has defined as the address) sender needs to reroute the invoice to a new address. Rerouting can be done either from the user interface under the invoice details or then via API from the ERP. Using rerouting functionality does not create a new assignment.
If the reason for failure is in the XML content, the sender needs to send a new invoice with corrected information. In order to do so the sender probably needs to credit the existing erroneous invoice in the ERP. Addition to crediting the invoice in the ERP the sender needs to communicate that to the receivables assignment in question so that Visma Amili also gets notified to close the assignment. This can be done using the credit_note event. We highly advise to automate this process in the ERP side to always create a credit_note event to an assignment when the user creates credit notes in the ERP. Although marking the assignment as credited can also be done through the user interface. Note! When sending the new corrected invoice, remember to use a new invoice number to avoid the duplicate invoice number error above.
When an invoice ends up in the error state, Visma Amili is notified. In case the sender does not act on the error, and the invoice remains in error state even when the invoice is due, Visma Amili closes the assignment and adds a comment about the closing reason to the assignment details.
In case the receiver doesn’t pay the invoice on time, Visma Amili will first sent out reminder invoice. First reminder is sent 10 days after the due date of the invoice for B2B invoices, and 14 days after due date for consumer invoices (B2C). Reminders are always sent through the normal post (Letters won’t be sent during weekends or public holidays which will then in some cases add few additional days to the schedule). Language of the reminders and debt collection letters is based on the customer’s language code defined in the original invoice (Finvoice InvoiceRecipientLanguageCode). Default language is Finnish.
To open the Receivables Management service use REST API method PUT /v2/services/amili/receivables to initiate the activation process. GET /v2/services/amili/receivables method is used to follow up when the service get activated.
To complete the activation process, a person authorized to act on behalf of the company must fill and sign an electronic agreement with Visma Amili. This authorization can be based on the individual’s position within the company or a provided power of attorney, which must be attached to the form if applicable. Personal online banking credentials or a Mobile ID are required to fill out the form. According to the Money Laundering Act, we must ensure that we know our customers and their activities.
The authentication and signing process is facilitated by our partner, Netvisor KYC.
There are two options for handling the Know Your Customer (KYC) part from the ERP:
By providing an email address in the “authorization_email” parameter, an email containing a link to the Netvisor KYC service is sent to the specified address. If the “authorization_email” parameter is left empty, no email will be sent
The GET /v2/services/amili/receivables method will return a link in “activation_url” parameter to the Netvisor KYC service. Customers can be guided there directly from the ERP. When displaying the link, it is advisable to keep the “authorization_email” parameter blank
Note! If the KYC process is not completed within a week, a reminder email with a link will be sent to the contact person’s email address.
| Parameter | Description |
|---|---|
| iban | Account information (IBAN) that Visma Amili will use when they pay the money they get from the customer (receiver of the invoice). There can only be one account. |
| bic | Bank identification code e.g. DABAFIHH |
| bank | Name of your bank |
| contact_person | Contact person name |
| contact_email | Email for possible problem cases and contacting |
| contact_phone_number | Phone number for the contact person |
| authorization_email | Email for sending the request to sign the electronic agreement. If left blank, email is not sent |
| accountable_party | “vfsfi” (default) or “company”. If set as “vfsfi” Visma Financial’s account details are used. If “company”, company’s own account details are used (note! only allowed for certain vendors) |
| service_type | “full” receivables management service or Reskontravahti Auto (default). “express” Reskontravahti Express service |
| customer_service_email | This email will be shown on the factoring clause that Visma Amili will add to the invoices routed through them |
| customer_service_phone_number | This phone number will be shown on the factoring clause that Visma Amili will add to the invoices routed through them |
| billing_address | Billing address for possible service costs related to the debt collection processes in the later phase. Price list |
| postal_address | Company’s postal address |
When agreement is signed and verified by Visma Amili the service gets activated. This happens usually within 1-2 workdays. Note! If you have consumer invoicing enabled you will need to add Visma Financial Solution’s provided IBAN to your sender agreements (SI-messages). You will get the IBAN as a response parameter from the GET /v2/services/amili/receivables call. Read more How to handle Finnish consumer invoicing.
Use GET /v2/services/amili/receivables to fetch the status of the activation to see when the service is activated. Or register a webhook to get a request from Maventa when the service gets activated (or rejected).
Receivables Management service can also be activated through our user interface.
If you have the Finnish consumer invoicing enabled on your company’s account, there is an important change you will need to do before this Receivables Management service can be used with e-invoicing to netbanks. There will be a 5 days delay to do the needed changes. During these 5 days all the consumer e-invoices will still go directly to the banks instead of going through the Receivables Management. After the delay the consumer e-invoices are also routed through receivables Management like all the other invoices. This change will enable consumer e-invoices to be sent to your consumers with the Visma Amili’s IBAN information.
You will need to update your consumer agreements (SI-messages) by adding Visma Amili provided IBAN to them and to change the SellerInvoiceIdentifierType (type of the identifier asked from the consumer in their netbank when adding the seller as their invoicer).
You will need to send CHANGE type sender info messages SI-messages to each bank you have the agreement with and do the following changes:
In the SI-message you will need to add Visma Amili’s provided IBAN number as a new seller account (note! we do not recommend overriding the existing seller account information but instead just add that as a new one).
Addition to adding a new seller account number you need to change the SellerInvoiceIdentifierType if you are currently using either type 01 (national reference number) or 02 (international RF creditor reference). SellerInvoiceIdentifierType defines the type of the identifier the consumer is asked to fill in when they add the seller as their invoicer in their netbank, and with which the invoicer can identify the payer in its system.
Some banks have automated routines to check the seller from the invoice based on the reference number, IBAN and beneficiary name (under EpiBeneficiaryPartyDetails) used and make suggestions for consumers to add as their invoicer. In the case of the Receivables service, the IBAN and beneficiary name used on the invoices belongs to Visma Amili and in that case the consumer might end up actually making the consumer agreement with Visma Amili instead of the actual sender company. Reference numbers are also a bit problematic identifiers because the reference number sent from the ERP is not the same as what the receiver gets and what they would fill in in their netbank. Reference numbers are changed by Visma Amili on the transit. If reference number is used to link new consumer agreements in your ERP’s consumer register you need to check the reference number used by Visma Amili from the assignment details using GET /v1/assignments/{assignment_id} method from the “reference_ids” parameter, value for the type “number”. And then connect that reference number to your register. if you still want to keep using the reference number as the identifier and want to do the connection between your reference number and reference number used by Visma Amili you can switch using SellerInvoiceIdentifierType 08 (other numeric identifier), 09 (other alphanumeric identifier) or 99 (other identifier). These types of identifiers banks do not have any checking routines. In the instructions on the sender info (SellerInvoiceIdentifierText) you can still advise the consumer to give the reference number (“Please give the reference number of your latest invoice”).
Easiest solution would be to switch to using something else than reference numbers as identifiers. Good alternative is customer number.
If there is a functionality to create and send the SI-messages directly from your ERP you can most likely do the change easily through that. If you are unsure if there is such functionality in your ERP or you don’t know how to use it contact your ERP support team. After the messages are created they can be sent through our UI or via the API. More information about SI-messages and a link to message_send method to use for sending.
There is also a possibility for senders to use their own invoice image and payment details on the invoices sent through the Receivables service. When this setting is enabled payment details in invoices will not be modified by Visma Amili and Maventa will not drop the original invoice image and create a new one as it would happen in the default process of how the service normally works.
When a company’s own payment details are used on invoices, receivers will pay the invoice directly to the company’s own account. Therefore all the payments need to be informed to Visma Amili as direct payments for them to be able to update the assignments accordingly (mark assignment as paid and closed). This means that in order to use this setting the company’s ERP needs to have the full Receivables integration including an automated process for informing direct payments through the API (See Handling payments under the events).
In the service activation there is a parameter called accountable_party which defines who is the receiver for the payments. By default the value is set as “vfsfi” which means that Visma Amili is the one receiving the payments. This is the default process where invoice details are modified by the service. If accountable_party is left empty or not defined at all, the default value is used.
By setting the accountable_party as “company”, invoices are sent to the receivers with the sender’s own payment details and invoice image. Sender will be the receiver of the payments and payments must be informed as direct payments to Visma Amili through the Receivables API.
Use of own invoice image and payment details can also be enabled afterwards using a PATCH /v2/services/amili/receivables endpoint by setting the accountable_party to company”.
As it is crucial to report all the payments (expect the ones coming from a payer with the name VISMA AMILI or part of the name (old VISMA FINANC)) as direct payment through the API, the use of the above mentioned parameter is only allowed for predefined ERPs (vendor keys) that have been verified to have a proper automated solution for handling the direct payments through the API. If you as an integrator wish to use this setting, please contact our support team (support@maventa.com) to verify your integration and to add your key as allowed one. Also note when handling the payments, all the payments where payer’s name is/is starting with “VISMA AMILI” should not be reported as direct payments as they are reminder or payment demand payments and Visma Amili will in these cases mark the assignment as paid/partially paid.
If you want to change company information, you will need to contact our support. Currently it is not possible to do via the API.
If there is a need to limit the debt collection of a certain customer (company), that can be done by adding the customer to a VIP or PREMIUM customer group. Please note that the default model is the most effective option in terms of cash flow and does not require any actions from the user. Adding customers to the service level groups will tranfer the responsibility for monitoring the assignment, preventing expiration of the assignment etc. to the user. In some cases using service level groups might create additional costs for the sender. The grouping feature works based on the customer’s business ID - please make sure that the customer’s information has the correct business ID and that the ID is also given corrently on the invoice XML when sending. If you have added the customer to a group, but you decide you want to continue collecting invoices - simply remove the customer’s business ID from the customer group listing.
Please note that the debt collection does not continue on cases that have been closed in the process earlier even if the customer group is updated.
Service level can be set using the PATCH /v1/service_levels/{customer_bid}
On assignment there is a parameter called service_level. In case the customer in question is either on the PREMIUM or VIP service level group, that parameter will return the information accordingly. If customer is not on the VIP or the PREMIUM group, the parameter will be “default”. There will also be an event added for the assignment, called service_level_changed that will indicate the service level if it is either VIP or PREMIUM. Note! service_level information does not get updated immediately after the invoice is sent and assignment is created. It will get updated after a few hours from the sent.
The default payment monitoring process is pictured below. This is the most effective option in terms of your cash flow and requires no action from you.

A payment reminder and a demand for payment are sent for an overdue invoice, after which the collection of the invoice ends 30 days after the due date of the demand for payment. After this, the responsibility for monitoring the receivable, preventing expiration of the receivable etc. is transferred to your own responsibility. If the customer has not paid the open receivable in full, you will be charged 30€+VAT.

Only a payment reminder will be sent for an overdue invoice. The payment reminder has no reminder fee for your customer. The collection of the invoice ends 30 days after the due date of the payment reminder and the case will be closed. After this, the responsibility for monitoring the receivable, preventing expiration of the receivable etc. is transferred to your own responsibility. You will be charged 5€+VAT for each payment reminder sent

If you do not want to transfer a specific customer’s invoices to Receivables management service payment monitoring at all, add the customer’s business ID below. The information on these invoices will not be transferred to Visma Amili. Please note that your own account number will be printed on these invoices and you must take care of the processing of the payments, the control of the receivables, preventing expiration of the receivable etc. yourself. There are no additional costs for you.
From all the invoices sent through the Receivables Management service an assignment is created. Assignment is something through which the company can follow up the process on the Visma Amili side and if the invoice gets paid on time by the debitor (receiver). Assignment is also used for all the communication between the sender company and Visma Amili. To link the sent invoice and assignment together, there is parameters reference_ids and invoice_id in the assignment having the invoice uuid of the sent invoice. There are 3 different statuses the assingment can have:
| Parameter | Description |
|---|---|
| id | Assignment id |
| status | Open (unpaid) / closed (paid or cancelled) / partially_closed (Invoice is paid but not the reminder or collection charges) |
| collection_status | Tells the collection status of the assignment. Set based on event added by the agency. Values can be “unknown” (default value until reminder is sent/collection process starts), “reminder_sent”, “debt_collection”, “legal_collection”, “recovery_proceedings”, “debt_surveillance”, “lack_of_means”, “payment_plan” |
| service_level | default (normal process) / premium / vip |
| debtor | “name”: Name of customer (receiver of the invoice) and “bid”: customer’s bid |
| due_date | due date from the original invoice or new due date if due date change request is accepted (see Request a due date change event) |
| issued_at | Invoice date from the original invoice |
| number | Invoice number from the original invoice |
| sum | Total sum of the invoice |
| paid | Amount that is paid or credited |
| currency | Currency from the original invoice |
| created_at | When assignment was created |
| updated_at | When assignment was updated last time (e.g. when paid sum was updated) |
| partially_closed_at | When assignment was partially closed by Visma Amili |
| closed_at | When assignment was closed by Visma Amili |
| reference_ids | Contains three ids: “agency_id” = Visma Financial id, “invoice_id” = id of the original invoice (invoice uuid), “number” = New reference number that was changed to the original invoice |
[
  {
    "id": "fa9781ba-20d1-4677-a125-f04bff7bbac0",
    "status": "open",
    "collection_status": "unknown",
    "service_level": "default",
    "debtor": {
      "name": "Hanna's Test Company"
    },
    "due_date": "2020-04-20",
    "issued_at": "2020-04-01",
    "number": "64488",
    "sum": 12.3,
    "paid": 10,
    "currency": "EUR",
    "created_at": "2020-04-15T05:47:07Z",
    "partially_closed_at": null,
    "updated_at": "2020-04-15T21:01:18Z",
    "closed_at": null,
    "reference_ids": [
      {
        "type": "agency_id",
        "value": "078dbb88-ef8e-4115-8260-c8a542aaa87c"
      },
      {
        "type": "invoice_id",
        "value": "f6dcf18d-a1bd-4e72-bb8a-80908527b6c8"
      },
      {
        "type": "number",
        "value": "356241887794"
      }
    ],
    "events": [
      {
        "id": "c0c56722-a28b-49d1-aa87-1c4d7f3cf1af",
        "type": "paid",
        "data": {
          "sum_paid": 10,
          "booked_at": "2020-04-16",
          "archive_number": "12345"
        },
        "party_id": "938fc79f-9c00-47af-8507-cdf15838aa96",
        "seens": [
          {
            "seen_at": "2020-04-15T22:00:06Z",
            "seen_by": "Visma Amili FI"
          }
        ],
        "created_at": "2020-04-15T21:01:18Z",
        "happened_at": "2020-04-16T00:00:00Z"
      }
    ]
  }
]
REST API for assignment handling.
| collection_status | Events that sets the collection status |
|---|---|
| unknown | default value until reminder is sent or collection activities are started |
| reminder_sent | reminder_sent / second_reminder_sent |
| debt_collection | collection_started (first payment demand is sent) / second_demand_sent / tratta |
| legal_collection | legal_collection_started |
| recovery_proceedings | application_for_enforcement |
| debt_surveillance | credit_loss_suggestion (Note! credit_loss event does not change the collection status |
| lack_of_means | lack_of_means |
| payment_plan | payment_plan |
There is a possibility to create assignments manually for the Receivables service without sending an actual invoice to the receiver through Maventa.
This functionality comes especially handy for housing companies that usually send one invoice at the beginning of the year containing all the upcoming payments for that particular year for all their customers. And in order to follow up the monthly payments, they can create assignments for the service each month. In this way the Receivables service can take care of the payment monitoring and start reminder and collection processes automatically in case the due date has passed.
Adding assignments manually can be done with the POST /v1/invoices by setting the prevent_routing parameter to true. Setting the parameter true will mark the invoice immediately as SENT state without actually sending it anywhere, and creates an assignment to the Receivables service to be followed up as any other assignment.
For the call you will need a valid invoice XML with all the needed data including full receiver’s address details and due date that is in the future. The use of the prevent_routing parameter is only allowed for predefined ERPs (vendor keys). If you as an integrator wish to use this setting, please contact our support team (support@maventa.com) to verify your integration and to add your key as allowed one.
Note! remember to inform the payments for these manually created assginments as direct payments so that Visma Amili is up to date when the original invoice gets paid.
Creating assignments manually will have a debit action and it will be billed according to the existing price lists.
Parties connected to an assignment (company and Visma Amili) can add events to communicate changes to the assignment. Events describe what has happened to the assignment for example when the customer pays the invoice Visma Amili will add an Paid event to the assignment. Events can also be used to update assignment information from the sender side like requesting a new due date or inform direct payments. Events can be considered as a communication channel between Visma Amili and your company.
We highly advice to automate these events as far as it is possible from the ERP. At least paid and credit_note events for making sure these will be commnunicated always to the Visma Amili without needing to rely end user to remember to do these through our UI.
REST API for event handling.
comment - Add a comment or question. With this event you can add a comment or ask a question from Visma Amili related to the assignment in question. Visma Amili will also use this event for sending comments or questions to your company.
It is highly recommended to follow up closely these comment events. Good solutions would be to build some separate view to list only the comment events for a clear separation from all the other events. In this way you will ensure that senders will easily see if an assignment gets a question or a comment from Visma Amili that they might need to respond to somehow.
NOTE! There is a new improved messaging functionality available now to handle the communication better. More information from the messaging functionality
Both company and Visma Amili can send this event.
paid - This event is used for notifying when assignment gets paid by the customer, for informing direct payment and for marking credit note as used.
close event is added).
If the customer pays more than the invoice sum is the extra money is returned to the customer. So there is no way of paying more than one invoice at a time. Visma Amili won’t save the money to upcoming payments. In account statement (for example SEPA) all the payments done by Visma Amili have VISMA AMILI as a payer’s name abbreviation (name could be shorter or longer depending on bank). This information can be used to identify direct payments which will then have something else as payer’s name.comment event if you want to give some additional information related to the payment. If assignment is fully paid Visma Amili will close the assignment afterwards (close event is added). It is really important to use this event to inform the direct payments in order for Visma Amili to know to update the sum that is still open or to close the assignment. We highly advice to automate this event from the ERP when direct payments happens.credit_note event is used) credit note is also needed to be marked as used and that can be done using this event for the credit note and giving the paid sum as negative value. In this way Visma Amili will get the information to also mark the credit note as closed (close event is added). (When connecting a credit note to an assignment through our UI the credit note is marked automatically as used.)Paid event will update the parameter “paid” in the assignment. the assignment “sum” does not get updated.
  {
    "type": "paid",
    "data": {
      "sum_paid": 200.5,
      "booked_at": "2019-01-04",
      "archive_number": "12345"
    }
  }
Both company and Visma Amili can send this event.
close - This event is used by Visma Amili to mark the assignment as closed. Assignment gets closed when it is fully paid by the customer, marked as fully paid by the sender or if the sender wants to cancel the assignment.
Only Visma Amili can send this event.
partially_closed - This event is used by Visma Amili to mark the assignment as partially closed. This is used when invoice sum is fully paid but customer did not pay reminder or collection charges. This means that from the mandator’s perspective the assignment is closed, but the customer still needs to pay more money to the Visma Amili. When assignment gets this event it’s status changes to ‘partially_closed’.
When customer eventually pays the remining reminder or collection charges Visma Amili will add the close event and the assignment status changes to ‘Closed’
Only Visma Amili can send this event.
due_date_change_request - Request a due date change. If there is a need to update the due date of an assignment, you can request the change. Visma Financial Solution Oy will either accept or reject the request depending on the new due date and how far in the collection process the assignment already is. If the debt collection process has been started, due date change will be rejected. When a due date change request is accepted you will receive a confirmation event (due_date_changed event is added) about the acceptance and due date is updated accordingly for the assignment (parameter due_date gets a new value).
If request is rejected you will get a comment with the reason for the rejection (comment event is added).
Only company can send this event.
due_date_changed - This is an event that will be received when due date change request is approved by Visma Amili. This will update the assignment’s due date. Note! This won’t update the original invoice in question.
Only Visma Amili can send this event.
credit_note - You can connect a credit note to an assignment by giving the credit note number and credit sum with this event. This event is added for the assignment in question you want to connect the credit note to. Give the credit note sum as positive value in the request. If assignment is fully credited Visma Amili will close the assignment (close event is added). If the credit note is sent through Maventa you will also need to mark the credit note as used and connected by adding a paid event to the credit note assignment and give the paid sum as negative value. If the credit note is not sent through Maventa you should still use this event to inform Visma Amili for crediting the assignment so that they know to close the assignment, or if only part of the assignment is credited they will continue payment monitoring and possible debt collection process with a different sum.
If whole assignment is credited with the credit note:
Assignment gets credit_note event with credit sum given as positive value
Credit note gets paid event with paid sum as negative value
We highly advice to automate this event in the ERP side to always create credit_note event to an assignment when user creates credit notes in the ERP.
Only company can send this event.
cancel - You can cancel the whole receivable process for the assignment. Please note that this will close the assignment (close event is added) and the closing cannot be reversed or modified afterwards. Visma Amili will not monitor the assignment or take actions to collect the debt. Company is then responsible for monitoring the assignment. Do not use this for reporting a credit loss. Note! If reminder or collection actions have already been initiated, Visma Amili will charge the client a cancellation fee.
Only company can send this event.
freeze - You can request to suspend the debt collection process for the assignment in question until the specified date. Please note that once the suspension has been set, Visma Amili will not monitor the assignment or take actions to collect the debt. Company is then responsible for monitoring the assignment. The suspension can be requested until the legal collection has started or the enforcement authority has found the customer insolvant. The debt collection will automatically continue after the expiration date. You can request an update to the debt collection suspension expiration date by choosing a new date or you can end the suspension by setting today as the expiration date.
Set the parameter “frozen” to true
  {
    "type": "freeze",
    "data": {
      "frozen": true,
      "end_date": "2019-01-04"
    }
  }
Only company can send this event.
freeze_confirmed - This event is added by Visma Amili as a confirmation when the Temporary suspension of debt collection has been set to an assignment.
  {
    "type": "freeze_confirmed",
    "data": {
      "happened_at": "2019-01-04",
      "end_date": "2019-02-15"
    }
  }
Only Visma Amili can send this event.
unfreezed - The Temporary suspension of debt collection has been terminated and the debt collection of the assignment will continue.
  {
    "type": "unfreezed",
    "data": {
      "happened_at": "2019-01-04"
    }
  }
Only Visma Amili can send this event.
interest_paid - With this event Visma Amili will inform if there was interest paid for an assignment and what was the interest amount. This event is usually received at the same time than the paid event. Interest will be paid daily as one payment that contains all the interests from the same day. Message in the account statement is “Korkotilitys PVM”.
Interest in this matter is the one defined by the sender for their invoices if the receiver does not pay on time. Note! Interest needs to be defined on the invoice XML. It is not enough to have it only on the invoice image.
Only Visma Amili can send this event.
cash_discount - With this event Visma Amili informs if the customer used cash discount on the payment and how much was the cash discount amount.
paid sum + cash_discount sum = assignment’s sum
This event is usually received at the same time than the paid event.
Only Visma Amili can send this event.
reminder_sent - This event is added by Visma Amili when a first payment reminder has been sent of an unpaid invoice. This event will set the “collection_status” of an assignment to reminder_sent if it is not already set.
Only Visma Amili can send this event.
second_reminder_sent - This event is added by Visma Amili when a second payment reminder has been sent of an unpaid invoice. This event will set the “collection_status” of an assignment to reminder_sent if it is not already set.
Only Visma Amili can send this event.
collection_started - This event is added by Visma Amili when a first payment demand has been sent of an unpaid invoice. This event will set the “collection_status” of an assignment to debt_collection if it is not already set.
Only Visma Amili can send this event.
second_demand_sent - This event is added by Visma Amili when a second payment demand has been sent of an unpaid invoice. This event will set the “collection_status” of an assignment to debt_collection if it is not already set.
Only Visma Amili can send this event.
tratta_sent - A tratta has been sent of an unpaid invoice. This event will set the “collection_status” of an assignment to debt_collection if it is not already set.
Only Visma Amili can send this event.
legal_collection_started - A summons application has been sent and legal collection of the assignment has started. This event will set the “collection_status” of an assignment to legal_collection.
Only Visma Amili can send this event.
application_for_enforcement - An application for enforcement has been sent and the assignment has been transferred to the enforcement authority. This event will set the “collection_status” of an assignment to recovery_proceedings.
Only Visma Amili can send this event.
lack_of_means - The enforcement authority has found the debtor insolvent. This event will set the “collection_status” of an assignment to lack_of_means.
Only Visma Amili can send this event.
payment_plan - A payment plan has been agreed on the invoice. This event will set the “collection_status” of an assignment to payment_plan.
Only Visma Amili can send this event.
credit_loss_suggestion - A recommendation from Visma Amili to mark the assignment as credit loss. This event will set the “collection_status” of an assignment to debt_surveillance.
Only Visma Amili can send this event.
credit_loss - You can mark a credit loss on assignment in question. Reporting a credit loss is only done for the accounting purposes and has no impact on the payment control and monitoring. Visma Amili will continue the collection process. Visma Amili will suggest that the sender marks the assignment as credit loss if they know the customer won’t pay it. Note! After posting, the credit loss cannot be reversed or modified.
Only company can send this event.
service_level_changed - This event is created by Visma Amili if the customer of the invoice (receiver) is either on the VIP or PREMIUM service level group. If the service level group is changed, there will be a new event added. This event will set the “service_level” of an assignment to default / vip / premium based on the choosen service level group.
Only Visma Amili can send this event.
delivery_status - This event is mainly created for Visma Amili to follow up if the original invoice sending has been successful or if it has failed. This is the only way they can get the information. If the original invoice ends up in the error state and the sender does not act on it, and if the invoice remains in error state even when the invoice is due, Visma Amili closes the assignment and adds a comment about the closing reason to the assignment details.
As an ERP integrator this event might not bring any additional value in your implementation if you are already following up the statuses of sent invoices through the invoice APIs and communicating the errors to the user. In this case these events can be filtered out.
If you want to show these events for the users, there are few things to consider when implementing them:
Only Maventa can send this event.
Messaging functionality is used for the communication between Visma Amili and the customer. Customer can add a comment or question related to the assignments or Visma Amili can contact customer regarding some important information related to the assignments. It is highly recommended to add this functionality as part of the integration to make sure both parties have a functional discussion connection and important messages do not get lost.
REST API for message handling.
Receivables reporting tool has been designed to give customers a better insight into their receivables and collections activity. Reports can be downloaded for a selected date range (up to 365 days). Two report types are currently available:
Both reports are available in PDF and Excel formats, customers can choose the one that suits their needs, whether it’s for quick viewing or deeper data analysis.
We have done our own implementation for the Receivables API that serves our UI users. The UI is done for our embeddable user interface (EUI) and can therefore be taken easily into use as is and customize by any integrator. For more information about our EUI and how to take that into use can be found here
Dasboard of the receivables. You can show the whole EUI with the main top navigation bar (this way customers can access other parts of the EUI as well):
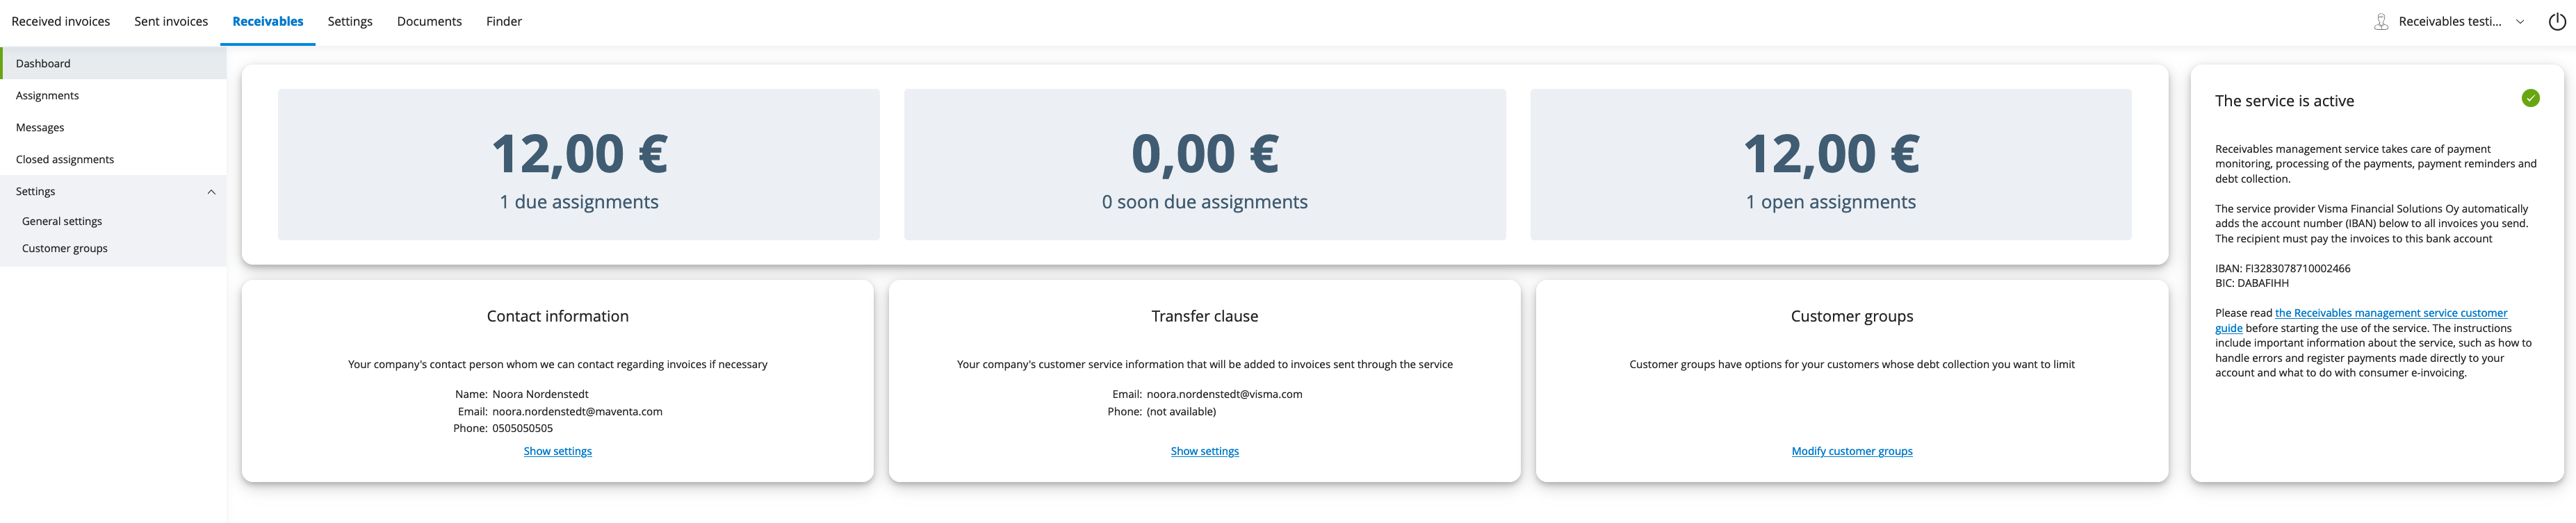
Listing of open assignments. You can also hide the main menu and only show the Receivables part of the EUI:
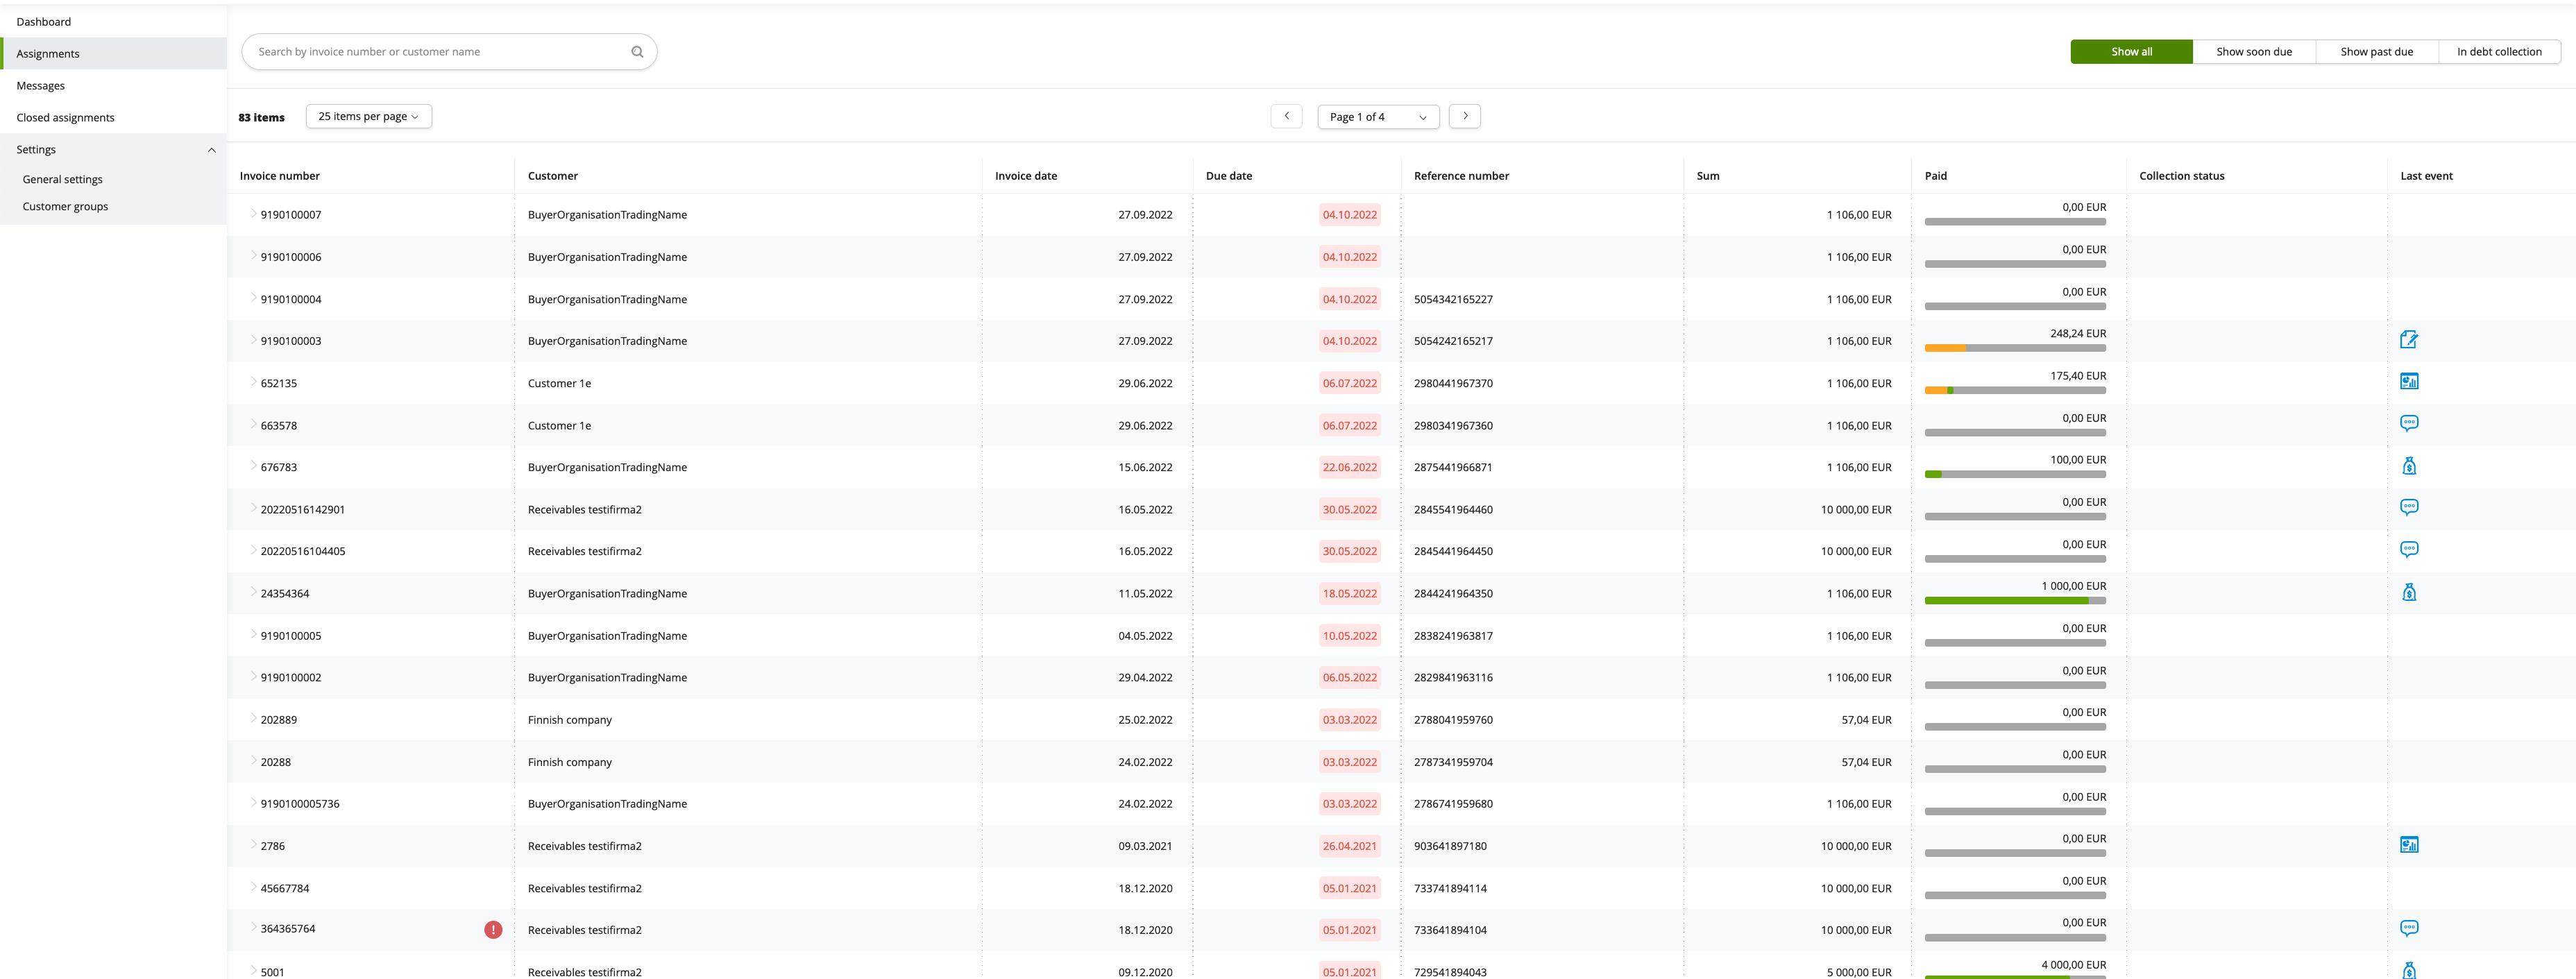
Details of one assignment. You can only show the details of only one assignment. This view could be part of the sent invoice details inside the ERP by providing easy and quick access to all the necessary information related to that particular invoice:
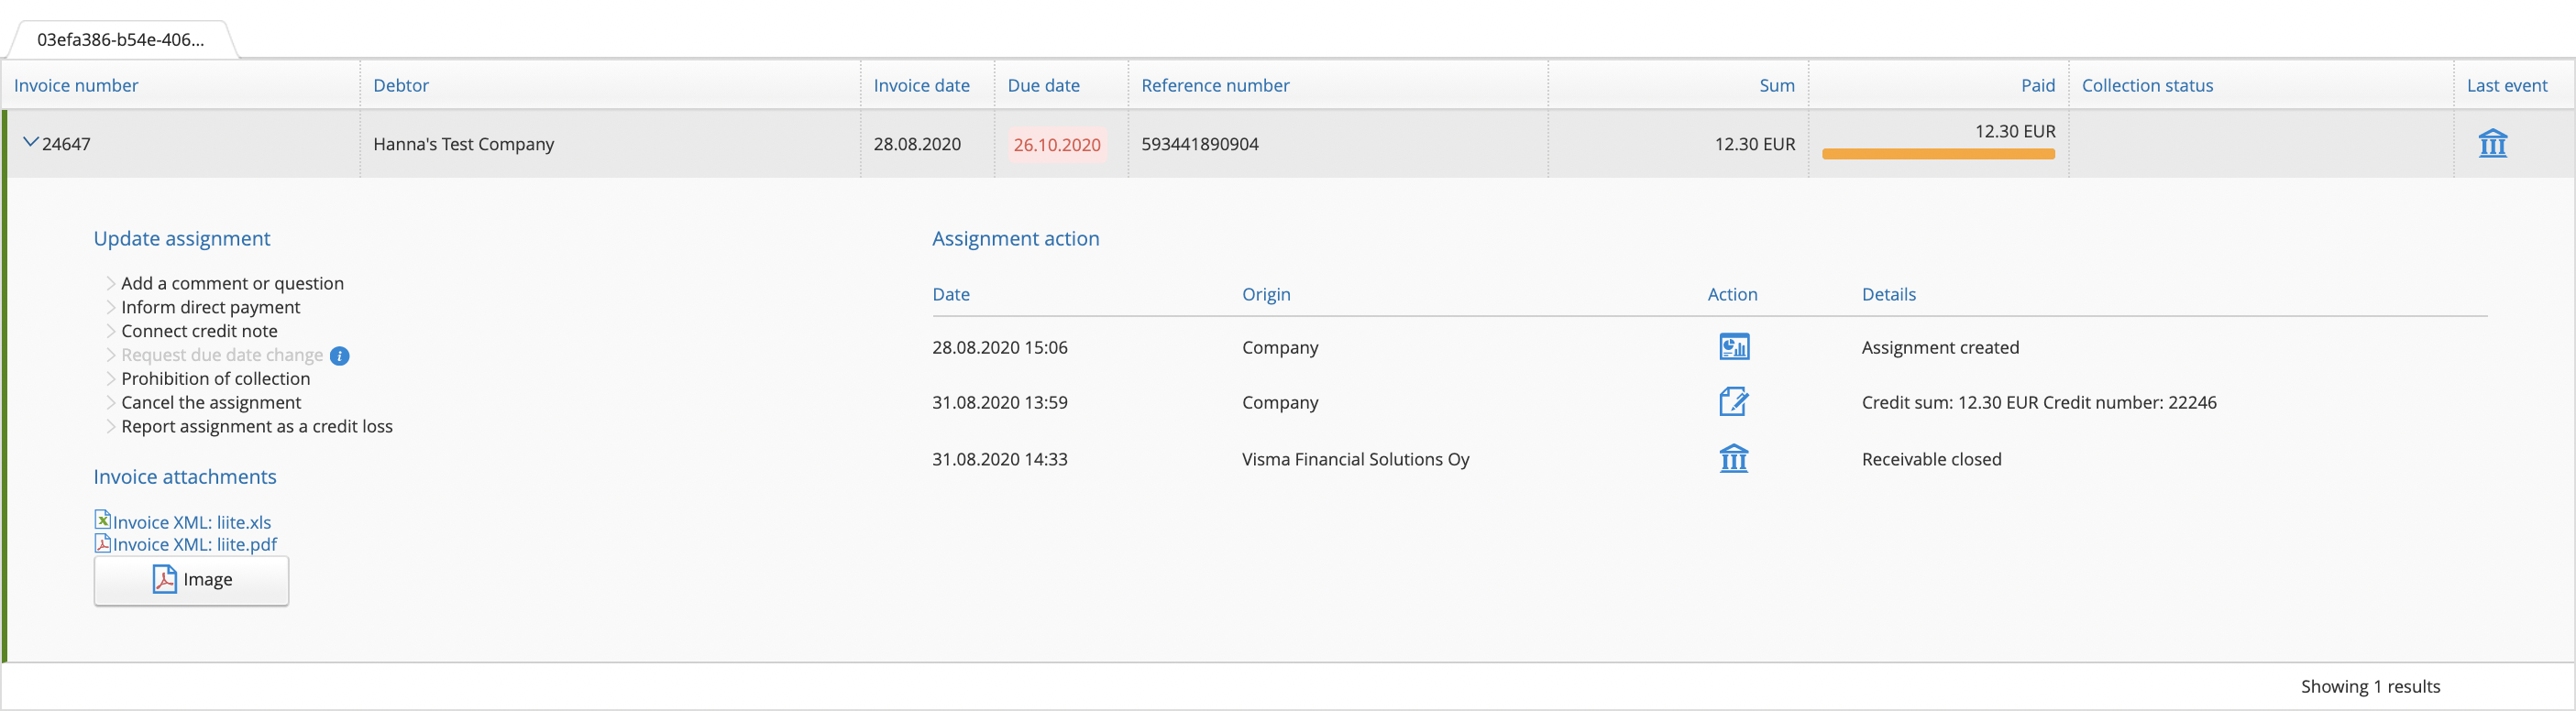
| Full API integration (all done inside the ERP) | Lightweight Integration | No API integration | |
|---|---|---|---|
| Activation | Through API using PUT and GET /v2/services/amili/receivables |
Full API integration / No API | Through the UI using our form |
| Consumer invoicing | ERP creates and sends automatically the SI CHANGE messages when service gets activated. The IBAN needed is in the response of GET /v2/services/amili/receivables. ERP handles the targeting of the new RI messages in case reference number is the connecting information: The reference number VFS used in the invoice can be found from the assignment details “reference_ids” and type “number” | Full API integration / No API | User creates SI CHANGE messages and then sends them through our UI. VFS IBAN is shown in the Receivables Settings page. User needs to then also somehow handle the targeting of new RI messages manually |
| Assignment listing | /v1/assignments, /v1/assignments/{assignment_id} and /v1/assignments/{assignment_id}/events. Assignments could be listed as their own view or then you could think of having the assignment information (and possibility to add event) shown under the invoice details. | Full API integration / No API | User uses our listing of assignments in our UI |
| Events | /v1/assignments, /v1/assignments/{assignment_id}, /v1/assignments/{assignment_id}/events and /v1/events. You should think a bit how much your users would like to follow up the receivables and which events do they want to see or being able to add themselves. Is it enough to see if there is something happening, for example a comment is added by VFS or if there has been a reminder sent for a customer that hasn’t paid on time? Should these events create some notification on the ERP side when arriving through the API? Adding of events to an assignment is something that should be fully integrated as part of the ERP processes. For example if direct payment comes in then paid event is automatically created from the ERP to the Receivables API. Also having some separate handling for comment events would be beneficial so that important comments or questions from VFS would not get lost and it would be easy for the user to reply | We highly advice to automate at least the events for direct payments (paid event) and connecting credit notes (credit_note event). Also the request to change a due date and then the confirmation for that (due_date_change_request, due_date_changed) |
User needs to handle all the events through our UI which migh in some cases mean double work. For example requesting a new due date might also then need them to do a change also on the ERP side. Informing of direct payments and connecting credit notes are then on the hands of the sender. These are something that are really important to remember to do so that VFS does not start collection process even though the customer has already paid the invoice |
When testing the Receivables integration in our stage environment, please note that the activation step does not work automatically. To complete the activation flow during testing, you’ll need to contact our support team (support@maventa.com), as it requires a manual configuration on Amili’s side. Once activated, the rest of the functionality can be tested as usual. This manual step is only necessary in the test environment—production handles activation automatically.
Service can be closed by calling DELETE /v2/services/amili/receivables or then by closing the service through the user interface. After the service is closed new invoices sent are not routed through Visma Amili anymore. Visma Amili will still handle the open assignments.
NOTE! Even though the user closes the service, it might still be necessary to allow the use of the APIs in order for the user to continue following up the remaining open assignments and to perform events if necessary.
Reopening the service needs manual handling and therefore being in contact with our support.
Reskontravahdin asiakasohje (in Finnish only)
Reskontravahti Express is a reminder and collection service provided by Visma Amili. It allows selected due invoices to be forwarded for reminder and collection process or directly to collection process. Only available for Finnish companies
Reskontravahti Express enables you to outsource the time-consuming tasks of sending reminders and managing the debt collection process to Visma Amili Oy. The service allows you to choose specific invoices for Visma Amili to handle. By using Reskontravahti Express, you can also monitor the progress of reminder and collection activities through our APIs (and UI).
The service is included in the Maventa service with no additional costs for using it. Only costs there might be are related to the debt collection process in later phases and if assignments are cancelled. Service contract and price list.
To open the Reskontravahti Express service use REST API method PUT /v2/services/amili/receivables to initiate the activation process. GET /v2/services/amili/receivables method is used to follow up when the service get activated.
To complete the activation process, a person authorized to act on behalf of the company must fill and sign an electronic agreement with Visma Amili. This authorization can be based on the individual’s position within the company or a provided power of attorney, which must be attached to the form if applicable. Personal online banking credentials or a Mobile ID are required to fill out the form. According to the Money Laundering Act, we must ensure that we know our customers and their activities.
The authentication and signing process is facilitated by our partner, Netvisor KYC.
There are two options for handling the Know Your Customer (KYC) part from the ERP:
By providing an email address in the “authorization_email” parameter, an email containing a link to the Netvisor KYC service is sent to the specified address. If the “authorization_email” parameter is left empty, no email will be sent
The GET /v2/services/amili/receivables method will return a link in “activation_url” parameter to the Netvisor KYC service. Customers can be guided there directly from the ERP. When displaying the link, it is advisable to keep the “authorization_email” parameter blank
Note! If the KYC process is not completed within a week, a reminder email with a link will be sent to the contact person’s email address.
| Parameter | Description |
|---|---|
| iban | Account information (IBAN) that Visma Amili will use when they pay the money they get from the customer. There can only be one account. |
| bic | Bank identification code e.g. DABAFIHH |
| bank | Name of your bank |
| contact_person | Contact person name |
| contact_email | Email for possible problem cases and contacting |
| contact_phone_number | Phone number for the contact person |
| authorization_email | Email for sending the request to sign the electronic agreement. If left blank, email is not sent |
| accountable_party | Should be set as “vfsfi” (default) or left out. Does not apply to Reskontravahti Express service |
| service_type | Service type needs to be set us “express”. if left empty it will use the default value “full” which means the full Receivables management service aka Reskontravahti Auto |
| customer_service_email | This email will be shown on the factoring clause that Visma Amili will add to the invoices routed through them |
| customer_service_phone_number | This phone number will be shown on the factoring clause that Visma Amili will add to the invoices routed through them |
| billing_address | Billing address for possible service costs related to the debt collection processes in the later phase. Price list |
| postal_address | Company’s postal address |
When agreement is signed and verified by Amili the service gets activated. This happens usually within 1-2 workdays.
Use GET /v2/services/amili/receivables to fetch the status of the activation to see when the service is activated. Or register a webhook to get a request from Maventa when the service gets activated (or rejected).
Reskontravahti Express can also be activated through our user interface.
Due invoice can be transferred to the Reskontravahti Express service via the following API methods:
Transfer invoice:
POST /v1/invoices/{id}/assignment
As an input you will need to provide the invoice id (uuid) for an over due invoice, and the preferred collection type
reminder_and_collection - transfer the invoice to a full reminder and debt collection process
collection - transfer invoice directly to the collection process as you have already handled the reminder sending yourself
Possible errors:
If the due date of the invoice is not in the past, the API returns the following error as only invoices having due date in past can be transferred to the Reskontravahti Express service:
Error: response status is 400
{
  "code": "invalid_parameters",
  "message": "Request parameters are invalid",
  "details": [
    "Invoice not expired"
  ]
}
See the status of the transfer:
GET /v1/invoices/{id}/assignment
Pending - Waiting for the transfer
Sent - Transfer successful and an assignment is created. Response will also contain a link to the newly created assignment
Error - Trasfer failed (Most common reason is invalid XML file, or missing receiver’s address details) Note! API does not return the error reason
When invoice due date is in past, a button to transfer invoice to Reskontravahti Express will appear on UI under the sent invoice details.
Only invoices with currency EUR are accepted.
Valid XML file. Service does not support the following invoice XMLs: OIOXML, WoodX, BGC, Axflow, Facturae, PX, UBL, Facturae.
Full receiver’s address information is given: If there is something missing from the receiver’s address details your invoice will not be successfully forwarded for the Reskontravahti Express service.
Duplicate invoice numbers are not allowed in most cases. Ensure that each invoice number is unique, avoiding any reuse. However, there are few exceptions to this rule:
Sum of lines must equal the total sum of the invoice
There is a possibility to transfer invoices, that have not been sent through Maventa, for the Reskontravahti Express service. This means adding an assignment manually to the service.
Adding assignments manually can be done with the POST /v1/invoices by setting the prevent_routing parameter to true. Setting the parameter true will mark the invoice immediately as SENT state without actually sending it anywhere. After the invoice is created, above mentioned Reskontravahti Express APIs can be used to transfer the invoice to the reminder and/or debt collection process.
Creating assignments manually will have a debit action and it will be billed according to the existing price lists.
When invoice is transferred to Reskontravahti Express service for reminder and collection process Visma Amili will send out the first reminder 10 days after the due date of the invoice for B2B invoices, and 14 days after due date for consumer invoices (B2C). In case invoice is transferred directly to the collection process, payment demand is the first thing to send out. See the detailed reminder and collection process from the dropdowns below.
Reminders and payment demands are always sent through the normal post (letters won’t be sent during weekends or public holidays which will then in some cases add few additional days to the schedule). Language of the reminders and debt collection letters is based on the customer’s language code defined in the original invoice (Finvoice InvoiceRecipientLanguageCode). Default language is Finnish.
Out of all the invoices transferred to Reskontravahti Express, an assignment is created. Assignment is something through which the company can follow up the process on the Visma Amili side. Assignment is also used for all the communication between the sender company and Visma Amili. To link the sent invoice and assignment together, there is parameters reference_ids and invoice_id in the assignment having the invoice uuid of the sent invoice. There are 3 different statuses the assingment can have:
| Parameter | Description |
|---|---|
| id | Assignment id |
| status | Open (unpaid) / closed (paid or cancelled) / partially_closed (Invoice is paid but not the reminder or collection charges) |
| collection_status | Tells the collection status of the assignment. Set based on event added by the agency. Values can be “unknown” (default value until reminder is sent/collection process starts), “reminder_sent”, “debt_collection”, “legal_collection”, “recovery_proceedings”, “debt_surveillance”, “lack_of_means”, “payment_plan” |
| service_level | default (normal process) / premium / vip, Note! Does not apply to Reskontravahti Express |
| debtor | “name”: Name of customer (receiver of the invoice) and “bid”: customer’s bid |
| due_date | due date from the original invoice |
| issued_at | Invoice date from the original invoice |
| number | Invoice number from the original invoice |
| sum | Total sum of the invoice |
| paid | Amount that is paid or credited |
| currency | Currency from the original invoice |
| created_at | When assignment was created |
| updated_at | When assignment was updated last time (e.g. when paid sum was updated) |
| partially_closed_at | When assignment was partially closed by Amili |
| closed_at | When assignment was closed by Amili |
| reference_ids | Contains three ids: “agency_id” = Visma Amili id, “invoice_id” = id of the original invoice (invoice uuid), “number” = Reference number from the original invoice |
[
  {
    "id": "fa9781ba-20d1-4677-a125-f04bff7bbac0",
    "status": "open",
    "collection_status": "reminder_sent",
    "service_level": "default",
    "debtor": {
      "name": "Test receiver Oy"
    },
    "due_date": "2020-04-20",
    "issued_at": "2020-04-01",
    "number": "64488",
    "sum": 12.3,
    "paid": 10,
    "currency": "EUR",
    "created_at": "2020-04-15T05:47:07Z",
    "partially_closed_at": null,
    "updated_at": "2020-04-15T21:01:18Z",
    "closed_at": null,
    "reference_ids": [
      {
        "type": "agency_id",
        "value": "078dbb88-ef8e-4115-8260-c8a542aaa87c"
      },
      {
        "type": "invoice_id",
        "value": "f6dcf18d-a1bd-4e72-bb8a-80908527b6c8"
      },
      {
        "type": "number",
        "value": "356241887794"
      }
    ],
    "events": [
      {
        "id": "c0c56722-a28b-49d1-aa87-1c4d7f3cf1af",
        "type": "paid",
        "data": {
          "sum_paid": 10,
          "booked_at": "2020-04-16",
          "archive_number": "12345"
        },
        "party_id": "938fc79f-9c00-47af-8507-cdf15838aa96",
        "seens": [
          {
            "seen_at": "2020-04-15T22:00:06Z",
            "seen_by": "Amili Oy FI"
          }
        ],
        "created_at": "2020-04-15T21:01:18Z",
        "happened_at": "2020-04-16T00:00:00Z"
      }
    ]
  }
]
REST API for assignment handling.
| collection_status | Events that sets the collection status |
|---|---|
| unknown | default value until reminder is sent or collection activities are started |
| reminder_sent | reminder_sent / second_reminder_sent |
| debt_collection | collection_started (first payment demand is sent) / second_demand_sent / tratta |
| legal_collection | legal_collection_started |
| recovery_proceedings | application_for_enforcement |
| debt_surveillance | credit_loss_suggestion Note! credit_loss event does not change the collection status |
| lack_of_means | lack_of_means |
| payment_plan | payment_plan |
Parties connected to an assignment (sender company and Visma Amili) can add events to communicate changes to the assignment. Events describe what has happened to the assignment for example when the remainder is paid Visma Amili will add an Paid event to the assignment. Events can also be used to update assignment information from the sender side like informing direct payments. Events can be considered as a communication channel between Visma Amili and sender company.
We highly advice to automate these events as far as it is possible from the ERP. At least paid and credit_note events for making sure these will be commnunicated always to the Visma Amili without needing to rely end user to remember to do these through our UI.
REST API for event handling.
comment - Add a comment or question. With this event you can add a comment or ask a question from Visma Amili related to the assignment in question. Amili will also use this event for sending comments or questions to your company.
NOTE! There is a new improved messaging functionality available now to handle the communication better. More information from the message functionality
Both company and Visma Amili can send this event.
paid - This event is used for notifying when assignment gets paid by the customer, for informing direct payment and for marking credit note as used.
close event is added).
If the customer pays more than the invoice sum is the extra money is returned to the customer. So there is no way of paying more than one invoice at a time. Amili Oy won’t save the money to upcoming payments. In account statement (for example SEPA) all the payments done by Amili Oy have VISMA AMILI as a payer’s name abbreviation (name could be shorter or longer depending on bank). This information can be used to identify direct payments which will then have something else as payer’s name.comment event if you want to give some additional information related to the payment. If assignment is fully paid Amili Oy will close the assignment afterwards (close event is added). It is really important to use this event to inform the direct payments in order for Amili Oy to know to update the sum that is still open or to close the assignment. We highly advice to automate this event from the ERP when direct payments happens.credit_note event is used) credit note is also needed to be marked as used and that can be done using this event for the credit note and giving the paid sum as negative value. In this way Amili Oy will get the information to also mark the credit note as closed (close event is added). (When connecting a credit note to an assignment through our UI the credit note is marked automatically as used.)Paid event will update the parameter “paid” in the assignment. the assignment “sum” does not get updated.
  {
    "type": "paid",
    "data": {
      "sum_paid": 200.5,
      "booked_at": "2019-01-04",
      "archive_number": "12345"
    }
  }
Both company and Visma Amili can send this event.
close - This event is used by Amili Oy to mark the assignment as closed. Assignment gets closed when it is fully paid by the customer, marked as fully paid by the sender or if the sender has cancelled the assignment.
Only Visma Amili can send this event.
partially_closed - This event is used by Amili Oy to mark the assignment as partially closed. This is used when invoice sum is fully paid but customer did not pay reminder or collection charges. This means that from the mandator’s perspective the assignment is closed, but the customer still needs to pay more money to the Amili Oy. When assignment gets this event it’s status changes to ‘partially_closed’.
When customer eventually pays the remining reminder or collection charges Amili Oy will add the close event and the assignment status changes to ‘Closed’
Only Visma Amili can send this event.
credit_note - You can connect a credit note to an assignment by giving the credit note number and credit sum with this event. This event is added for the assignment in question you want to connect the credit note to. Give the credit note sum as positive value in the request. If assignment is fully credited Amili Oy will close the assignment (close event is added). If the credit note is sent through Maventa you will also need to mark the credit note as used and connected by adding a paid event to the credit note assignment and give the paid sum as negative value. If the credit note is not sent through Maventa you should still use this event to inform Amili Oy for crediting the assignment so that they know to close the assignment, or if only part of the assignment is credited they will continue payment monitoring and possible debt collection process with a different sum.
If whole assignment is credited with the credit note:
Assignment gets credit_note event with credit sum given as positive value
Credit note gets paid event with paid sum as negative value
We highly advice to automate this event in the ERP side to always create credit_note event to an assignment when user creates credit notes in the ERP.
Only company can send this event.
cancel - You can cancel the whole receivable process for the assignment. Please note that this will close the assignment (close event is added) and the closing cannot be reversed or modified afterwards. Amili Oy will not monitor the assignment or take actions to collect the debt. Company is then responsible for monitoring the assignment. Do not use this for reporting a credit loss. Note! If reminder or collection actions have already been initiated, Amili Oy will charge the client a cancellation fee.
Only company can send this event.
freeze - You can request to suspend the debt collection process for the assignment in question until the specified date. Please note that once the suspension has been set, Amili Oy will not monitor the assignment or take actions to collect the debt. Company is then responsible for monitoring the assignment. The suspension can be requested until the legal collection has started or the enforcement authority has found the customer insolvant. The debt collection will automatically continue after the expiration date. You can request an update to the debt collection suspension expiration date by choosing a new date or you can end the suspension by setting today as the expiration date.
Set the parameter “frozen” to true
  {
    "type": "freeze",
    "data": {
      "frozen": true,
      "end_date": "2019-01-04"
    }
  }
Only company can send this event.
freeze_confirmed - This event is added by Amili Oy as a confirmation when the Temporary suspension of debt collection has been set to an assignment.
  {
    "type": "freeze_confirmed",
    "data": {
      "happened_at": "2019-01-04",
      "end_date": "2019-02-15"
    }
  }
Only Visma Amili can send this event.
unfreezed - The Temporary suspension of debt collection has been terminated and the debt collection of the assignment will continue.
  {
    "type": "unfreezed",
    "data": {
      "happened_at": "2019-01-04"
    }
  }
Only Visma Amili can send this event.
interest_paid - With this event Visma Amili will inform if there was interest paid for an assignment and what was the interest amount. This event is usually received at the same time than the paid event. Interest will be paid daily as one payment that contains all the interests from the same day. Message in the account statement is “Korkotilitys PVM”.
Interest in this matter is the one defined by the sender for their invoices if the receiver does not pay on time. Note! Interest needs to be defined on the invoice XML. It is not enough to have it only on the invoice image.
Only Visma Amili can send this event.
cash_discount - With this event Amili Oy informs if the customer used cash discount on the payment and how much was the cash discount amount.
paid sum + cash_discount sum = assignment’s sum
This event is usually received at the same time than the paid event.
Only Visma Amili can send this event.
reminder_sent - This event is added by Amili Oy when a first payment reminder has been sent of an unpaid invoice. This event will set the “collection_status” of an assignment to reminder_sent if it is not already set.
Only Visma Amili can send this event.
second_reminder_sent - This event is added by Amili Oy when a second payment reminder has been sent of an unpaid invoice. This event will set the “collection_status” of an assignment to reminder_sent if it is not already set.
Only visma Amili can send this event.
collection_started - This event is added by Amili Oy when a first payment demand has been sent of an unpaid invoice. This event will set the “collection_status” of an assignment to debt_collection if it is not already set.
Only Visma Amili can send this event.
second_demand_sent - This event is added by Amili Oy when a second payment demand has been sent of an unpaid invoice. This event will set the “collection_status” of an assignment to debt_collection if it is not already set.
Only Visma Amili can send this event.
tratta_sent - A tratta has been sent of an unpaid invoice. This event will set the “collection_status” of an assignment to debt_collection if it is not already set.
Only Visma Amili can send this event.
legal_collection_started - A summons application has been sent and legal collection of the assignment has started. This event will set the “collection_status” of an assignment to legal_collection.
Only Visma Amili can send this event.
application_for_enforcement - An application for enforcement has been sent and the assignment has been transferred to the enforcement authority. This event will set the “collection_status” of an assignment to recovery_proceedings.
Only Visma Amili can send this event.
lack_of_means - The enforcement authority has found the debtor insolvent. This event will set the “collection_status” of an assignment to lack_of_means.
Only Visma Amili can send this event.
payment_plan - A payment plan has been agreed on the invoice. This event will set the “collection_status” of an assignment to payment_plan.
Only Visma Amili can send this event.
credit_loss_suggestion - A recommendation from Amili Oy to mark the assignment as credit loss. This event will set the “collection_status” of an assignment to debt_surveillance.
Only Visma Amili can send this event.
credit_loss - You can mark a credit loss on assignment in question. Reporting a credit loss is only done for the accounting purposes and has no impact on the payment control and monitoring. Amili Oy will continue the collection process. Amili Oy will suggest that the sender marks the assignment as credit loss if they know the customer won’t pay it. Note! After posting, the credit loss cannot be reversed or modified.
Only company can send this event.
Following events exists but are not applicable when using the Reskontravahti Express service. Useful when Reskontravahti Auto is in use.
delivery_status
service_level_changed - This event is created by Amili Oy if the customer of the invoice (receiver) is either on the VIP or PREMIUM service level group. If the service level group is changed, there will be a new event added. This event will set the “service_level” of an assignment to default / vip / premium based on the choosen service level group. Service levels are working with the Reskontravahti Express service, but there is really no need to use them.
due_date_changed - This is an event that will be received when due date change request is approved by Amili Oy. This will update the assignment’s due date. Note! This won’t update the original invoice in question.
due_date_change_request - Request a due date change. If there is a need to update the due date of an assignment, you can request the change. Visma Financial Solution Oy will either accept or reject the request depending on the new due date and how far in the collection process the assignment already is. If the debt collection process has been started, due date change will be rejected. When a due date change request is accepted you will receive a confirmation event (due_date_changed event is added) about the acceptance and due date is updated accordingly for the assignment (parameter due_date gets a new value).
Receivables reporting tool has been designed to give customers a better insight into their receivables and collections activity. Reports can be downloaded for a selected date range (up to 365 days). Two report types are currently available:
Both reports are available in PDF and Excel formats, customers can choose the one that suits their needs, whether it’s for quick viewing or deeper data analysis.
Messaging functionality is used for the communication between Visma Amili and the customer. Customer can add a comment or question related to the assignments or Visma Amili can contact customer regarding some important information related to the assignments. It is highly recommended to add this functionality as part of the integration to make sure both parties have a functional discussion connection and important messages do not get lost.
REST API for message handling.
When testing the Reskontravahti Express integration in our stage environment, please note that the activation step does not work automatically. To complete the activation flow during testing, you’ll need to contact our support team (support@maventa.com), as it requires a manual configuration on Amili’s side. Once activated, the rest of the functionality can be tested as usual. This manual step is only necessary in the test environment, production handles activation automatically.
Reskontravahti Express can be closed by calling DELETE /v2/services/amili/receivables or then by closing the service through the user interface. Visma Amili will still handle the open assignments.
NOTE! Even though the user closes the service, it might still be necessary to allow the use of the APIs in order for the user to continue following up the remaining open assignments and to perform events if necessary.
Reopening the service needs manual handling and therefore contact with our support.
Reskontravahdin asiakasohje (in Finnish only)
Use scanning service to receive PDF and print invoices in electronic format. Open scan accounts where suppliers can send print and PDF invoices. The invoices are scanned and then delivered to the companies as electronic invoices.
When e-invoicing isn’t an option, scanning solutions can help automate invoice delivery and processing.
With Maventa’s scanning solutions, you can easily receive all invoices through a single pipeline. Additionally, you can enable extra features such as Detect, fraud checks, and reports identifying suppliers who could send e-invoices.
For data interpretation, Maventa works with several third-party service providers. Currently, our offering includes Scan Network (default scanning service), AutoScan (a fully automated solution using machine learning to interpret invoice data), the Visma Scanner mobile app (to be deprecated by the end of 2026), and the DocScan web application.
Available services may vary depending on your company’s country.
The scanning service receives invoices either as PDF (by email) or as paper invoices, which are scanned into PDF. An Optical Character Recognition (OCR) system is used to interpret keywords from the invoices.
After the OCR interpretation and validation, all invoices are checked in an extra quality control. If the program finds any deviation, the invoices will be manually checked one more time.
The interpreted invoice file, along with the original or flattened PDF invoice, is delivered to recipient’s Maventa account, from where the recipient’s ERP can fetch them. It is important that the recipient always checks the accuracy of scanned invoices.
| Field | Source | Validation | Comments |
|---|---|---|---|
| Invoice number | Scanned | ||
| Invoice date | Scanned | Valid date, not too old | |
| Invoice due date | Scanned | Valid date, not too old, not too far into the future | |
| Currency | Scanned | Valid currency | |
| Supplier Organisation number OR Supplier VAT number | Scanned | Valid format and modulus |
NO: Organisation number (for foreign suppliers VAT number is used in the OrgNumber field) SE: Organisation number and VAT number NL: KvK number and VAT number DK: CVR number FI: Organisation number (y-tunnus) and VAT number |
| Supplier name | Searched from a list of companies | Searched from a list by organisation number. Not first time when invoice is passed, second time automatic.If name of the company can’t be found by search, organisation number will be shown as the name. If organisation number cannot be interpreted invoice will be passed with UNKNOWN_VENDOR as the supplier name. | |
| Buyer Organisation number | Email address / Scanned | When an invoice is sent to scan service by email, the email address contains organisation number. For a paper invoice, organisation number is intepreted from the scan. If no organisation number or scan id (serial number) can be found, buyer's name will be used to find organisation number. | |
| Gross amount (including VAT) | Scanned | Gross amount should agree with VAT amount | |
| Net amount (excluding VAT) | Calculated by Scan service | Calculated: Gross amount - VAT amount | |
| VAT amount | Scanned | Gross amount should agree with VAT amount | |
| VAT percent | Calculated by Scan service | Calculated from Gross amount and VAT amount, and delivered without decimals.If there are products with different VAT percents on the invoice, the calculated VAT percent will be somewhere between the actual VAT percents. If there is a rounding amount on the invoice, it is not taken into account when calculating the VAT percent. | |
| Invoice identification (debit/credit) | Reminders and other documents that are not invoices or credit notes are sent from Scan service to customers by email. | ||
| Supplier IBAN number OR Supplier account number | Scanned | Modulus checked for account numberValid IBAN |
NO: Account number, for foreign suppliers IBAN number is used in the AccountNumber field. SE: Account number (bank giro or post giro), for foreign suppliers IBAN number is used in the AccountNumber field NL: IBAN number DK: Both Account number and IBAN. If the account number is missing from the invoice, the last part of the FIK code is used. FI: IBAN number |
| Payment reference or reference number / OCR number | Scanned | Modulus checked |
NO: KID SE: OCR number NL: Nothing DK: FIK code, all the numbers and signs FI: Viitenumero |
| Reference name/number | Scanned |
DK: Their reference and order number FI: Text in "Viitteenne" field SE: Reference name/number NO,NL: - |
|
| Number of pages |
The scan account can be opened over the API or through the UI invoice receiving page.
SOAP API: scan_account_order
REST API: POST/v1/services/scan
Before opening the scan account for a company, make sure company has the receiving setting turned on. Company must complete the customer authentication process to enable the receiving of invoices. Scanned invoices from the scanning service are delivered to the Maventa customer like any other incoming e-invoice and for this reason the invoice receiving must be on to enable scanning.
When opening the scanning service, the customer needs to provide a return e-mail address where all other material than invoices are delivered by the scanning service. The return email address is available in Finland, Sweden, Norway and Denmark, but not in the Netherlands.
The scan account can be updated over the API or through the UI invoice receiving page.
SOAP API: scan_account_order
REST API: PUT/v1/services/scan
Company informs their suppliers about their scan address they have received when service is activated. Scan address contains the company’s scan ID number that is used to identify the recipient.
There are two ways suppliers can send invoices to the scanning service to be scanned; by e-mail or by post.
Finland, Sweden, Norway, Denmark and Netherlands
Requirements for sending
Finland
Scan service identifies the recipient using following information found from the invoice image if invoice is sent by post:
Sweden
Scan service identifies the recipient using the FeAddress (Postal scan address) and company name on the envelope
| Finland | Sweden | Norway | Denmark | Netherlands | Belgium | |
|---|---|---|---|---|---|---|
| Scan ID | company business ID | company business ID | company business ID | CVR number |
VAT number or KvK number |
company business ID |
| Email scan address |
invoice-BID@kollektor.fi e-mail address without “-“ in business identity code (e.g. invoice-12345678@kollektor.fi) |
BID@autoinvoice.se | BID@autoinvoice.no | CVRnumber@autoinvoice.dk |
KvKnumber@autoinvoice.nl or VATnumber@autoinvoice.nl Depending which one was used when the company was registered to Maventa |
BE-ENnumber@scan.maventa.com |
| Postal scan address |
Company name Scan ID PL 100 80020 Kollektor |
Company name AISEXXXX Scancloud SE-831 90 ÖSTERSUND, Sweden *where XXXX is a customer number assigned to the company |
- | - | - | - |
Scan service delivers only invoices and credit notes electronically. When a customer opens the scan service they need to specify a scan return address that is used to deliver none invoice materials. Marketing materials are not delivered.
Delivered as e-invoices:
Delivered via e-mail:
Delivered via post:
Thrown away:
See your used price list for the relevant delivery prices.
End users can report interpretation errors by email to support@maventa.com. Support contacts the validation teams at scan service provider to use auto learning process, where interpretation is manually changed so that invoices are correctly interpreted the next time.
If there are problems on the invoice, users can also request rescanning.
Closing the service (disabling the scanning service) is done by calling API or via the UI’s invoice receiving page.
SOAP API: scan_account_disable
REST API: DELETE/v1/services/scan
After the scan account is closed in the Maventa, information is sent to the scanning service provider. When the account is fully closed the scan e-mail address stops working. If some party still sends material to it they will receive an automatic reply that the e-mail address is no longer in use.
Material sent by post will be scanned and delivered to the recipient by e-mail (to the return e-mail address) for the next 60 days and after that everything is destroyed. The scanning service does not inform the senders that their paper invoices were not delivered. When closing a scan account, the company should inform their suppliers about the way the company will receive invoices from them in the future.
AutoScan is a fully automated solution for receiving PDF invoices. Powered by machine learning technology, it interprets invoice data without manual verification or quality control. Compare to our scan networks, AutoScan is ideal for customers who prioritize quick delivery, place less emphasis on data verification and completeness, and are looking for a cost-effective scan solution.
AutoScan is currently available in our main market countries including Norway, Sweden, Demmark and the Netherlands. However, it is not yet available in Finland at the momemnt. Finnish companies interested in this feature can contact Maventa support for further information.
AutosSan can be opened via REST api method: PUT /v1/services/autoscan or the user interface.
Request Example:
{}
Response Example:
{
  "status": "active",
  "scan_email_address": "NO-987654321@autoscan.maventa.com",
  "features": {}
}
Once AutoScan is successfully opened, the customer will be provided with an AutoScan email address.
Format: countrycode-bid@autoscan.maventa.com Example: NO-987654321@autoscan.maventa.com
You can update an existing AutoScan account using the same REST API method: PUT /v1/services/autoscan or via the user interface.
To disable AutoScan, use the following API method: DELETE /v1/services/autoscan or via the user interface.
To ensure successful delivery, supplier should make sure:
If processing fails, an error email is sent to the email sender. Non-PDF emails and emails containing viruses are automatically discarded.
AutoScan interprets the following fields from invoices or credit notes:
AutoScan also provides a feature to interprete the invoice line level data such as: Item number, Product code, Unit, Unit price, VAT etc. This feature is currently in pilot mode. Integrators interested in enabling invoice line scanning can reach out to Maventa Support for more details.
Maventa has integration to Visma Scanner and DocScan scan applications. Visma Scanner is a mobile application for scanning and DocScan is a web application (Visma Home). Both applications can be used to forward invoices and vouchers and to get data interpreted from them into an accounting system.
Scanning is based on machines only, which means both products use machine learning based technology (SmartScan) for interpreting the data. Benefits of using Visma Scanner and DocScan are easy and quick usage combined with lower cost.
Visma Scanner and DocScan can be integrated directly to ERPs or accounting systems or the integration can work through Maventa.
Receiver company needs to have Maventa account and receiving activated. Sender needs to have Visma Scanner mobile app or use DocScan web app (from Visma Home).
Invoices delivered via Visma Scanner or DocScan can be downloaded as part of the regular invoice receiving flow. If receiver wishes to receive vouchers as well, it’s requered to register a separate network SCAN_DOCUMENTS with profile VOUCHER. In addition, accounting system needs to be able to download vouchers via Document Exchange
and handle the voucher xml.
Use Maventa Detect service to add more automation and safety into received invoice handling. Service runs different automated checks on company’s suppliers and purchase invoices based on which company can get useful notifications to support their invoice processing.
As a source the checks are using a variety of external registers, such as central business registers or warning lists, as well as data based on the broad invoice traffic in the Nordics.
With supplier activation feature, customers can get information about suppliers who have sent invoices through scan service, but could send the invoices electronically.
Maventa Connector is a simple Maventa client program for Windows. If your ERP does not have a direct Maventa integration but can create invoices as XML files, you can use Maventa Connector to send those invoices. More information available in Finnish at www.maventa.fi and our support portal.
You can find and download the installer and more information about the latest version here
Please also note that Connector version 2.0+ requires .NET Framework 4.6.1.
We do not recommend using old versions of Maventa Connector. For special cases we keep some old versions available. Please contact our support for more information.
Connector’s security depends 100% on the OS security and folder privileges that it is running on. Connector client program moves documents between a folder and Maventa API using HTTPS same as all other ERP traffic. As the client program only makes API calls and copies files between API and folder and is triggered from the OS side there are no additional security aspects to consider as there are no incoming ports the software listens to. All local users that are given access to the filesystem that contain the configuration files can read the contents (API keys) thus the application should be protected from the OS side users using folder permissions. The program is using an old framework so software framework itself is outdated and this should be taken into consideration when thinking about using it.
Invoices can also be sent as an email invoices to the recipients. Email route is used as a secondary delivery route if invoice could not be sent as an e-invoice and if recipient e-mail address is available. Email invoice sending can also be forced or then disabled completely.
Email is the first fallback route that our automated routing tries when it cannot find a way to send the invoice as an e-invoice. Routing order is the following 1. as an e-invoice 2. as an email 3. through the print service. Email route can also be forced if the desired way to reach the receiver is email. This can for example be a case for consumer invoicing when the recipient doesn’t have a way to receive invoices electronically through netbank (Read more about consumer invoicing).
Email sending is by default enabled on all company accounts. If needed it can be disabled from company settings or then invoice by invoice in sending. More about the disabling here.
Email route is used when sending as an e-invoice is not possible. To be able to route invoice as an email the receiver’s email address needs to be present in the XML.
It is possible to force the invoice to be sent as an email by using invoice_put_invoice_with_metadata or POST /v1/invoices methods for sending. In the metadata other routes are being set as disabled to force email route. Also the receiver’s email address can be given in the metadata. Email address given in the metadata will be used instead the one in the XML.
Forcing to email route is also possible with certain XML formats:
S-EDI: If OutputMedia is set as “PDF” only e-mail route is enabled
There are 4 choices from which the sender can choose how they want their e-mail invoices to be send out. These e-mail settings can be changed via the UI or using configure_company or PATCH /v1/company/settings API methods.
Selecting this option means that the invoice e-mail will contain a link to download the invoice from Maventa service. There is also a passcode on the email that the receiver needs to give behind the link to access the invoice. When the receiver clicks the link and open the invoice, the sender receives a notification e-mail.
Please note: the link to the hosting service is valid for 90 days after invoice due date. After this period, the recipient will be asked to contact the sender to get the copy of the invoice.
Selecting this option means that all invoice e-mails will contain the PDF image and any other invoice attachments. If the total size of the attachments is larger than 5 megabytes the recipient will be instructed to download using a link provided in the email.
In Finland, virtual barcode is also added into the email body when sending invoice with image attached.
Please note: the link to the hosting service is valid for 90 days after invoice due date. After this period, the recipient will be asked to contact the sender to get the copy of the invoice.
Selecting this option means that all invoice e-mails will contain the PDF image and any other invoice attachments. All the PDF attachments and invoice image will be merged into one file. This can be helpful when sending to scanning services. If the total size of the attachments is larger than 5 megabytes the recipient will be instructed to download using a link provided in the email.
Note! Sending with merged PDF attachments does not work with signed PDF files.
In Finland, virtual barcode is also added into the email body when sending invoice with image attached.
Please note: the link to the hosting service is valid for 90 days after invoice due date. After this period, the recipient will be asked to contact the sender to get the copy of the invoice.
By selecting invoice objections, the receiver must accept the invoice before being able to view any payment information. Receiver can also choose to decline the invoice, with the option to notify sender the reason for the decline. When any changes occur to the invoice, for example, the receiver accepts the invoice, the sender receives a notification e-mail and the status in Maventa is updated accordingly.
Please note: the link to the hosting service is valid for 90 days after invoice due date. After this period, the recipient will be asked to contact the sender to get the copy of the invoice.
You can attach an invoice XML file to email invoices. This enables the receiving party to obtain structured XML data instead of a PDF, making it easier to import the invoice directly into their invoicing systems. This feature was initially requested by the Netherlands, where Peppol does not support departmental divisions due to the lack of separate Peppol IDs. By attaching the XML to the email, departments can still receive structured invoice data and manually import it into their systems. Although developed for Dutch use case, this functionality is available for all countries without any restrictions.
To enable XML attachment for email invoice, use the email_settings[xml_format] parameter in the POST /v1/invoices request and specify the desired XML format (see list of available formats in the Swagger documentation).
Note! When this parameter is provided, the invoice will be sent only via email. The email route is forced, and no other delivery channels are attempted even if the email sending fails.
The cost of this feature is the same as for sending an e-invoice in the respective country.
Invoice email body can be customized by adding a header image that will be visualized on top of the email. Adding a header image to customize the email provides a great opportunity to enhance recognition and ensure that recipients can easily identify the sender.
Header image can be added via API using the endpoint PATCH /v1/company/settings by updating the company settings with the chosen image, or via the UI from invoice settings.
Once the email header image is added, the next time an invoice is sent via email, the email will feature the uploaded image. It is important to note that the header image only affects the invoice email. Other types of emails, such as notifications, will not include the header image.
There is a possibility to add customer’s own payment link to be visible on the email invoice display service. This will enable the recipient to access the payment service by simply clicking the provided payment link within the email invoice display. To ensure security, we require prior approval of the link’s domain, and we always validate the link before displaying it. If you wish to use payment links in your invoice emails, please reach out to our support team at support@maventa.com to request the activation of this feature.
Link can be given in an AdditionalDocumentReference element in UBL based formats (PeppolBIS 3.0, SiUBL 2.0) by defining the ID as “68” and DocumentDescription as “Payment link”. Link itself is given in the URI field.
Sender can define a message and contact details that are shown in the email body. These details can be added either through API or via our UI. When using API use either configure_company method with giving the information in the parameters message_from_sender, contact_person, contact_email and contact_phone, or PATCH /v1/company/settings.
Note! When you define a contact email address we will send a confirmation email to this email address where you need to confirm that the address may be used for that purpose.
Email language depends on the input format (XML) and how language is set there. We currently support the following languages: Finnish (FI), English (EN), Swedish (SE), Norwegian (NO), Danish (DK) and Dutch (NL). Not all are according to the ISO 639-1 codes but we hope to get support soon for at least SV, NN, NB and DA soon.
Click the XML your product is sending from the list below to see how the language of the email invoice is defined:
InvoiceRecipientLanguageCode
Fallback / default: FI
Finvoice also supports SV (Swedish) because Finvoice uses ISO 639 Language Codes e.g. FI, SV, to define the language. So both SV and SE will result the same, Swedish language.
Sender’s Maventa account country code (FI/SE/NO/DK/NL only, when AccountingCustomerParty/Party/PostalAddress/Country/IdentificationCode empty)
BuyerParty/Party/Address/Country/IdentificationCode (FI/SE/NO only) NOT WORKING CURRENTLY
Fallback / default: EN
Sender can specify how often a reminder email is sent if the invoice has not been accepted, declined or the link has not been opened by the receiver. This does not apply if the invoices are sent as attachments.
configure_company email_remind_freq or PATCH /v1/company/settings “reminder_frequency”.
All invoice emails are sent from the address noreply@mail.maventa.com. This sending address is fixed and cannot be changed. However, you can define your own reply-to address to be shown in the email’s “reply-to” field, allowing recipients to see your preferred contact instead.
If you have defined a contact email that is used as the reply-to address for email invoices. If not defined the fallback is the user’s email address (either API user’s email or an email address from the XML if defined). If that does not exists, fallback is the company email address.
If the email bounces due to for example a non existing email account the invoice will go into error state. The sender will be notified by email as long as the email notifications are not disabled. Error is also returned through API when asking after status of the sent invoice.
Note that the invoice will not go into error state if the recipients email box is full, or if recipients email marks the email as spam. If you will be sending out an email invoice with big attachments it is good practise to contact the receiver afterwards and making sure they really received the invoice to their email box.
Email sending is by default enabled on all company accounts. You can either disable the whole email sending possibility from company settings or then disable it invoice by invoice in sending.
To disable the whole email invoice sending use configure_company API method and set parameter send_invoice_email to 0, or with REST API use PATCH /v1/company/settings set “enabled” as false under the “send_invoice_email”. By choosing this setting the email route is skipped in automated routing.
To disable the email sending invoice by invoice use invoice_put_invoice_with_metadata or POST /v1/invoices methods for sending and set the email route as disabled. This will skip the email route for that particular invoice. If you are using some other method for sending also leaving the receiver’s email address empty will cause the email route to be skipped.
The Embeddable User Interface (EUI) is Maventa user interface that can be embedded into the ERP. With EUI customers don’t need to visit any external webpage to access their Maventa account but instead they can access their Maventa related settings, activate additional services and view their invoice listings directly from inside the ERP system. EUI is highly customizable which means that every ERP using it can create their own look of it by hiding parts of it their customers don’t need.
By using EUI you have the possibility to skip part(s) of the API integration towards us and still provide your customers everything directly from your product. Your end customers can also get a possibility to have a quick access to our new features and services without them having to wait for developement and changes on the ERP side thus reducing the time to market of our new cool features. Embedding the EUI to be part of your product is really easy and does not require lot of time or development resources.
Even though almost everything can be done via the EUI there is still some functions that we highly recommend that the ERP does through the normal Maventa API integration:
Basically all the rest can be done via the EUI:
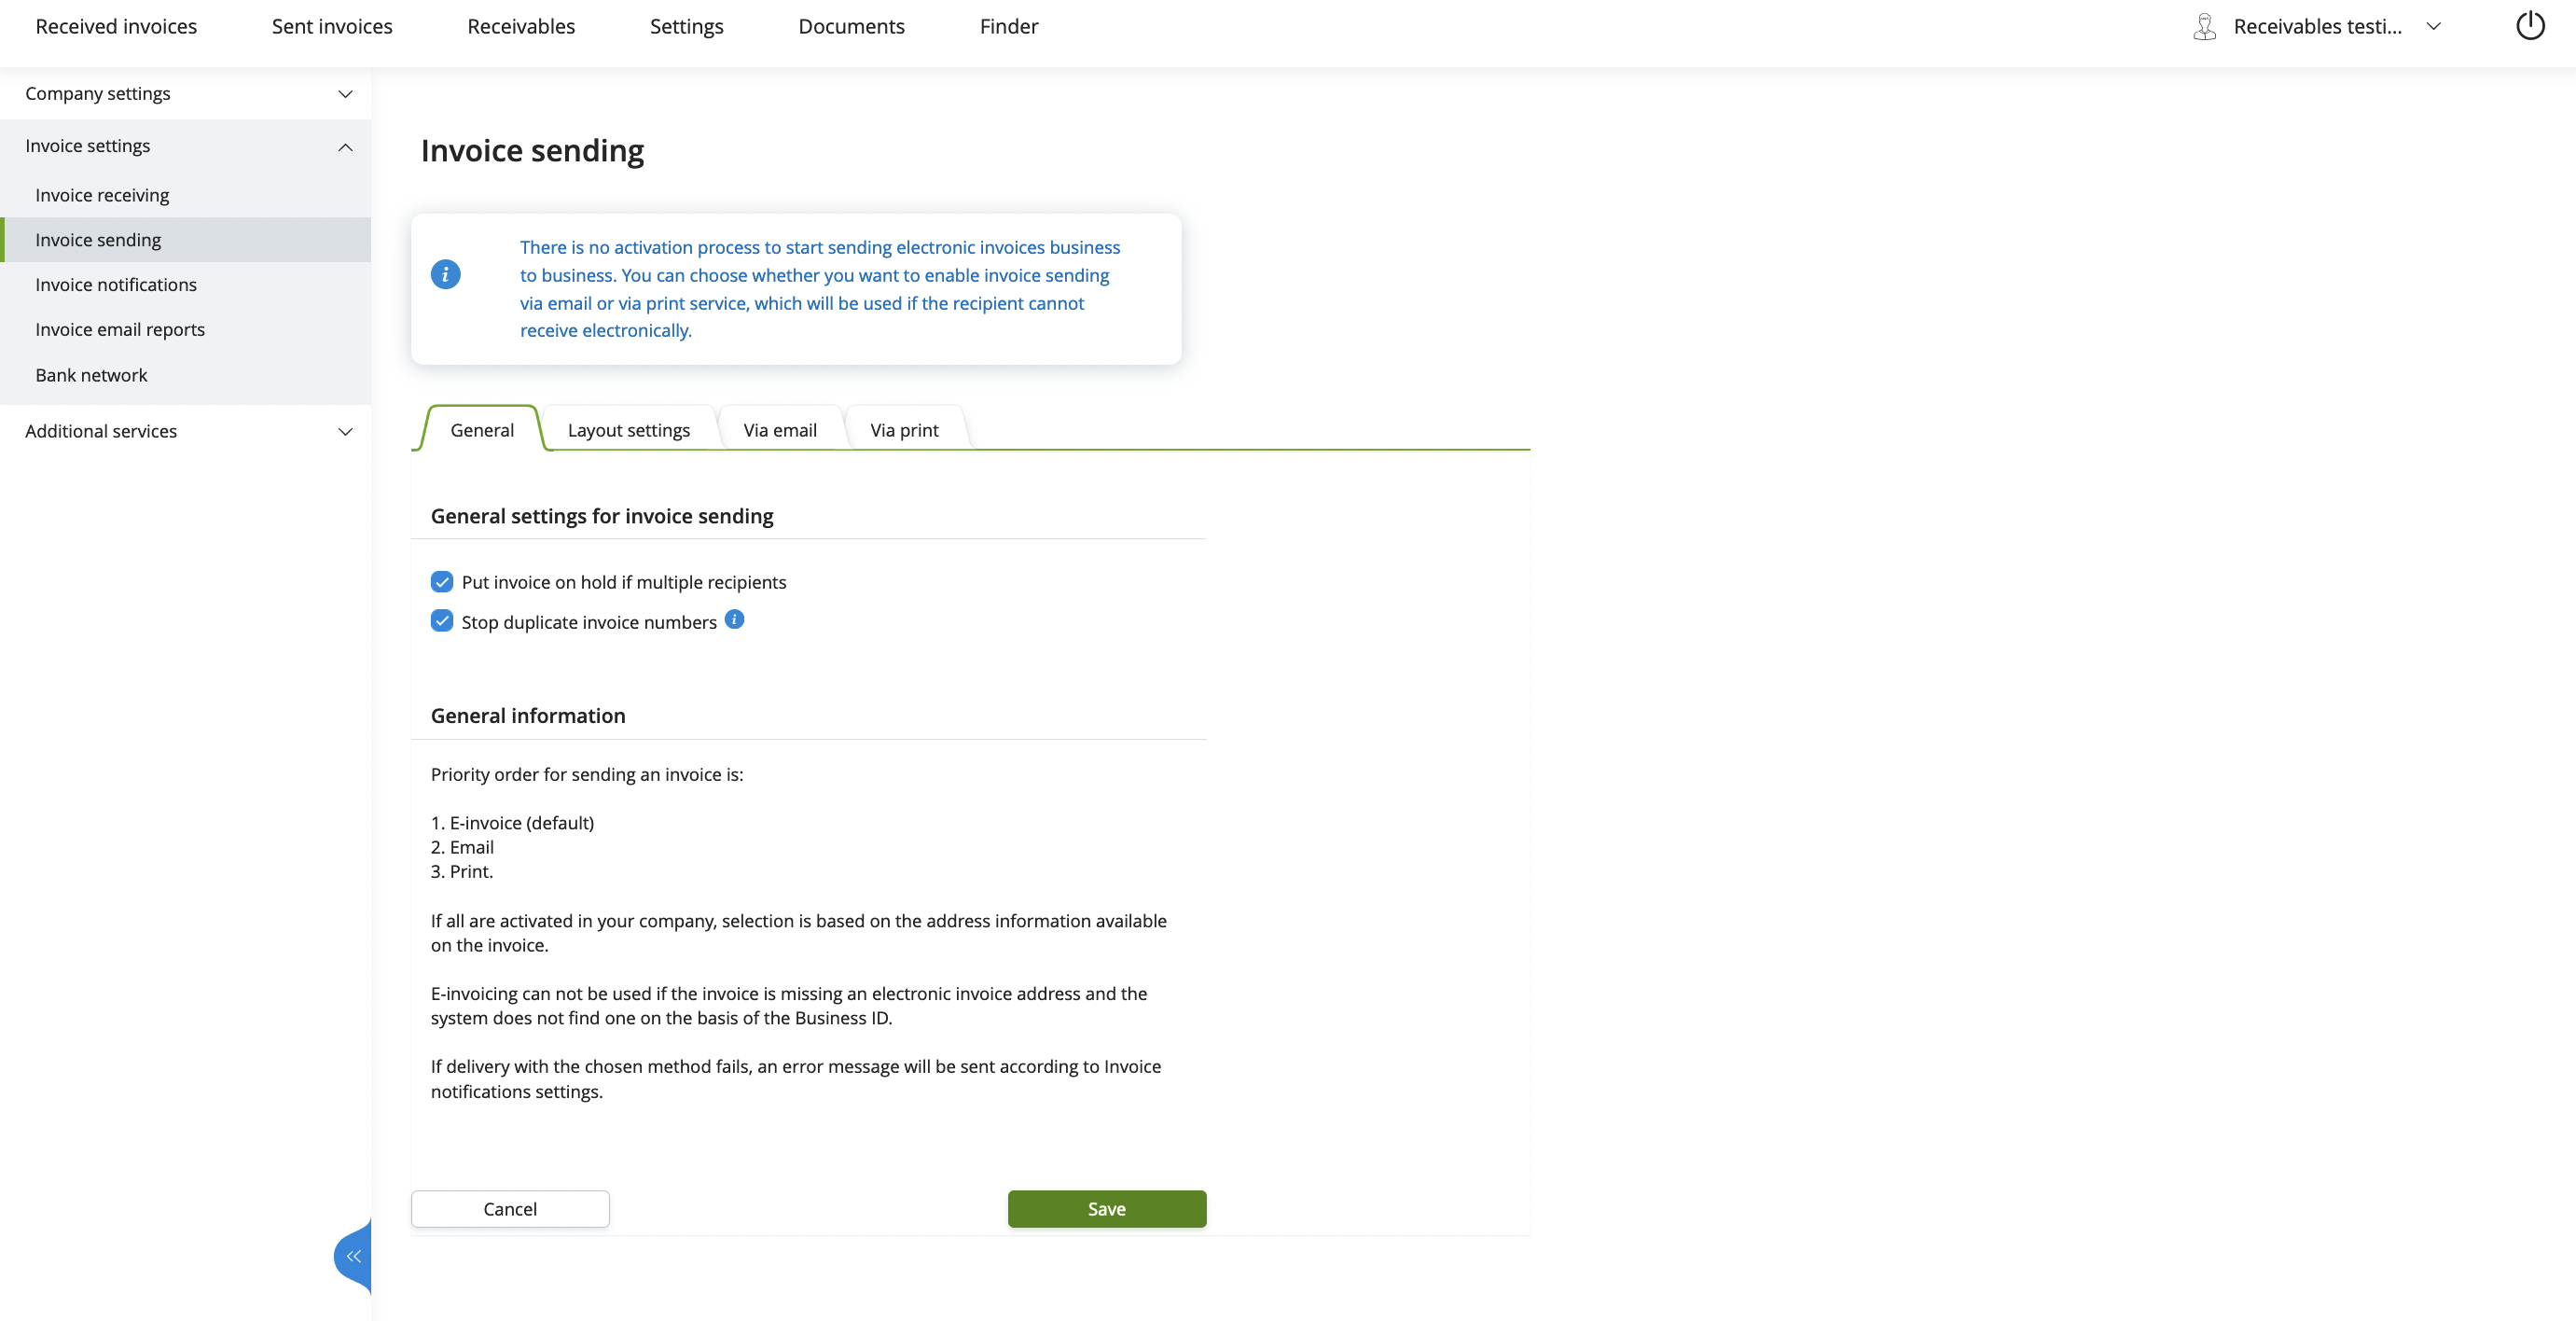
First you should think a bit what do you want your end customers to see. What parts of the EUI they need? And then decide how to show those views. Should you add one button to open up the whole EUI and let customers navigate themselves to the page they need or should you show different views in different parts of the ERP depending on the context (Settings view embedded into the part which shows ERP’s settings, and invoices lists where there are invoices listed on the ERP)?
Read more about the customisation of the EUI. Our team is happy to assist you in deciding what would be the best fit for your ERP. If you want help in deciding or if you have made some decisions youself contact Maventa support and ask for an EUI ERP profile. We will then set up you profile based on your preferences.
It is really easy to embed. We offer two different solutions for embedders, one where you can include a script tag on your HTML page within your product, and another one where you can use an iframe (or similar solution) to embed the EUI. First one we recommend to those products that are running in the user’s browser because with the iframe solutions there might (and most likely will) be problems loading cross-domain content. Both of these embedding methods, script embedding and Iframe embedding, explained in details.
What is common in both ways to embed are the domains listed below and that you will need to get an access token for the company.
We currently host the EUI under 3 different domains:
Production environment:
Testing environment:
Authentication and access to the EUI is done using token based login (based on company_uuid, user_api_key and vendor_api_key).
The token to open EUI is fetched using the AX Oauth2 endpoint using the following parameters
| Parameter | Desciption | Value/example |
|---|---|---|
| vendor_api_key | The vendor API key for the ERP | 37fc1ebc-dd4f-11ea-87d0-0242ac130003 |
| scope | The scope that is needed, eui is required | eui |
| grant_type | The OAuth2 grant type | client_credential |
| client_id | company_uuid | 298c6ce2-dd4f-11ea-87d0-0242ac130003 |
| client_secret | user_api_key | 32d74434-dd4f-11ea-87d0-0242ac130003 |
Endpoint for getting the token:
Testing: https://ax-stage.maventa.com/oauth2/token
Production: https://ax.maventa.com/oauth2/token
curl -X POST "https://ax-stage.maventa.com/oauth2/token"
-H "accept: application/json"
-H "Content-Type: multipart/form-data"
-F "grant_type=client_credentials"
-F "client_id=company_uuid"
-F "client_secret=user_api_key"
-F "scope=eui"
-F "vendor_api_key=erp_vendor_api_key"
{
  "access_token": "eyJhbGciOiJIUzI1NiIsInR5cCI6IkpXVCJ9.eyJpZGVudG......",
  "token_type": "bearer",
  "expires_in": 3600,
  "scope": "eui"
}
When you have an access token you can then use it in the emdedding solution you have chosen, script embedding or Iframe embedding. Both are explained below:
Add script tag <script> in your browser page with the following content:
<body>
    <div style="height: 1024px" id="eui-container"></div>
    <script src="http://autointerface.visma.net/embed"
            data-token="eyJ0eXAiOiJKV1QiLCJraWQiOiJjODJhZTdiZTU...."
            data-container-id="eui-container"
            data-default-path="/invoices"
            data-profile="my_erp_profile_name"
            data-locale="en"
            data-setup-top_menu="false"
    ></script>
</body>
| Parameter | Desciption | Value/example |
|---|---|---|
| src | Main URL for EUI | http://autointerface.visma.net/embed |
| data-token | access_token property from the OAuth2 response | eyJhbGciOiJIUzI1NiIsInR5cCI6IkpXVCJ9…. |
| data-container-id | Must match the id of the div. Inside this div the EUI will be rendered | eui-container |
| data-default-path | What page to open. List of direct URLs | /invoices |
| data-profile | Each ERP will have their own profile for customisation | my_erp_profile_name |
| data-locale | For defining language of the EUI (fi,se,no,dk,nl) | fi (default = company’s country) |
| data-setup-top_menu | Setup parameters for further customization if needed | data-setup-… false = hide / true = show |
| div style=”height:..” | a Proper height must be given. static or dynamic. If not defined you won’t see the EUI | div style=”height: 1024px” |
In the above example the EUI is opened directly to the invoices page, language is set to be english and the whole top menu is hidden.
With this embedding method there is no way to renew the token. This means if the user has the EUI open for over one hour the session will be unusable and needs to be restarted with a new authentication. So remember that the token will expire in one hour and user will be kicked out. When that happens customers should be able to refresh the page and gain access again.
The endpoints for the process are the following:
| Testing | Production | |
|---|---|---|
| Endpoint for getting the token | https://ax-stage.maventa.com/oauth2/token | https://ax.maventa.com/oauth2/token |
| Endpoint for initiating a new EUI session | https://autointerface-embeddable-stage.maventa.com/authentication/token | https://autointerface-embeddable.maventa.com/authentication/token |
| Endpoint for renewing the token | https://autointerface-embeddable-stage.maventa.com/authentication/renew | https://autointerface-embeddable.maventa.com/authentication/renew |
While the user’s EUI session is active you need to act when the token is about to expire. The expires_in attribute in the token response tells how long the access token is valid. To be sure deduct a few minutes from the time to not run into issues. It’s important to stop the renewal process if the user closes the EUI session or the user have logged out in some other way.
The provided token in the initial request will be valid for one hour and if the token is not renewed the users session will end when the token expires. This means if the user has the EUI open for over one hour the session will be unusable and needs to be restarted with a new authentication. To prevent this the token can be updated for the user in the background without the user noticing anything (Step 4). To be able to renew the token the first thing to do is to pass a unique ID as the session id for each authentication that is initiated, this to be able to associate to the session on renewal. The unique ID is given in the session_id parameter on the initial authentication request (see the step 3).
token = fetch_token

setTimeout(function(){
  if(user_session_active()) {
    renew_token();
  } else {
    // user has closed the EUI window
  }
}, token.expires_in - 60*5);
When you have a token you are ready to open EUI in a browser window.
Depending on the browser component capabilities it varies a little how the EUI session can be initiated. The token can be put in either the POST body or in the Authorization header as a Bearer token.
| Parameter | Desciption | Value/example |
|---|---|---|
| token | access_token property from the OAuth2 response | eyJhbGciOiJIUzI1NiIsInR5cCI6IkpXVCJ9…. |
| profile | Each ERP using the EUI will have their own (profile) for customisation | my_erp_profile_name |
| locale | For defining language of the EUI (fi,se,no,dk,nl) | no |
| redirect_to | What page to open. List of (direct URLs) | /invoices |
| session_id | Define a session id. We prefer UUID | erp_users_session_id |
curl -X POST "https://autointerface-embeddable-stage.maventa.com/authentication/token"
-H "Content-Type: multipart/form-data"
-F "token=eyJhbGciOiJIUzI1NiIsInR5cCI6IkpXVCJ9......"
-F "profile=my_erp_profile_name"
-F "locale=no"
-F "redirect_to=/invoices"
-F "session_id=erp_users_session_id"
<!DOCTYPE html>
<html>
<head></head>
<body>
  <form action="https://autointerface-embeddable-stage.maventa.com/authentication/token" method="POST" target="_blank">
    <fieldset>
      <legend>Authentication using token</legend>
      <br/>
      <label>token:</label>
      <input type="text" name="token" size="100" />
      <br/>
      <label>session_id:</label>
      <input type="text" name="session_id" size="70" />
      <br/>
      <label>redirect_to:</label>
      <input type="text" name="redirect_to" size="70" />
      <br/>
      <label>profile:</label>
      <input type="text" name="profile" size="40" />
      <br/>
      <br/>
      <input type="submit" value="Log in"/>
    </fieldset>
  </form>
</body>
When the token is about to expire a new token needs to be obtained exactly the same way as in (Step 1).
The token then needs to be passed to the renew endpoint in EUI, combined with the session_id generated in the initial request. If you are able to extract/use the session cookie from the browser component it’s possible to use that when renewing the token, then there is no need to pass and use the session_id.
curl -X POST "https://autointerface-embeddable-stage.maventa.com/authentication/renew"
-H "Content-Type: multipart/form-data"
-F "token=eyJhbGciOiJIUzI1NiIsInR5cCI6IkpXVCJ9.eyJpZGVudGl0eSI6InVzZXIiLCJ1c......"
-F "session_id=erp_users_session_id"
function start_user_session(session_id, token) {
  monitor_session_token(session_id, token.access_token); // Start waiting for the token to expire
  open_browser_window(session_id, token.access_token); // Open browser component with the token
}

function monitor_session_token(session_id, token) {
  setTimeout(function(){
    if(user_session_active(session_id)) {
      renew_token(session_id);
    } else {
      // user has closed the EUI window
    }
  }, token.expires_in - 60*5);
}

function renew_token(session_id) {
  token      = fetch_token();
  if(post_new_token_to_eui(session_id, token.access_token) == 200) {
    monitor_session_token(session_id, token);
  }
}

token      = fetch_token(); // Fetch token from AX
session_id = generate_uuid(); // Generate an ID for future reference

start_user_sesion(session_id, token);
EUI is highly customisable and every ERP can create their own look and feel of it. You can decide what to show to your end customers through the EUI and what should be hidden from them. For example if there is no invoice receiving capabilities in the ERP, received invoices list can be hidden and as well all the invoice receiving related settings. Customised view will greatly improve the user experience by always provide only useful information to the end customers. Customisation of the EUI is a really cool feature.
Customisation can be done using the ERP profiles and optional setup parameters:
ERP profiles are the main way to customise the views and are created for each ERP using the EUI. Using profile in a call toward EUI will load the ERP specific view. ERP profiles are created and modified by Maventa team based on the ERP’s needs and requirements. So before you start to build the integration towards the EUI, please contact Maventa support and ask for an EUI profile. One ERP can have multiple profiles. For example one for each version of the system or if you have different customer groups and would like to show them different content based on what functionalities they have in use.
...&profile=name_of_the_profile
When we add something big to the EUI for example a new service or functionality we will always contact all the EUI ERPs if they wish to have that new service visible also to their customers. Using EUI comes really handy by reducing the time to market of new services. Of course it is good to keep in mind that some of the new services might also require some changes from the ERP side or to the API integration but some services work just fine only through the EUI.
Profiles are great way of setting up the EUI look and feel, but if you want to have further control use the EUI setup parameters. EUI setup parameters have the same structure as the profiles and those can be used in combination with a profile. EUI setup params will override any setting from the profile so if you want to have a bit different views for one specific customer you can do it by using setup parameters. Empty values for any EUI setup parameter, equals false.
Let’s say that you have few customers that do not receive invoices through your ERP at all and you want to provide them a different view than for the rest of your customer by hiding all that is related to the invoices receiving:
EUI setup parameters will look like:
...&setup[sections][invoices][inbound]=false
&setup[sections][settings][invoice][receiving]=false
Here is a list of setup parameters you can use to hide or show parts of the EUI. If you wish to hide or show something that is not on this list please contact us and we will see if can fulfill your request.
With direct URLs customers can be redirected straight to the page you want. In the part of the ERP where invoices are handled could be a direct link to the invoices list of the EUI. And in the part where there are all the setting there could be a link to open up a settings page of the EUI. You can also have direct link for only showing details of an one invoice if you for example want to integrate the EUI invoice details as being part of the invoice details shown in the ERP.
In Denmark, all e-invoices to NemHandel receivers are routed via our partner Sproom. For sending companies without a Sproom account, Maventa handles the connection directly. But if the sending company already has a Sproom account, an extra approval step is required before invoices can be delivered.
In Denmark, most of the e-invoicing is routed through NemHandel, the national infrastructure for electronic documents. Instead of connecting directly to NemHandel, Maventa uses Sproom as an intermediary.
Sproom is a Danish e-invoicing platform and part of Visma. It acts as a technical access point and a routing directory, enabling companies to send and receive electronic invoices via NemHandel. This ensures proper delivery of e-invoices across Denmark.
Whenever your company sends invoices to Denmark to a participant in NemHandel (which includes most of the Danish companies), the process depends on whether the sending company already has an existing Sproom account:
No existing Sproom account → The invoices are automatically handled through Maventa’s parent account in Sproom. No additional actions are required from the sender.
Existing Sproom account → The company must explicitly approve Maventa (Visma Software AS) as a parent account in Sproom. This approval links the company’s existing Sproom profile with Maventa, ensuring invoices continue to be routed correctly through NemHandel.
A company can have multiple parent accounts in Sproom, which makes it possible for several software vendors to send and receive invoices on behalf of the same company.
When an invoice is sent from a company that already has a Sproom account, Sproom automatically sends an approval request email. This email is sent to the sender’s company email address registered in Maventa, so it’s important to keep it up to date.
The email contains a link that the company must follow and sign using MitID (Business or Private, depending on the signatory rights) to complete the approval.
Currently, Sproom will continue sending approval requests after each invoice until the approval is completed. At the moment, invoice sending still works, but in the near future, invoices will fail if the approval is not completed after the first attempts.
Today, the approval emails come from Sproom, notification@sproom.net. But in the future, Maventa may take over sending these emails, which would then come from our own domain.
API to use: REST API
In addition to invoices Maventa also enables usage of other trading documents.
Companies and governments have a growing interest towards full procurement automation. eOrdering automates the purchase-to-pay process and offers benefits to different teams involved in the process and the organization as a whole. These benefits include:
Automation of ordering, for example usage of structured catalogues as a basis for ordering, simplifies the information exchange and offers benefits for both parties in the procurement chain, since different steps like approval, order picking and invoicing can be automated to name a few.
In order to start sending documents you have to be able to produce Peppol BIS or EHF. Sending of documents happens by sending a document file (XML) and specifying other necessary data as parameters. For receiving documents, you have to first register the company as a document receiver and then activate different document types and profile versions. Different document types supported by Maventa are described below.
Recipient and the operator needs to be specified during the send. Senders and receivers in PEPPOL are identified using ISO6523 identifiers. Depending on the country, they can be organization IDs, VAT IDs, public sector IDs, for example
Norway - Organisation number (prefix 0192)
OVT: 0192:1111111111 Operator: PEPPOL
Finland - OVT (prefix 0216)
OVT: 0216:111111111111 Operator: PEPPOL
Read more information about service activation from here and sending and receiving of documents from here.
Through Peppol network the supported document types by Maventa are:
Read more about different Peppol BIS documents from here.
Check full list of supported document types in AX from here.
Partner and Maventa agree about the way the end customers (users of partner’s software) are invoiced for their transactions and use of Maventa services.
Billing is transaction based. All transactions are billed based on the partner vendor_api_key that is provided on the API calls or in some cases stored in the company details. Based on the vendor_api_key setting the transactions can be billed from the key owner (partner) or from the end customer directly.
Billing is partner specific meaning that same transaction is only billed once from a partner and you can refetch invoices to same partner’s other systems without additional cost. If a customer receives invoices into different partners’ products, i.e. uses multiple ERPs from different partners to receive invoices at the same time, each partner will be billed separately for the invoice they have received into their system.
We recommend all our Partners to fetch transaction reports using our Billing API. Using Billing API is not tied to Maventa’s billing time and it allows billing / transaction review automatically at any time of the month.
Billing company transactions endpoint returns transaction counts that are assigned to the authenticated billing company (partner). The endpoint contains transactions for the current and previous month. (Note! Current quarter’s data is kept until the 15th of the first month of the next quarter.)
The exact amount to be invoiced for the previous month will be checked on the 1st working day of the following month 14:00 EET (A day before Maventa’s actual invoicing). For example March transactions are ready to be fetched 3.4.2023 14:00 EET, which is the 1st working day of April.
All Maventa invoices are attached with a transaction report that contains all the transacations that are billed in the invoice.
The transaction report contains the following information of the transactions
| Header | Value |
|---|---|
| BillingCompanyID | unique identifier of the invoiced company in Maventa billing system |
| BillingCompanyName | name of the invoiced company in Maventa billing system |
| BillingCompanyOrganizationIdentifier | business ID of the invoiced company in Maventa billing system |
| TargetCompanyID | unique identifier of the company who has performed the transaction |
| TargetCompanyName | name of the company who has performed the transaction |
| TargetCompanyOrganizationIdentifier | business ID of the company who has performed the transaction |
| MaventaProduct | name of the transaction |
| InvoicingProductCode | product information on the invoice |
| DimensionItemSoftware | name of the software used to perform the transaction |
| NumberOfActions | number of transaction |
| ActionOriginTime | first day of each invoiced month |
| UnitNetPrice | unit price of transaction |
| LineNetSum | total line amount |
See example transaction report:
Note that the structure of this report is based on a real life example, but the data in the report is made-up.
An Invoice Response is a message between Buyer and a Seller that enables efficient means for communicating about the status of a received Invoice in the Peppol network.
For example Buyer can inform the Seller if the Invoice has been rejected, under query, approved or paid.
More detailed use cases and specifications for invoice response can be found in Peppol documentation.
In this tutorial we dive deeper into how:
Before starting:
In the case where a company is sending invoices they are the Seller and therefore the receiver of Invoice Responses from the Buyer. To enable the receiving of Invoice Responses the following steps needs to be taken.
Step 1 - Enable receiving of Invoice Response documents from Peppol
Use the POST /v1/company/profiles endpoint to enable Invoice Response receiving capabilities in the Peppol network. Read more about Enabling Receiving from Peppol Peppol
Request to POST /v1/company/profiles:
{
  "profiles": [
    "INVOICE_RESPONSE"
  ],
  "profile_version": "PEPPOLBIS30",
  "network": "PEPPOL"
}
Response:
{
  "id": "3abac0e6-20c1-4172-9e0b-1f882192ca6d",
  "status": "pending",
  "profile": "INVOICE_RESPONSE",
  "profiles": [
    "INVOICE_RESPONSE"
  ],
  "profile_version": "PEPPOLBIS30",
  "endpoint_id": "003751734872004",
  "scheme": "0216",
  "network": "PEPPOL"
}
Step 2 - Integrate to API for receiving ordering and other documents
The Invoice Response documents go in the other documents category and should be fetched using the POST /v1/documents endpoint. Read more about it in the Document Exchange) documentation.
Step 3 - Process the received Invoice Response
Details about the content of Invoice Responses can be found from the Peppol documentation.
In the case where a company is receiving invoices they are the Buyer and therefore the sender of Invoice Responses to the Seller. To enable the sending of Invoice Responses the following steps needs to be taken.
Step 1 - Integrate to receive invoices. Read more about receiving invoices in the Integration guide for invoice receiving.
Step 2 - Check if the Seller has capabilities to handle Invoice Response documents. This can be done doing a Peppol lookup using the GET /v1/lookup/receivers endpoint. The Sellers identifier can be found from the received invoice. For example in a PeppolBIS30 document the information is in the EndpointID element.
  <cbc:ID>567</cbc:ID>
  ...
  <cac:AccountingSupplierParty>
    <cac:Party>
      <cbc:EndpointID schemeID="0216">003751734872004</cbc:EndpointID>
      ...
    </cac:Party>
  </cac:AccountingSupplierParty>
The lookup to resolve the receiving capabilities of the Seller requires three parameters.
network, always set to PEPPOL, we are interested in the Peppol receiving capabilitiesdocument_type, always set to INVOICE_RESPONSE, we are interested if the recipient can handle Invoice Response documentseia, in the form 0216:003751734872004 and depends on the received Invoice. Represents the Seller identifier.curl -X 'GET' \
'https://ax-stage.maventa.com/v1/lookup/receivers?network=PEPPOL&eia=0216%3A003751734872004&document_type=INVOICE_RESPONSE' \
-H 'accept: application/json' \
-H 'authorization: Bearer TOKEN'
[
  {
    "eia": "0216:003751734872004",
    "network": "PEPPOL",
    "operator": "PEPPOL",
    "document_types": [
      {
        "document_type": "INVOICE_RESPONSE",
        "document_identifier": "urn:oasis:names:specification:ubl:schema:xsd:ApplicationResponse-2::ApplicationResponse##urn:fdc:peppol.eu:poacc:trns:invoice_response:3::2.1",
        "process_identifier": "urn:fdc:peppol.eu:poacc:bis:invoice_response:3"
      },
      ...
    ],
    "participant": {
      "name": "Seller",
      "country": "FI"
    }
  }
]
The endpoint returns entries if the Seller enabled for processing Invoice Responses, otherwise the response will be an empty array.
Step 3 - Generate and send an Invoice Response document
Details about the business content for an Invoice Response check out the Official Peppol documentation
Example of an invoice response payload that acknowledges the receive for an Invoice with the id 567 from Seller 0216:003751734872004.
<?xml version="1.0" encoding="UTF-8"?>

<ApplicationResponse xmlns="urn:oasis:names:specification:ubl:schema:xsd:ApplicationResponse-2" xmlns:cac="urn:oasis:names:specification:ubl:schema:xsd:CommonAggregateComponents-2" xmlns:cbc="urn:oasis:names:specification:ubl:schema:xsd:CommonBasicComponents-2" xmlns:xsi="http://www.w3.org/2001/XMLSchema-instance">
  <cbc:CustomizationID>urn:fdc:peppol.eu:poacc:trns:invoice_response:3</cbc:CustomizationID>
  <cbc:ProfileID>urn:fdc:peppol.eu:poacc:bis:invoice_response:3</cbc:ProfileID>
  <cbc:ID>1</cbc:ID>
  <cbc:IssueDate>2024-01-01</cbc:IssueDate>
  <cac:SenderParty>
    <cbc:EndpointID schemeID="0216">003751734872001</cbc:EndpointID>
    <cac:PartyLegalEntity>
      <cbc:RegistrationName>Buyer</cbc:RegistrationName>
    </cac:PartyLegalEntity>
  </cac:SenderParty>
  <cac:ReceiverParty>
    <cbc:EndpointID schemeID="0216">003751734872004</cbc:EndpointID>
    <cac:PartyLegalEntity>
      <cbc:RegistrationName>Seller</cbc:RegistrationName>
    </cac:PartyLegalEntity>
  </cac:ReceiverParty>
  <cac:DocumentResponse>
    <cac:Response>
      <cbc:ResponseCode listID="UNCL4343OpSubset">AB</cbc:ResponseCode>
    </cac:Response>
    <cac:DocumentReference>
      <!-- Information about the orignal received invoice -->
      <cbc:ID>567</cbc:ID>
      <cbc:DocumentTypeCode listID="UNCL1001">380</cbc:DocumentTypeCode>
    </cac:DocumentReference>
  </cac:DocumentResponse>
</ApplicationResponse>
The Invoice Response payload is handed over for delivery via the POST /v1/documents endpoint.
curl -X 'POST' \
  'https://ax-stage.maventa.com/v1/documents' \
  -H 'accept: application/json' \
  -H 'content-type: multipart/form-data' \
  -F 'file=@response.xml;type=text/xml' \
  -F 'recipient_eia=0126:003751734872004' \
  -F 'recipient_operator=PEPPOL'
Response:
{
  "id": "e6c1e92b-ceba-4155-89fd-072e7ba6148f",
  "type": "INVOICE_RESPONSE"
  ...
}
Read more about documents sending and follow-up in the Document Exchange) documentation.
BIS Invoice Response 3.2 specification
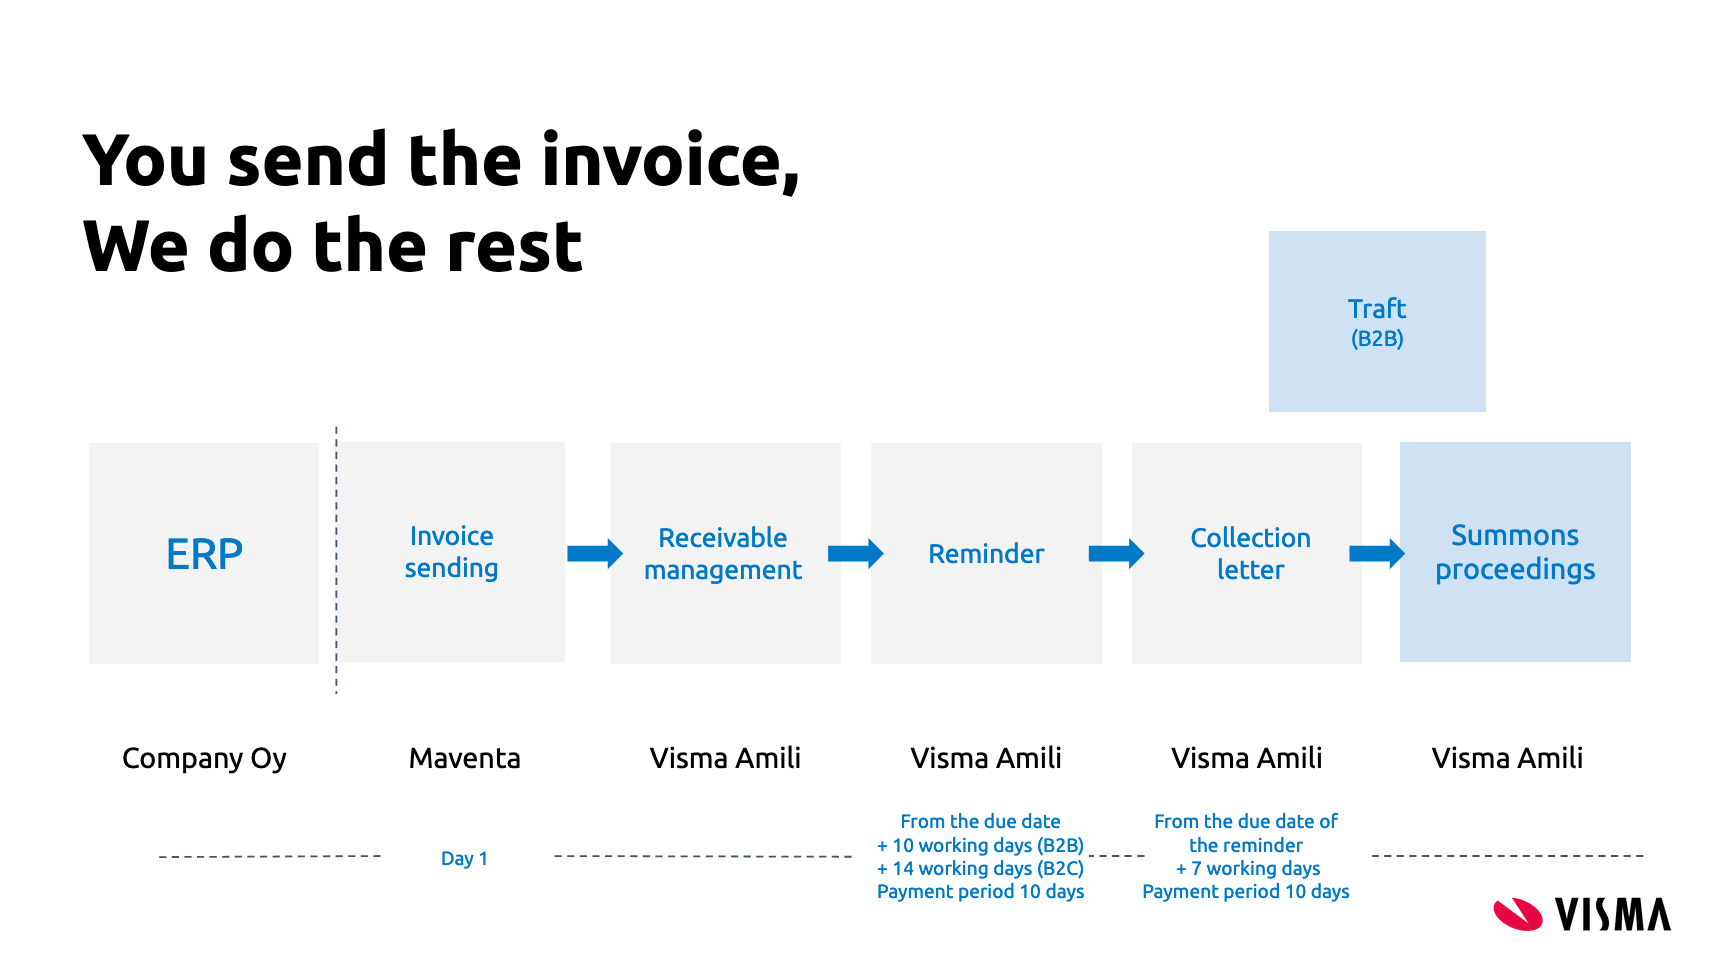
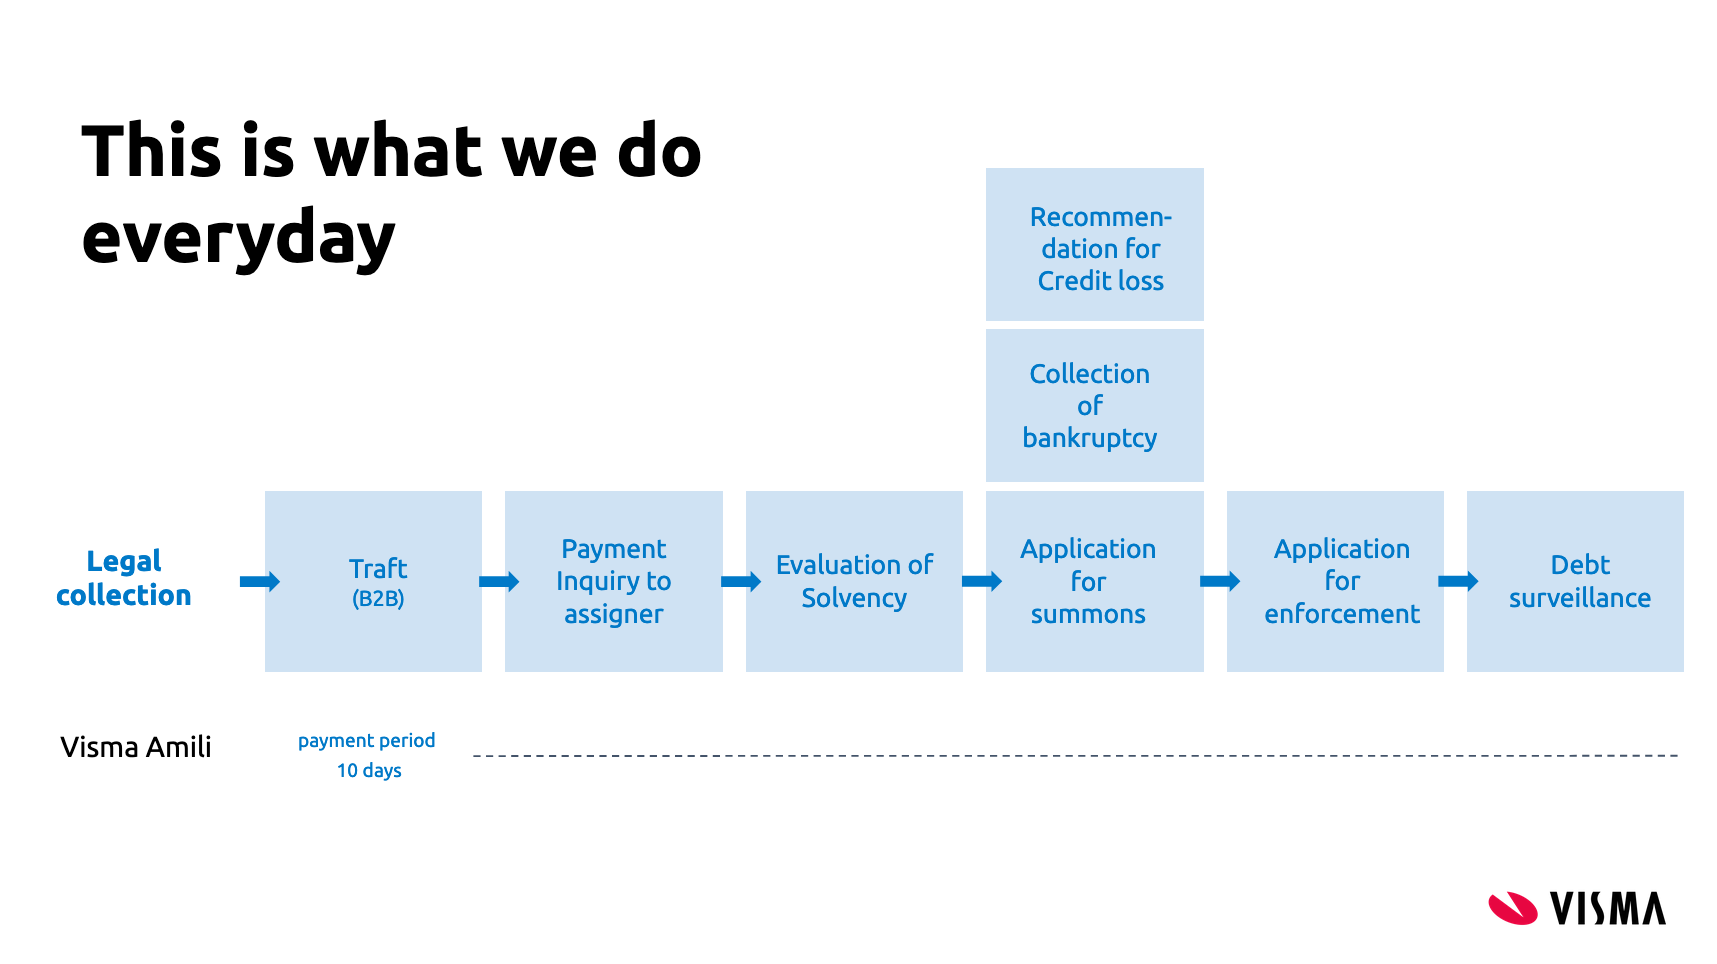
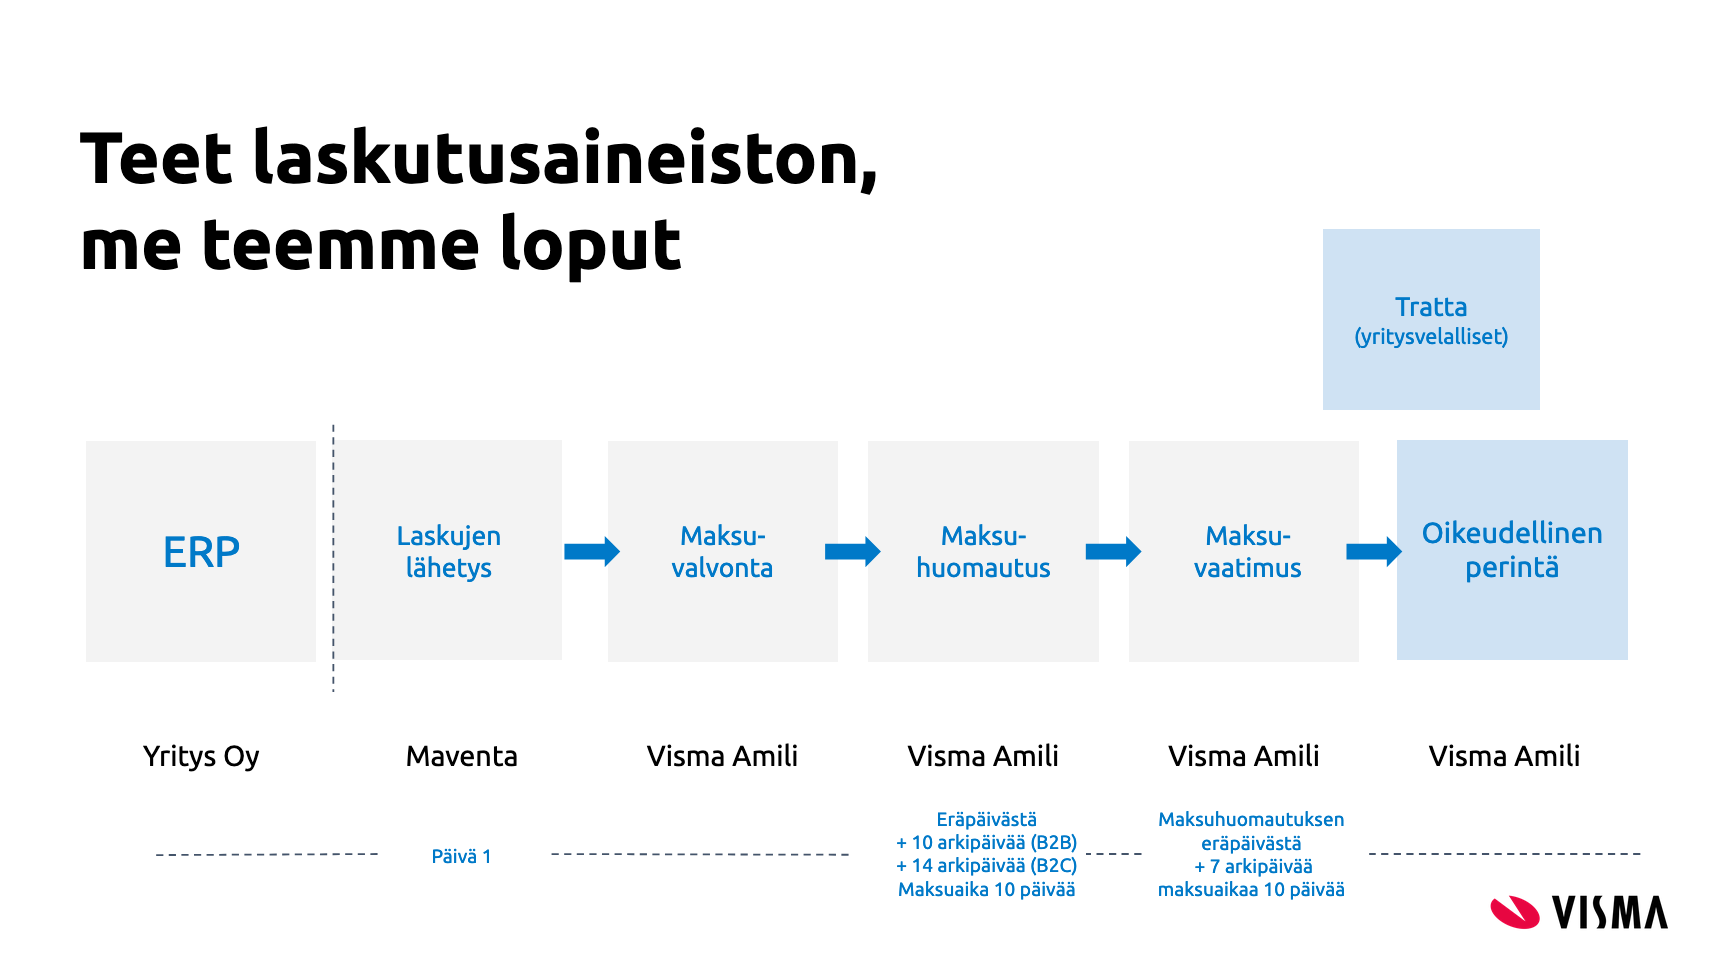
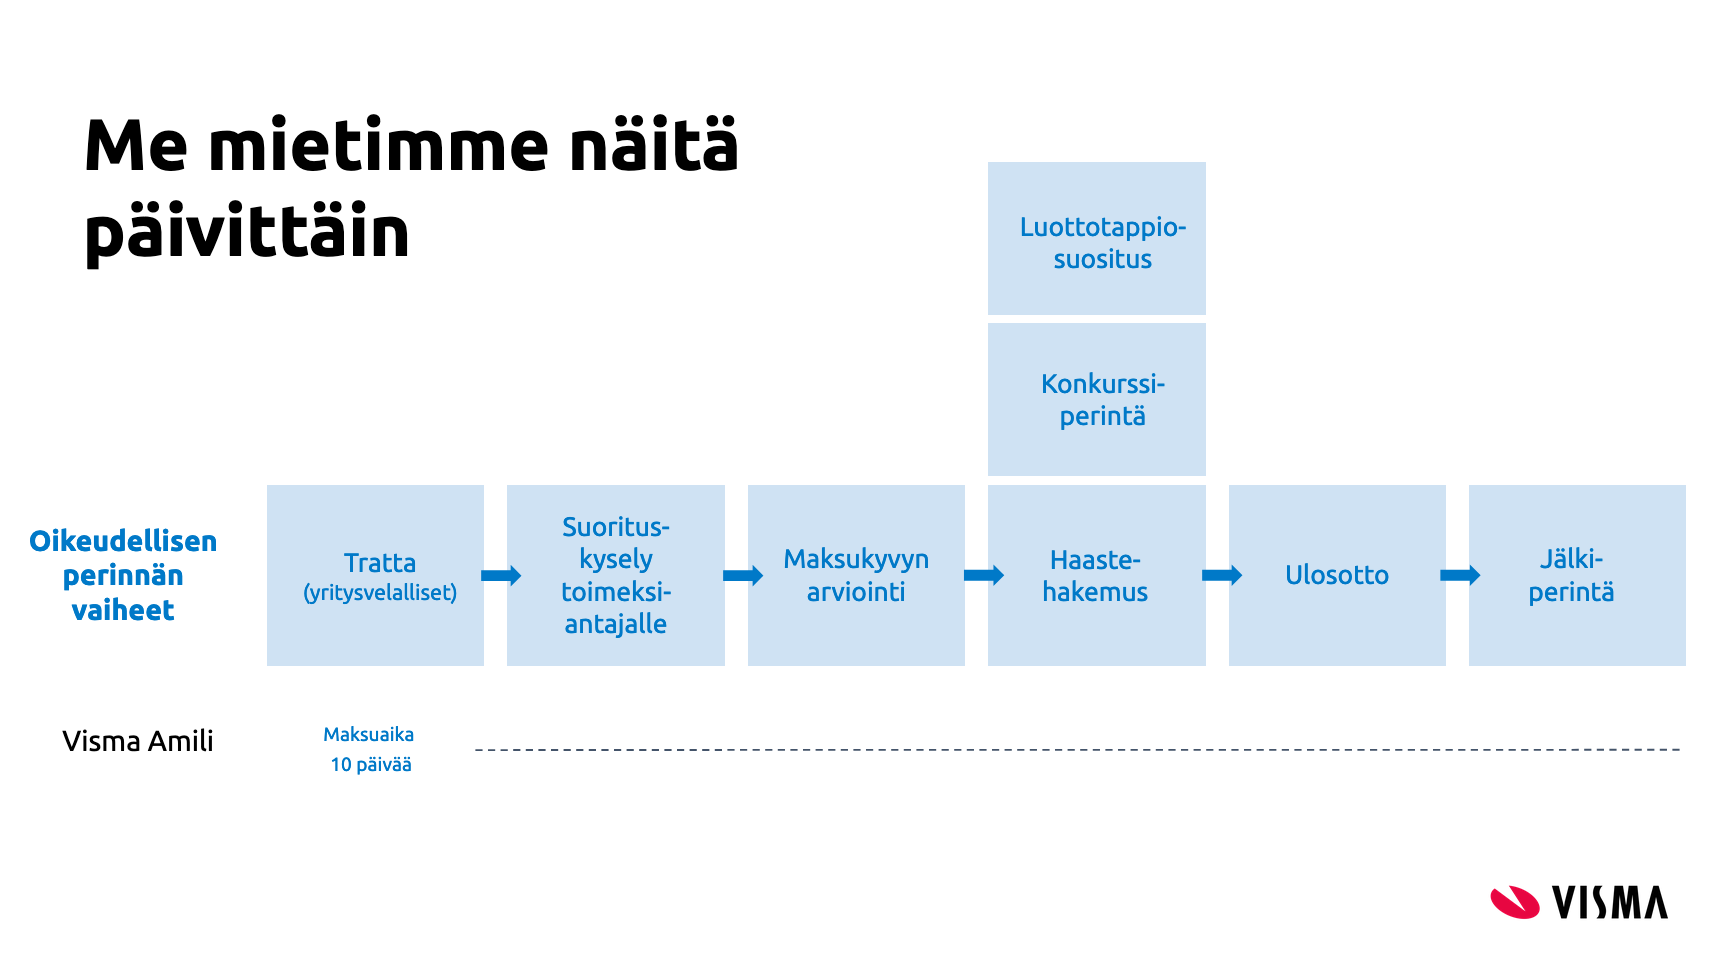
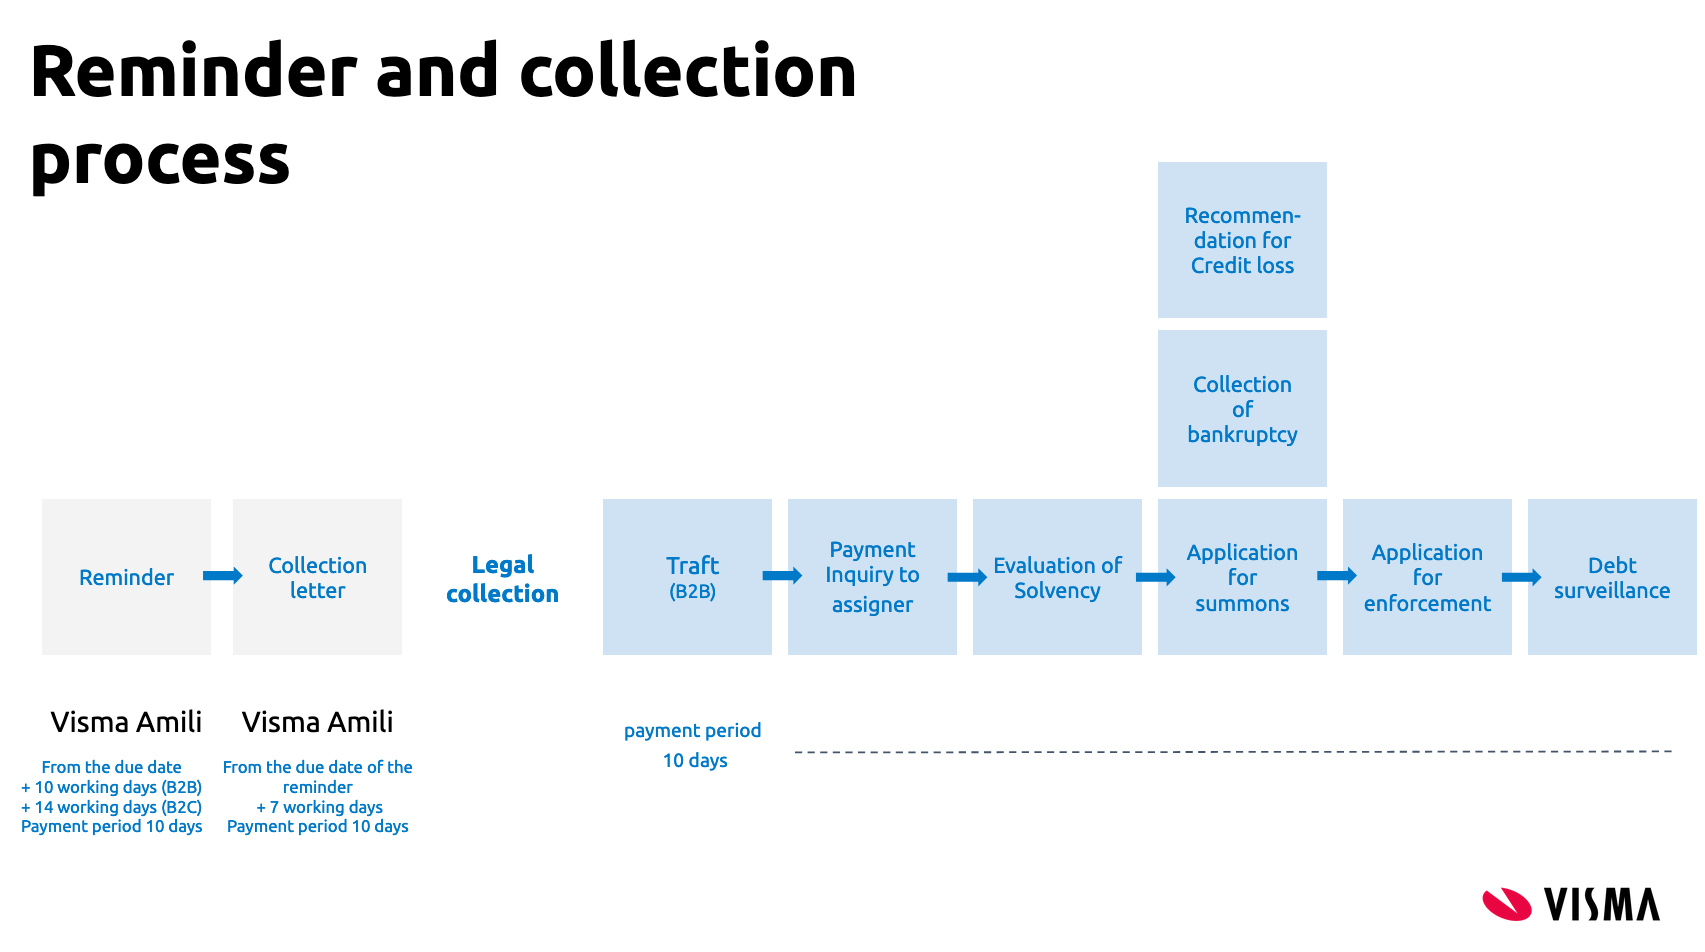
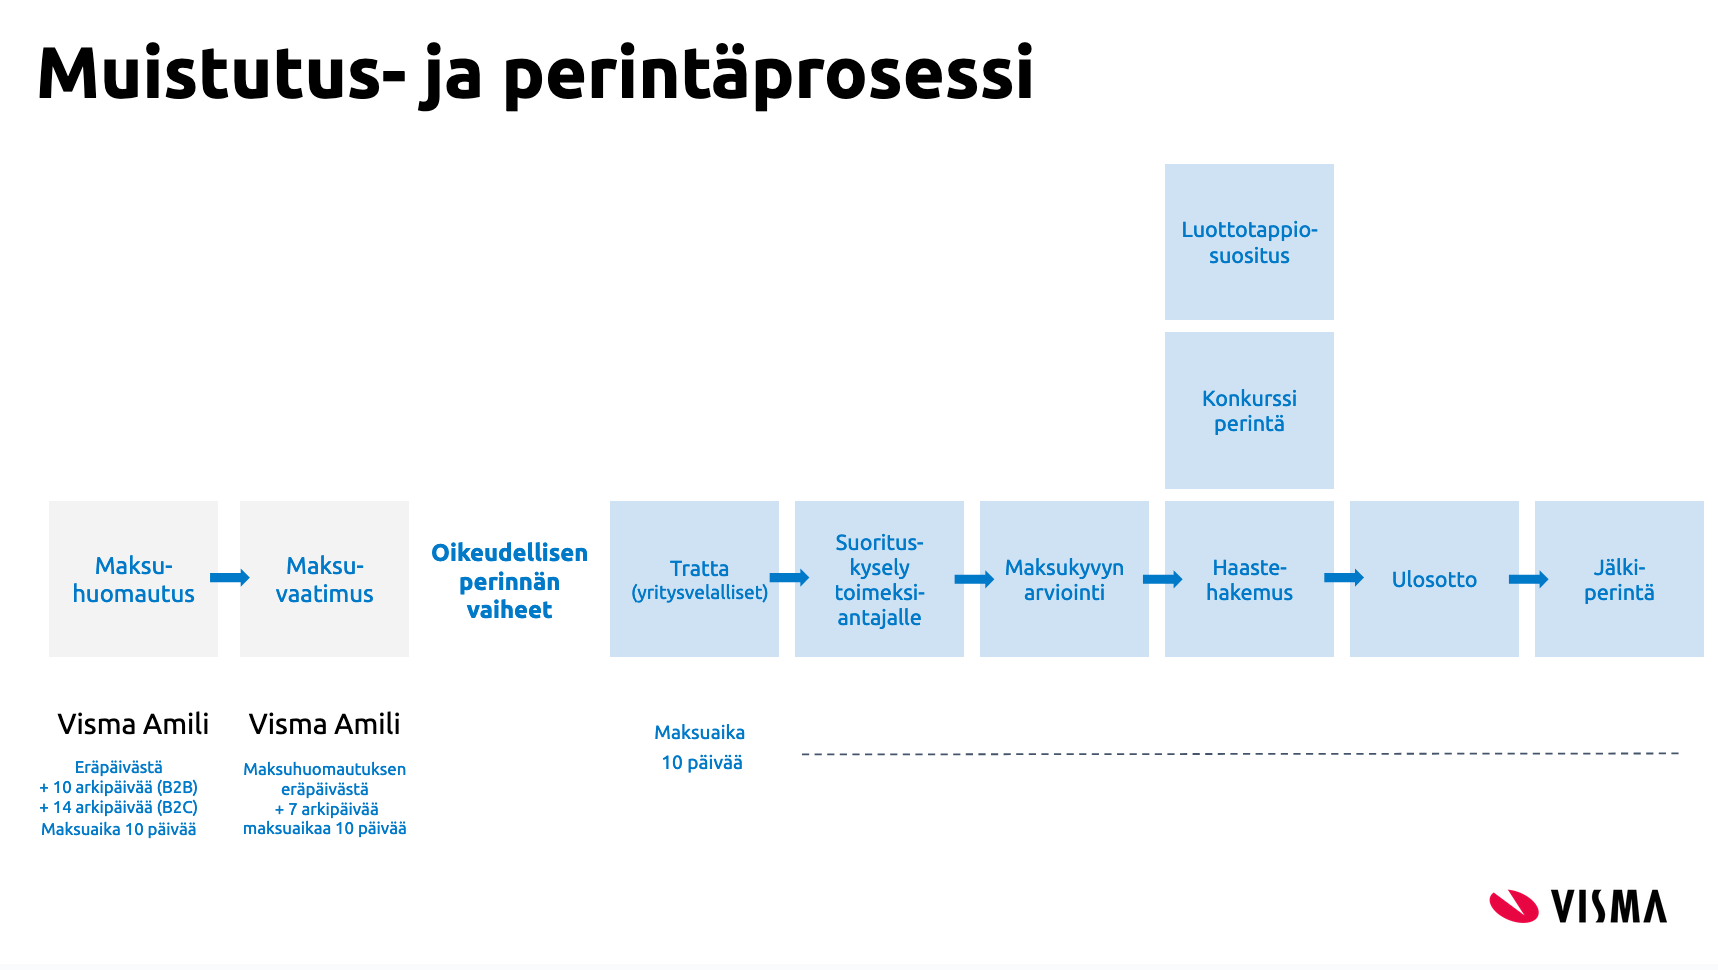
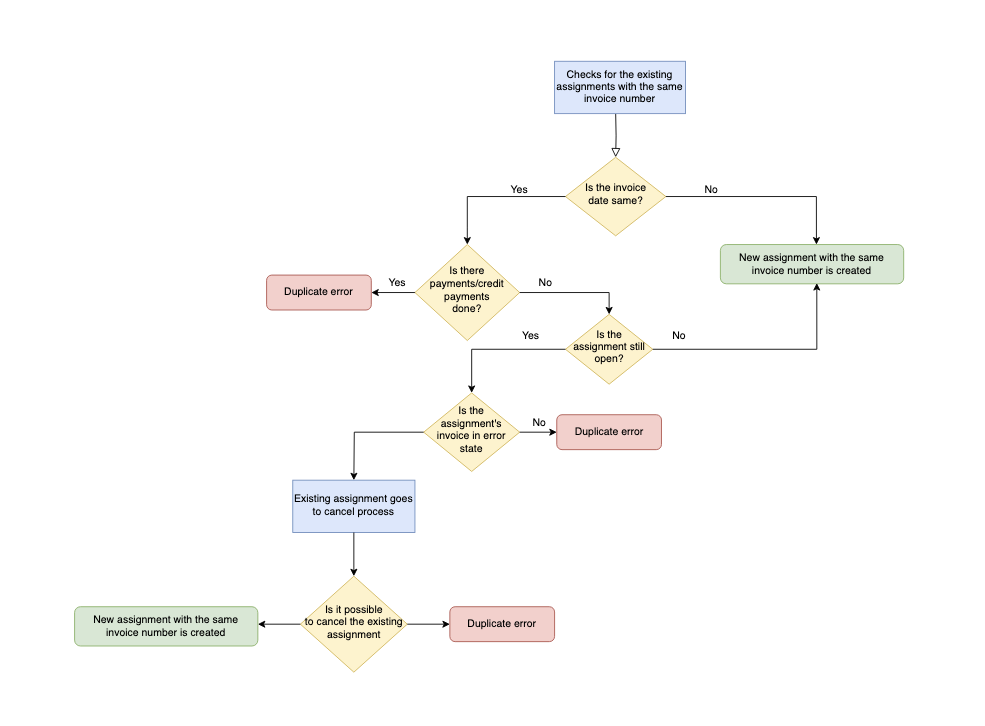