---
title: "Embeddable User Interface"
canonical: https://documentation.maventa.com/integration-guide/integration-tools/embeddable-user-interface/
---

The Embeddable User Interface (EUI) allows ERP integrators to embed Maventa's interface directly into their product. End customers get access to Maventa features and services without waiting for ERP-side development, reducing time to market for new capabilities.

## What to handle via API vs EUI

Although most functionality is available through the EUI, some functions are best handled through a direct API integration:

- Customer onboarding, meaning [registering](https://documentation.maventa.com/integration-guide/account-management/companies-and-settings/) companies with Maventa
- [Sending](https://documentation.maventa.com/integration-guide/invoice-sending/invoice-sending/) and [receiving](https://documentation.maventa.com/integration-guide/invoice-receiving/) invoices and other documents
- Invoice handling workflows such as approval
- Adding new [users](https://documentation.maventa.com/integration-guide/account-management/users/) to a Maventa company account

Everything else can be handled through the EUI:

- Listing invoices and documents, and viewing their details
- Resending and rerouting invoices
- Managing Maventa settings
- Registering to receive through different networks
- Searching for receiver's e-invoice addresses
- Listing consumer agreements (Norway)
- Enabling and using services such as [consumer invoicing](https://documentation.maventa.com/integration-guide/invoice-sending/consumer-invoicing/no/) (currently Norway only), [receivables management](https://documentation.maventa.com/receivables-customer-guide-fi/) (Finland, Amili Kassavirta and Amili Perintä only), Detect, and Visma Scanner

## How the EUI looks
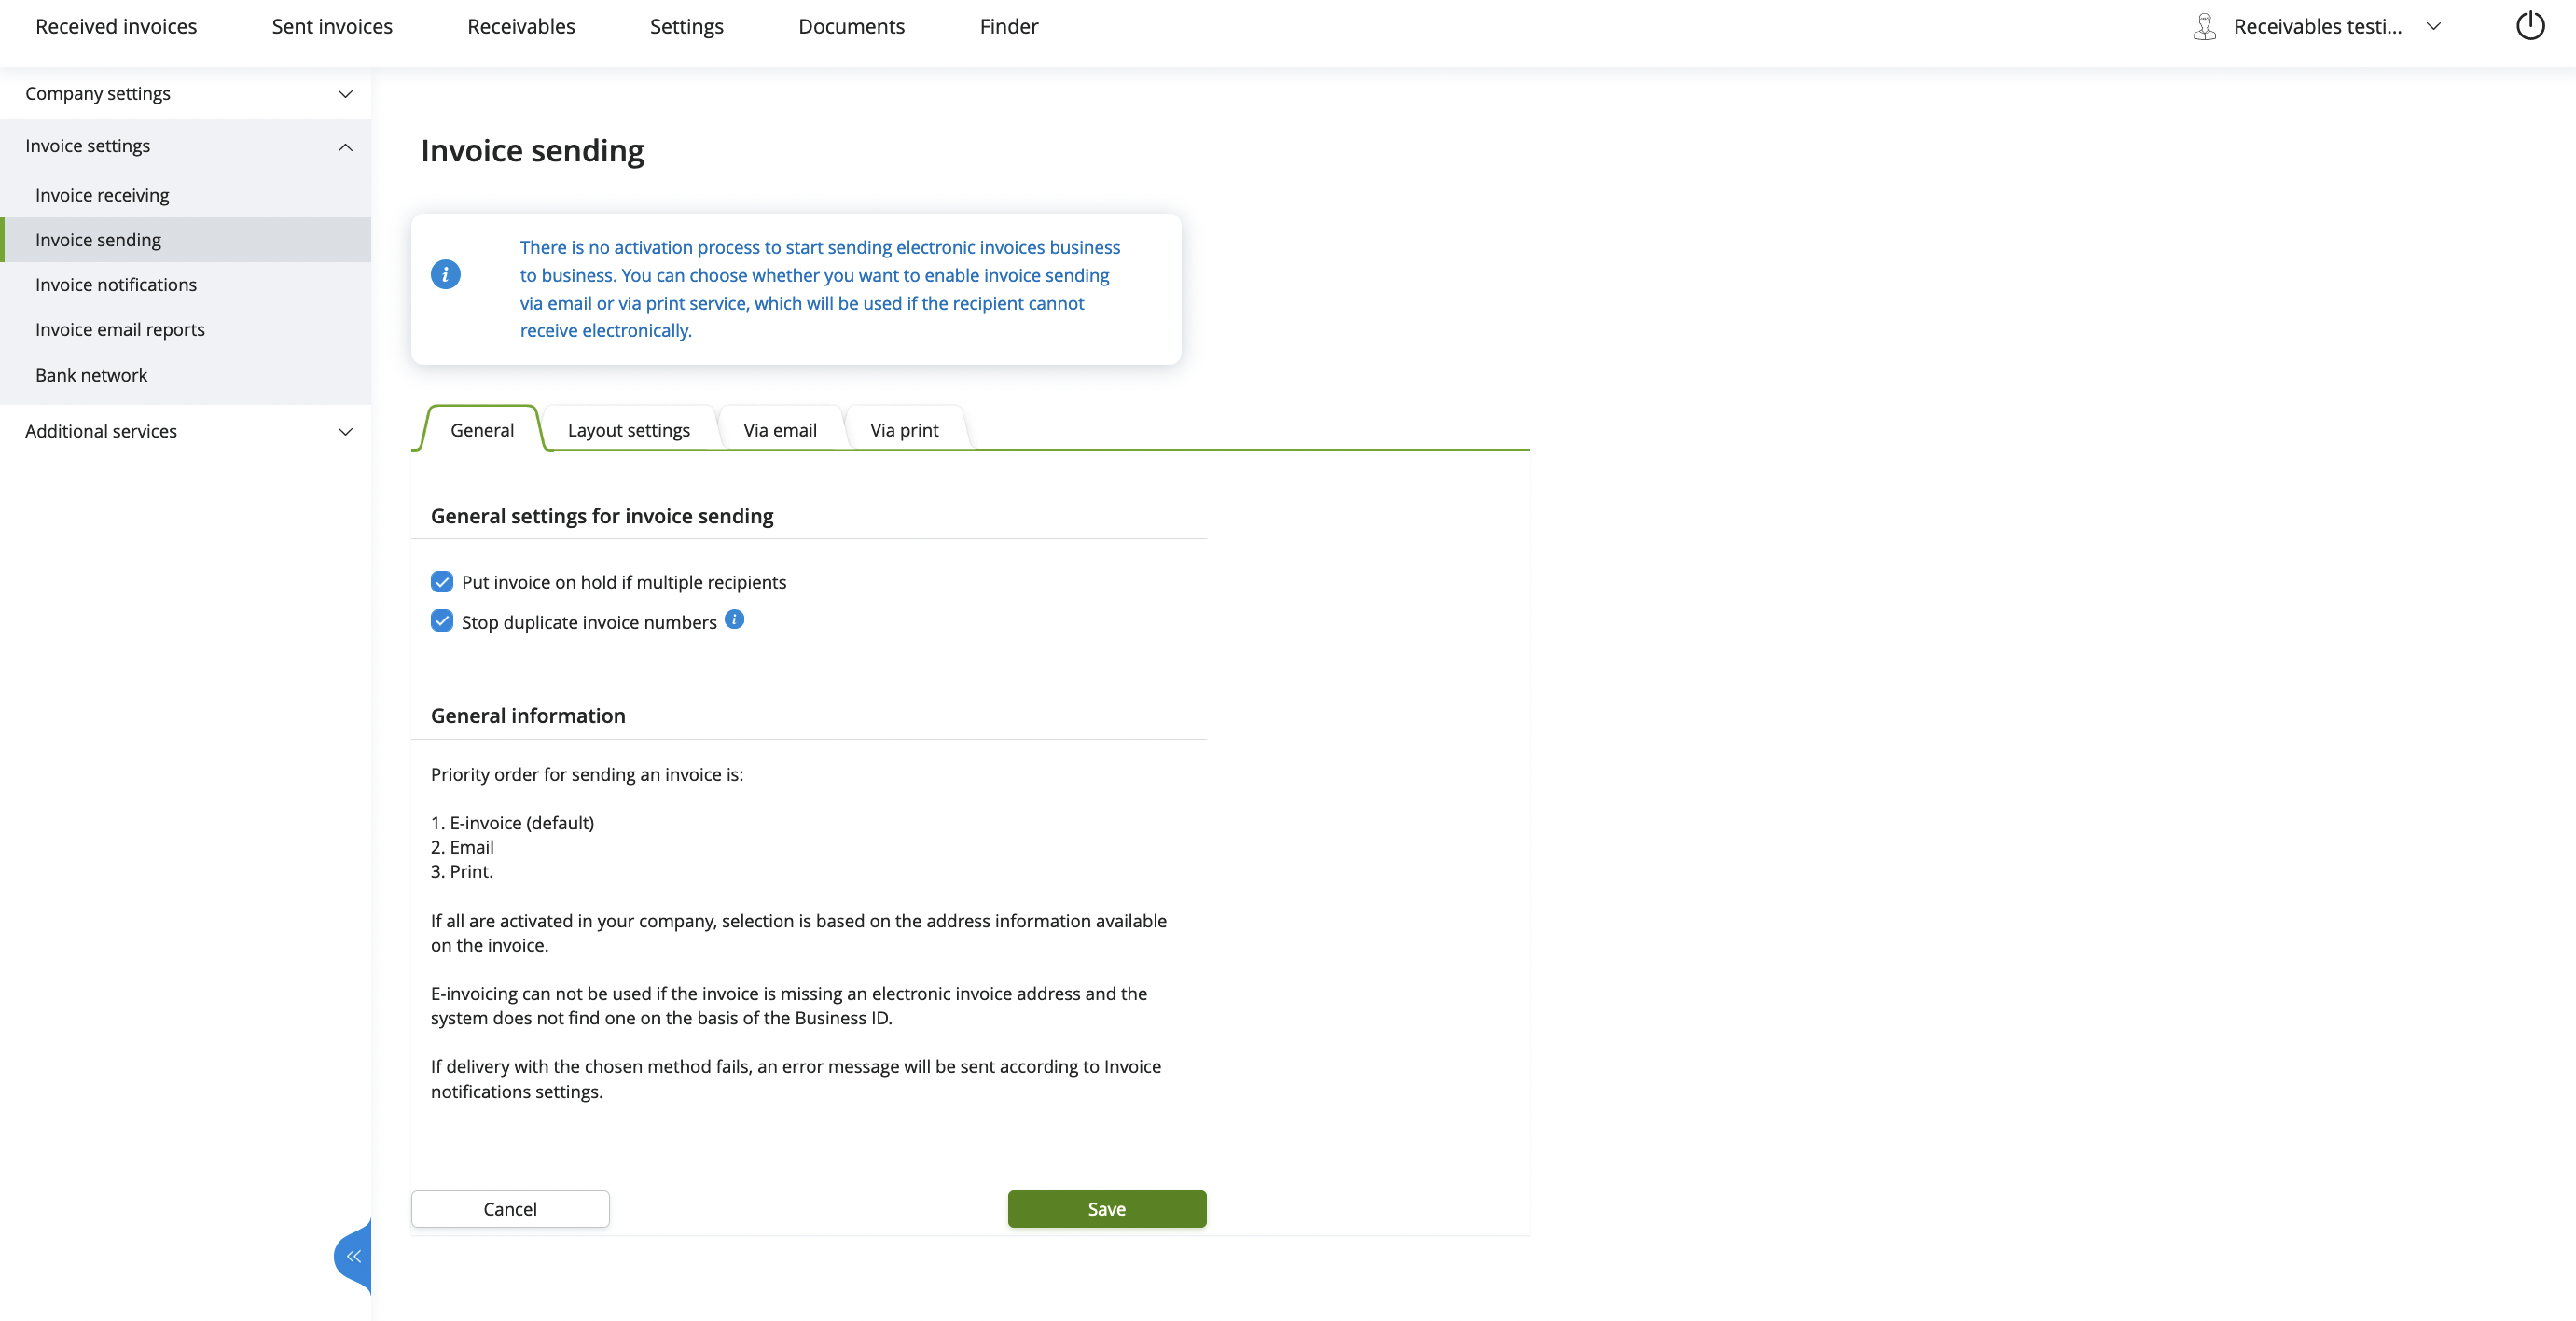
![EUI view for settings](https://documentation.maventa.com/assets/pages/01-integration-guide/03-integration-tools/11-embeddable-user-interface/eui_settings_invoice_sending_new.png)

## How to take the EUI into use

### Decide what to show and how

Start by deciding which parts of the EUI your end customers need. Then consider how to present those views:

- **Single entry point:** one button that opens the full EUI, letting customers navigate to the page they need
- **Contextual embedding:** different EUI views embedded in relevant parts of the ERP, for example a settings view in the ERP's settings section, or invoice lists alongside the ERP's invoice listing

> [!NOTE]
> You do not need anything from Maventa to start building. When no profile is given, the EUI loads a default profile with every view and setting enabled. Hide the parts you do not need with [setup parameters](#setup-parameters), and request an [ERP profile](#erp-profiles) once you know what your product should show.

### Choose an embedding method

Maventa offers two embedding methods:

1. **[Script embedding](#method-1---script-embedding):** include a script tag on your HTML page. Recommended for products that run in the user's browser.
2. **[Iframe embedding](#method-2---iframe-embedding):** use an iframe or similar solution. Note that cross-domain content loading may cause issues with this method.

Both methods require [fetching an access token](#fetch-an-access-token-for-the-company) for the company.

### Hosting domains

The EUI is hosted under the following domains:

**Production:**

- `autointerface-embeddable.maventa.com`
- `autointerface-embeddable.autoinvoice.visma.com`
- `autointerface-embeddable.visma.net` (Visma internal use)

**Testing:**

- `autointerface-embeddable-stage.maventa.com`
- `autointerface-embeddable.stag.visma.net` (Visma internal use)

### Fetch an access token for the company

The EUI uses token-based authentication with `company_uuid`, `user_api_key`, and `vendor_api_key`.

Fetch the token from the [AutoXChange OAuth2 endpoint](https://swagger.maventa.com/?urls.primaryName=STAGE%20-%20AutoXChange%20API#/oauth2/postOauth2Token) using the following parameters:

| Parameter        | Description                                | Value/example                        |
| ---------------- | ------------------------------------------ | ------------------------------------ |
| vendor_api_key   | The vendor API key for the ERP             | 37fc1ebc-dd4f-11ea-87d0-0242ac130003 |
| scope            | The scope required. `eui` is mandatory     | eui                                  |
| grant_type       | The OAuth2 grant type                      | client_credentials                   |
| client_id        | The company UUID                           | 298c6ce2-dd4f-11ea-87d0-0242ac130003 |
| client_secret    | The user API key                           | 32d74434-dd4f-11ea-87d0-0242ac130003 |

**Endpoints:**

- Testing: `https://ax-stage.maventa.com/oauth2/token`
- Production: `https://ax.maventa.com/oauth2/token`

<details>
<summary>cURL example for fetching a token</summary>

```bash
curl -X POST "https://ax-stage.maventa.com/oauth2/token" \
-H "accept: application/json" \
-H "Content-Type: multipart/form-data" \
-F "grant_type=client_credentials" \
-F "client_id=company_uuid" \
-F "client_secret=user_api_key" \
-F "scope=eui" \
-F "vendor_api_key=erp_vendor_api_key"
```
</details>

<details>
<summary>Example of a successful token response</summary>

```json
{
  "access_token": "eyJhbGciOiJIUzI1NiIsInR5cCI6IkpXVCJ9.eyJpZGVudG......",
  "token_type": "bearer",
  "expires_in": 3600,
  "scope": "eui"
}
```
</details>

Once you have an access token, use it with your chosen embedding method: [script embedding](#method-1---script-embedding) or [iframe embedding](#method-2---iframe-embedding).

### Method 1 - Script embedding

Add a `<script>` tag to your HTML page:

```html
<body>
    <div style="height: 1024px" id="eui-container"></div>
    <script src="https://autointerface-embeddable.maventa.com/embed"
            data-token="eyJ0eXAiOiJKV1QiLCJraWQiOiJjODJhZTdiZTU...."
            data-container-id="eui-container"
            data-default-path="/invoices"
            data-profile="my_erp_profile_name"
            data-locale="en"
            data-setup-top_menu="false"
    ></script>
</body>
```

| Parameter              | Description                                                                            | Value/example                                      |
| ---------------------- | -------------------------------------------------------------------------------------- | -------------------------------------------------- |
| src                    | Main URL for EUI                                                                       | https://autointerface-embeddable.maventa.com/embed |
| data-token             | The `access_token` from the OAuth2 response                                            | eyJhbGciOiJIUzI1NiIsInR5cCI6IkpXVCJ9....          |
| data-container-id      | Must match the `id` of the container div. The EUI renders inside this element          | eui-container                                      |
| data-default-path      | Page to open on load. See [direct URLs](#direct-urls)                                  | /invoices                                          |
| data-profile           | The ERP's [profile](#erp-profiles) name for customisation. Optional                    | my_erp_profile_name                                |
| data-locale            | Language of the EUI (`en`, `fi`, `se`, `no`, `dk`, `nl`)                               | fi (default: `en`)                                 |
| data-setup-*           | [Setup parameters](#setup-parameters) for further customisation                        | data-setup-top_menu="false"                        |
| div style="height:.."  | A height must be set on the container, either static or dynamic. Without it, the EUI will not be visible | height: 1024px                    |

In the example above, the EUI opens directly to the invoices page with the language set to English and the top menu hidden.

> [!WARNING]
> With script embedding, there is no way to renew the token. The access token expires after one hour, ending the user's session. Make sure your application allows users to refresh the page and re-authenticate when the token expires.

### Method 2 - Iframe embedding

**Endpoints:**

|                                               | Testing                                                                 | Production                                                        |
| --------------------------------------------- | ----------------------------------------------------------------------- | ----------------------------------------------------------------- |
| **Get access token**                          | https://ax-stage.maventa.com/oauth2/token                               | https://ax.maventa.com/oauth2/token                               |
| **Initiate EUI session**                      | https://autointerface-embeddable-stage.maventa.com/authentication/token | https://autointerface-embeddable.maventa.com/authentication/token |
| **Renew token**                               | https://autointerface-embeddable-stage.maventa.com/authentication/renew | https://autointerface-embeddable.maventa.com/authentication/renew |

#### Monitor token expiry for automatic session renewal

While the EUI session is active, monitor the token expiry time. The `expires_in` attribute in the token response indicates how long the access token is valid. Deduct a few minutes from this value to avoid session interruptions. Stop the renewal process when the user closes the EUI or logs out.

To enable token renewal, pass a unique ID as the `session_id` parameter in the initial authentication request (see the next step). This ID associates the session with subsequent renewal requests.

> [!NOTE]
> If the token is not renewed before it expires, the session ends and the user must re-authenticate.

#### Open the EUI session in a browser component

Once you have a token, open the EUI in a browser component. Depending on the component's capabilities, pass the token either in **the POST body** or in **the Authorization header** as a Bearer token.

| Parameter        | Description                                                                          | Value/example                            |
| ---------------- | ------------------------------------------------------------------------------------ | ---------------------------------------- |
| token            | The `access_token` from the OAuth2 response                                         | eyJhbGciOiJIUzI1NiIsInR5cCI6IkpXVCJ9.... |
| profile          | The ERP's [profile](#erp-profiles) name for customisation. Optional                  | my_erp_profile_name                      |
| locale           | Language of the EUI (`en`, `fi`, `se`, `no`, `dk`, `nl`)                             | no (default: the company's country, falling back to `en`) |
| redirect_to      | Page to open on load. See [direct URLs](#direct-urls)                                | /invoices                                |
| session_id       | Unique session identifier (UUID recommended)                                         | erp_users_session_id                     |
| `setup[...]`     | [Setup parameters](#setup-parameters) for further customisation                      | `setup[menu][top_menu]=false`            |

<details>
<summary>cURL for initiating an EUI session with POST</summary>

```bash
curl -X POST "https://autointerface-embeddable-stage.maventa.com/authentication/token" \
-H "Content-Type: multipart/form-data" \
-F "token=eyJhbGciOiJIUzI1NiIsInR5cCI6IkpXVCJ9......" \
-F "profile=my_erp_profile_name" \
-F "locale=no" \
-F "redirect_to=/invoices" \
-F "session_id=erp_users_session_id"
```
</details>

<details>
<summary>HTML form example for token login</summary>

```html
<!DOCTYPE html>
<html>
<head></head>
<body>
  <form action="https://autointerface-embeddable-stage.maventa.com/authentication/token" method="POST" target="_blank">
    <fieldset>
      <legend>Authentication using token</legend>
      <br/>
      <label>token:</label>
      <input type="text" name="token" size="100" />
      <br/>
      <label>session_id:</label>
      <input type="text" name="session_id" size="70" />
      <br/>
      <label>redirect_to:</label>
      <input type="text" name="redirect_to" size="70" />
      <br/>
      <label>profile:</label>
      <input type="text" name="profile" size="40" />
      <br/>
      <br/>
      <input type="submit" value="Log in"/>
    </fieldset>
  </form>
</body>
```
</details>

#### Renew the token for an existing session

When the token is about to expire, [fetch a new access token](#fetch-an-access-token-for-the-company) and pass it to the EUI renewal endpoint together with the `session_id` from the initial request. If you can extract the session cookie from the browser component, you can use that instead of the `session_id`.

<details>
<summary>cURL for renewing an EUI session token</summary>

```bash
curl -X POST "https://autointerface-embeddable-stage.maventa.com/authentication/renew" \
-H "Content-Type: multipart/form-data" \
-F "token=eyJhbGciOiJIUzI1NiIsInR5cCI6IkpXVCJ9.eyJpZGVudGl0eSI6InVzZXIiLCJ1c......" \
-F "session_id=erp_users_session_id"
```
</details>

## Companies that are not yet verified

If the company's state is `UNVERIFIED`, the EUI shows a KYC authorisation form instead of the view that was requested. The end customer must complete the form before any other view opens, including views opened through a [direct URL](#direct-urls).

Take this into account when embedding the EUI contextually. A settings view embedded in the ERP's settings page shows the KYC form as long as the company is unverified.

The KYC requirement is part of the [ERP profile](#erp-profiles), so it can be turned off for a profile if your onboarding flow handles verification another way. Contact Maventa support to discuss this.

## Customise your own view of the EUI

The EUI is highly customisable. Each ERP can control which views and features are visible to end customers, for example hiding the received invoices list if the ERP does not support invoice receiving. Customisation is done through [setup parameters](#setup-parameters), [ERP profiles](#erp-profiles), or both.

### Setup parameters

Setup parameters are the fastest way to customise the EUI. They need nothing from Maventa, they are set per request, and they override the profile. Use them to start building before you have a profile, and to adjust views for individual customers without creating a separate profile.

How you pass them depends on the embedding method:

### Script embedding

Pass setup parameters as `data-setup-*` attributes on the `<script>` tag.

```html
<script src="https://autointerface-embeddable.maventa.com/embed"
        data-token="eyJ0eXAiOiJKV1QiLCJraWQiOiJjODJhZTdiZTU...."
        data-container-id="eui-container"
        data-setup-sections-invoices-inbound="false"
        data-setup-sections-settings-invoice-receiving="false"
></script>
```

### Iframe embedding

Pass setup parameters as `setup[...]` parameters in the authentication request or query string.

```bash
...&setup[sections][invoices][inbound]=false
&setup[sections][settings][invoice][receiving]=false
```

> [!WARNING]
> Only the exact values `true` and `false` are recognised. Any other value, including an empty one, is ignored, and the profile setting applies instead. Setting a parameter to an empty value does not hide anything.

<details>
<summary>List of setup parameters</summary>

Use these parameters to show or hide specific parts of the EUI. To request a parameter that is not listed, contact Maventa support.

**Menus**

| Controls                                    | Script attribute            | Iframe parameter            | Accepted values |
| ------------------------------------------- | --------------------------- | --------------------------- | --------------- |
| All menus, both top and left                | `data-setup-menu`           | `setup[menu]`               | `false` only    |
| The top menu                                | `data-setup-top_menu`       | `setup[menu][top_menu]`     | `true`, `false` |
| The left menu                               | `data-setup-left_menu`      | `setup[menu][left_menu]`    | `true`, `false` |
| The log out button in the menu              | `data-setup-logout_button`  | Not available               | `true`, `false` |

**Invoice lists**

| Controls                                              | Script attribute                                                | Iframe parameter                        | Accepted values |
| ----------------------------------------------------- | --------------------------------------------------------------- | --------------------------------------- | --------------- |
| The received invoices list                            | `data-setup-sections-invoices-inbound`                          | `setup[sections][invoices][inbound]`    | `false` only    |
| The sent invoices list and the invoices in error state list | `data-setup-sections-invoices-outbound`                    | `setup[sections][invoices][outbound]`   | `false` only    |
| The link back to the previous invoices layout         | `data-setup-sections-invoices-show_to_previous_invoices_layout`  | Not available                           | `true`, `false` |

**Settings**

| Controls                                    | Script attribute                                       | Iframe parameter                                          | Accepted values |
| ------------------------------------------- | ------------------------------------------------------ | --------------------------------------------------------- | --------------- |
| The entire settings tab in the top menu     | `data-setup-sections-settings`                         | `setup[sections][settings]`                               | `false` only    |
| All company settings in the left menu       | `data-setup-sections-settings-company`                 | `setup[sections][settings][company]`                      | `false` only    |
| Company details                             | `data-setup-sections-settings-company-details`         | `setup[sections][settings][company][details]`             | `true`, `false` |
| Company address information                 | `data-setup-sections-settings-company-address`         | `setup[sections][settings][company][address]`             | `true`, `false` |
| All invoice settings in the left menu       | Not available                                          | `setup[sections][settings][invoice]`                      | `false` only    |
| Invoice receiving settings                  | `data-setup-sections-settings-invoice-receiving`        | `setup[sections][settings][invoice][receiving]`            | `true`, `false` |
| Invoice sending settings                    | `data-setup-sections-settings-invoice-sending`          | `setup[sections][settings][invoice][sending]`              | `true`, `false` |
| Invoice layout settings                     | `data-setup-sections-settings-invoice-layout_settings`  | `setup[sections][settings][invoice][layout_settings]`      | `true`, `false` |
| Invoice notification settings               | `data-setup-sections-settings-invoice-notifications`    | `setup[sections][settings][invoice][notifications]`        | `true`, `false` |

To hide all invoice settings with script embedding, hide the four individual invoice settings above.

**Other documents**

| Controls                              | Script attribute                                      | Iframe parameter                                        |
| ------------------------------------- | ----------------------------------------------------- | ------------------------------------------------------- |
| The other documents section           | `data-setup-sections-documents-order`                 | `setup[sections][documents][order]`                     |
|                                       | `data-setup-sections-documents-order_response`        | `setup[sections][documents][order_response]`            |
|                                       | `data-setup-sections-documents-catalogue`             | `setup[sections][documents][catalogue]`                 |
|                                       | `data-setup-sections-documents-catalogue_response`    | `setup[sections][documents][catalogue_response]`        |

> [!NOTE]
> The four document parameters currently work as a single switch. Setting any one of them turns the whole other documents section on, whatever value is given, and the values themselves are ignored. To show or hide individual document types, request an [ERP profile](#erp-profiles).
</details>

### ERP profiles

An ERP profile is a named set of customisations that Maventa stores for you. Everything in a profile applies automatically, so your integration does not have to pass setup parameters on every request. Profiles also cover settings that setup parameters do not reach, such as which invoice attachment formats are available and which bank networks are shown.

Profiles are created by the Maventa team based on the ERP's requirements. Once you have one, pass its name with your chosen embedding method:

```bash
...&profile=name_of_the_profile
```

Key points about profiles:

- A profile is optional. Without one, the EUI uses a default profile with all views and settings enabled
- Each ERP can have multiple profiles, for example one per product version or customer group
- Profiles control which views, settings, and services are visible
- Setup parameters override the profile for a single request, so you can keep one profile and still adjust individual customers
- When Maventa adds new services or features to the EUI, the Maventa team contacts ERP integrators to discuss enabling them. Some new services work entirely through the EUI, while others may require ERP-side or API integration changes

### Direct URLs

Direct URLs open the EUI on a specific page. Use these to provide contextual navigation, for example linking to the invoice list from the ERP's invoicing section, or opening the settings page from the ERP's settings area. You can also link directly to a single invoice's details.

<details>
<summary>Available URLs</summary>

**Dashboard**

- `/` Dashboard (currently a blank page with menus)

**Invoice lists**

- `/invoices` Received invoices
- `/invoices/outbound` Sent invoices
- `/invoices/error` Sent invoices in error state

**Invoice details**

- `/invoices/{invoice_id}` Details for a received invoice
- `/invoices/outbound/{invoice_id}` Details for a sent invoice

**Invoice settings**

- `/settings/invoice/sending/index` Invoice sending settings. Opens the general tab. Add `/general`, `/layout`, `/email`, or `/print` to open a specific tab
- `/settings/invoice/notifications/index` Invoice notification settings
- `/settings/invoice/receiving/index` Invoice receiving settings (network activation, scanning service)
- `/settings/invoice/bank_network_no/index` Consumer invoicing settings (Norway)
- `/settings/invoice/bank_network_fi/index` Bank network activation (Finland)
- `/settings/invoice/bank_network_se/index` Bank network activation (Sweden)
- `/settings/invoice/email_reports` Email report settings

**Company settings**

- `/settings/company/details/index` Company details
- `/settings/company/address/index` Company address information

**Other document lists**

- `/documents` Received documents
- `/documents/outbound` Sent documents
- `/documents/error` Sent documents in error state
- `/order` and `/order/outbound` Received and sent orders
- `/order_response` and `/order_response/outbound` Received and sent order responses
- `/catalogue` and `/catalogue/outbound` Received and sent catalogues
- `/catalogue_response` and `/catalogue_response/outbound` Received and sent catalogue responses

**Other document settings**

- `/settings/document/receiving/index` Receiving settings for non-invoice documents

**Additional services**

- `/settings/additional_services/visma_scanner_receiving/index` Visma Scanner activation
- `/settings/additional_services/detect/index` Detect activation
- `/settings/additional_services/maventa_reskontravahti/index` Receivables service settings (Finland)
- `/settings/additional_services/supplier_activation` Supplier activation
- `/settings/additional_services/request_e_invoices` Request e-invoices

**Services**

- `/finder` Finder (search for e-invoice addresses)
- `/receivables` Receivables management (Finland, Amili Kassavirta and Amili Perintä only)
- `/consumer_vendor_registry` Consumer agreements (Norway)

**Receivables details**

- `/receivables/{invoice_id}` Details for a receivable assignment

**Session**

- `/sign_out` Signs the user out and ends the EUI session

> [!NOTE]
> The receivables views in the EUI cover the **Amili Kassavirta** and **Amili Perintä** services only. Other debt collection solutions currently have no UI in the EUI.

> [!NOTE]
> Hiding a view removes it from the menus, but most direct URLs still open the page behind it. The invoice lists are the exception. If the received invoices list is hidden, `/invoices` redirects to `/invoices/outbound`, and if both invoice lists are hidden, neither URL opens anything.
</details>

## Supported browsers

- Chrome
- Firefox
- Safari
- Edge
